5 Spatial Interaction Design
5.1 Input Methods and Controllers in XR
Virtual Reality (VR) and other XR technologies offer unique ways to interact with digital environments. This section explores the various input methods and controllers used in XR, with a focus on VR interaction techniques.
5.1.1 VR Controllers and Hand Tracking
Modern VR systems typically use handheld controllers or hand tracking systems to allow users to interact with virtual objects. These input methods provide a more natural and intuitive way to manipulate the virtual environment compared to traditional input devices like keyboards and mice.
5.1.1.1 VR Controllers
VR controllers are handheld devices that allow users to interact with virtual objects. They typically include:
- Buttons for various actions
- Analog sticks or touchpads for movement and menu navigation
- Triggers for grabbing or selecting objects
- Haptic feedback for enhanced immersion
Many VR systems, such as the Oculus Quest, come with two controllers - one for each hand. This allows for more natural, two-handed interactions in the virtual space.
5.1.1.2 Hand Tracking
Some VR systems, like the Oculus Quest, also offer hand tracking capabilities. This allows users to interact with the virtual environment using their bare hands, without the need for controllers. While this can provide a more intuitive interaction in some cases, it may lack the precision and haptic feedback of physical controllers.
5.1.2 Basic VR Interactions
VR systems typically support several basic types of interactions:
Pointing and Selection: Users can point at objects in the virtual environment and select them, often using a laser pointer-like interface.
Grabbing and Manipulation: Users can reach out and grab virtual objects, manipulating them as they would in the real world.
UI Interaction: Users can interact with 2D or 3D user interfaces, pressing buttons or manipulating sliders and other UI elements.
Locomotion: Various methods for moving around in the virtual space, which we’ll explore in more detail in section 4.2.
5.1.3 Implementing Basic Interactions in Unreal Engine
Unreal Engine provides robust VR templates that offer a foundation for developing immersive VR experiences. These templates are included in the MyExercises template and provide essential functionalities for VR interaction.
5.1.3.1 Key Features of VR Templates
- Realistic Hand and Head Positioning: The VR templates ensure that hands and head are positioned sensibly relative to the tracking system. This creates a more natural and intuitive VR experience.
When you’re actually using this in VR, these hands will be your hands, so you can use them as you would expect to in VR. The tracking system ensures your head and hands are positioned at the correct height relative to the floor and surroundings.
- Hand Interaction Capabilities: Users can interact with the virtual environment using their hands in several ways:
- Poking or pushing objects
- Picking up items
- Dropping or throwing objects
These interactions are made possible through the implementation of specific interfaces on actors within the virtual environment.
5.1.3.2 Using VR Templates Without VR Hardware
One of the significant advantages of these templates is their usability even without VR hardware. This feature allows developers to design and test VR interactions using standard input devices.
5.1.3.2.1 Hand Interactions Without VR
- Poking and Grabbing: Users can still use virtual hands to interact with objects.
- Throwing: While more challenging without VR controllers, it’s still possible to throw objects.
5.1.3.2.2 Keyboard Controls
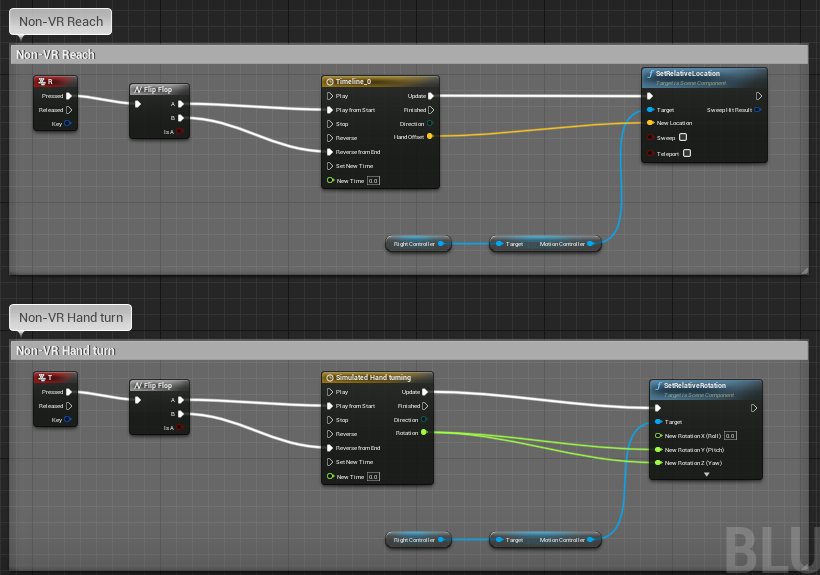
The templates include keyboard controls to simulate VR hand movements: - Press ‘R’ to reach forward - Press ‘T’ to turn the hand
You can press ‘R’ on the keyboard to reach forward with one of the hands, and press ‘T’ to perform a turn. I encourage you to check the implementation of these controls and feel free to imitate that approach when coding different kinds of motions you want to explore and use in your experiments.
These controls are implemented in the VRCapablePawn blueprint, specifically in the MotionControllerEvents graph.
5.1.3.2.3 Mouse Controls
- Use the Left mouse button to grab with the right hand
5.1.4 Implementing Grab Functionality with GrabComponent
To simplify object interaction in your VR projects, you can utilize the GrabComponent provided in the exercise template. This component is much simpler to use than methods from previous years and allows for straightforward implementation of grabbing mechanics.
Key Features of GrabComponent:
- Easy Attachment/Detachment: Attach or detach actors from the grabbing component, effectively simulating the action of picking up or dropping objects with a “hand.”
- Physics Simulation Toggle: Control physics simulation to pick up or drop physics-enabled objects.
- Movement Without Physics: Move objects through space without relying on physics, providing more control over their behavior.
To use the GrabComponent, simply add it to component list of the actor you want to be able to grab, keeping the checklist below in mind.
5.1.5 Checklist for Implementing Grabbing Mechanics
To ensure smooth functionality when using the GrabComponent, follow this checklist:
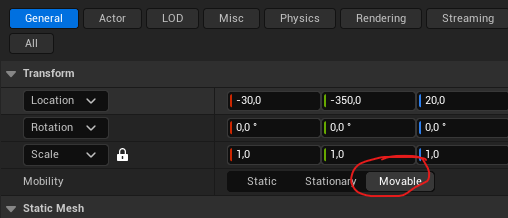
Set the Object to Movable
- Ensure that the object you want to grab is marked as Movable in its settings. Static objects cannot be moved during gameplay.
- Confirm that the object has appropriate Collision settings to interact with the grabbing component.
Setting Object to Movable Enable Overlap Events
- Activate Generates Overlap Events on the object. This allows the system to detect when the grabbing “hand” overlaps with the object, which is essential for initiating the grab action.
Enable Physics Simulation (If Required)
- If you want the object to behave according to physics when dropped (e.g., fall due to gravity), enable Simulate Physics on the object.
- This setting allows the object to interact naturally with the environment when not held.
Verify Component Hierarchy in Complex Blueprints
- For objects with complex blueprints or multiple components, check the component hierarchy.
- Ensure that the GrabComponent acts on the parent component so that all child components follow correctly during movement.
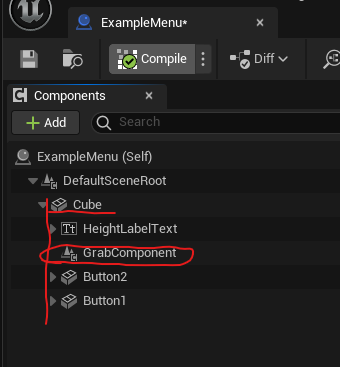
Component Hierarchy in Blueprint
By carefully following these steps, you can effectively implement grabbing mechanics in your VR application, providing users with an intuitive and responsive experience.
5.2 Constrained Manipulation: Levers, Switches, and Sliders
While grabbing freely movable objects with GrabComponent works well for items you pick up and carry, many VR interactions require constrained manipulation—objects that rotate around a pivot, slide along a track, or toggle between positions. Think of valve wheels, light switches, drawer handles, or cockpit controls. These require a different approach: continuously tracking hand movement while manually constraining the object’s transform.
5.2.1 The Manual Tracking Approach
Unlike free object grabbing, constrained manipulation doesn’t use attachment or physics simulation. Instead, you:
- Detect grab: Use overlap events and grip button input (similar to GrabComponent)
- Track continuously: Every frame while grip is held, read the hand’s position/rotation
- Calculate constrained transform: Project hand movement onto the allowed axis or rotation, clamp to min/max limits
- Update manually: Set the object’s transform directly using
Set Relative LocationorSet Relative Rotation - Release: When grip is released, stop tracking
This manual approach gives you precise control over exactly how the object moves and avoids the complexity of physics constraints, which can be finicky and unpredictable in VR.
5.2.2 Common Constrained Interaction Types
Rotational Levers (valves, dials, door handles): - Object rotates around a pivot point (single axis rotation) - Hand rotation drives object rotation within min/max angle limits - Maps to normalized 0-1 value (e.g., 0° to 270° → 0.0 to 1.0)
Linear Sliders (throttles, faders, drawers): - Object moves along a single axis (X, Y, or Z) - Hand position drives object position within min/max distance limits - Maps to normalized 0-1 value based on position along track
Multi-Position Switches (toggle switches, gear shifts): - Object snaps to discrete positions - Hand position determines which snap point is closest - On release, object jumps to nearest position with haptic/audio feedback
5.2.3 Blueprint Examples
For complete Blueprint implementations of these patterns, see:
- Lever/Rotational Control: https://blueprintue.com/blueprint/4i4x60m3/
- Slider/Linear Control: https://blueprintue.com/blueprint/2m1xqbkj/
These examples demonstrate the full event flow from grip detection through continuous tracking to release, showing how to handle the constraint math in Blueprint nodes.
5.2.4 Practical Implementation: Rotational Lever
Let’s build a simple valve wheel that rotates when grabbed. This pattern applies to door handles, steering wheels, dials, and any rotating control.
5.2.4.1 Setting Up the Lever Blueprint
- Create Blueprint Actor:
- Content Browser → Blueprint Class → Actor
- Name it “RotationalLever”
- Add components:
- Static Mesh for the lever handle (the part user grabs)
- Scene Component as root (optional, for easier positioning)
- Sphere Collision component overlapping the grabbable area
- Configure collision:
- Sphere Collision: Enable “Generate Overlap Events”
- Set to overlap with Pawn (so hand controller triggers it)
5.2.4.2 Adding Variables
In the My Blueprint panel, add these variables:
- bIsGrabbed (Boolean): Tracks whether lever is currently held
- MinAngle (Float): Minimum rotation angle (e.g., 0)
- MaxAngle (Float): Maximum rotation angle (e.g., 270)
- CurrentValue (Float): Normalized value 0.0 to 1.0
- GrabbingHand (Object Reference → MotionControllerComponent): Reference to which hand is holding
Make MinAngle and MaxAngle public (Instance Editable) so you can configure per-instance.
5.2.4.3 Implementing Grab Detection
- Add overlap event:
- Select Sphere Collision component
- Right-click → Add Event → On Component Begin Overlap
- Add grip input event:
- In Event Graph, add input event for grip button
- For Oculus/Quest: “MotionController (Right) Grip1 Axis”
- Use Branch to check if axis value > 0.5 (grip pressed)
- Connect grab logic:
- When overlap occurs AND grip pressed:
- Set bIsGrabbed to True
- Store reference to overlapping actor (the hand) in GrabbingHand
5.2.4.4 Implementing Continuous Tracking
This is the key part—while held, update every frame:
- Add Event Tick:
- This runs every frame
- First node: Branch checking bIsGrabbed
- Get hand rotation:
- From GrabbingHand reference → Get World Rotation
- Break Rotator to get individual components (Roll, Pitch, Yaw)
- Calculate constrained rotation:
- Decide which rotator component drives your lever (usually Yaw or Roll depending on axis)
- Use Clamp (Float) node: clamp hand rotation between MinAngle and MaxAngle
- This gives you the constrained angle
- Set lever rotation:
- Make Rotator from your constrained angle (put it in the right component: X for Roll, Y for Pitch, Z for Yaw)
- Set Relative Rotation on lever mesh with this rotator
- Calculate normalized value:
- Subtract MinAngle from constrained angle
- Divide by (MaxAngle - MinAngle)
- Store in CurrentValue variable (now 0.0 to 1.0)
Important: Only do this tracking on Event Tick when bIsGrabbed is True. This keeps it efficient—no calculations when lever isn’t held.
5.2.4.5 Implementing Release
- Add grip release event:
- Same grip axis input, but Branch for value < 0.5 (released)
- Connect release logic:
- Set bIsGrabbed to False
- Clear GrabbingHand reference (set to None)
- Optional: Broadcast the final CurrentValue via Event Dispatcher for other systems
5.2.4.6 Using the Lever Value
The CurrentValue variable (0.0 to 1.0) can drive other systems:
Method 1: Direct access - Other Blueprints can get a reference to your lever - Read CurrentValue directly (make it public)
Method 2: Event Dispatcher - Add Event Dispatcher “OnValueChanged” - Call it whenever CurrentValue updates (or on release) - Other Blueprints bind to this event
Example uses: - Lerp a light’s intensity: Light Intensity = Lerp(0, 5000, CurrentValue) - Control particle spawn rate: Spawn Rate = Lerp(0, 100, CurrentValue) - Drive animation: Set Playback Position = CurrentValue on a Timeline
5.2.4.7 Common Variations
Linear Slider (throttle, drawer): - Same structure, different math - Track hand position instead of rotation - Project hand position onto slider axis using Vector Projection - Clamp to min/max distance - Use Set Relative Location instead of rotation
Multi-Position Switch: - Define array of snap positions (e.g., [-0.1, 0.0, 0.1] for 3-position switch) - Track hand position while held (same as slider) - On release: find closest snap position, set object to that exact position - Play click sound and haptic pulse when snapping
Two-Handed Wheel (steering wheel): - Track both hands if both gripping - Calculate rotation from vector between hands - Use midpoint of hands as reference for rotation calculation
5.2.4.8 Troubleshooting
“Lever jumps to wrong angle when grabbed” - Calculate initial grab offset: store difference between hand angle and lever angle at grab moment - Apply this offset during tracking to maintain natural feel
“Lever rotation feels jittery” - Add smoothing: Lerp from current rotation toward target rotation - New Rotation = Lerp(Current, Target, 0.3) for smooth following
“Lever doesn’t track hand rotation” - Verify you’re reading the correct rotator component (Roll/Pitch/Yaw) - Check lever’s pivot point—rotation should be around correct axis
“Other objects can grab the lever” - Add Cast to MotionControllerComponent in overlap event - Only set bIsGrabbed if overlapping actor is actually a hand controller
5.2.4.9 Blueprint References
For complete working examples showing all the node connections:
- Rotational lever: https://blueprintue.com/blueprint/4i4x60m3/
- Linear slider: https://blueprintue.com/blueprint/2m1xqbkj/
These show the full Event Tick tracking loop, constraint math, and proper release handling.
5.2.5 Integration with Haptics
Consider adding haptic feedback for better physicality (see Section 5.5 for details):
- Threshold crossings: Pulse when CurrentValue passes 0.25, 0.5, 0.75
- Min/max limits: Stronger pulse when reaching ends of range
- Snap positions: Strong pulse when switch snaps to position
- Continuous feedback: Light pulse proportional to movement speed while dragging
Haptic feedback makes constrained manipulation feel more physical and helps users understand the control’s range without looking at it.
5.2.6 Conclusion
Understanding and implementing these basic interaction methods is crucial for creating immersive and intuitive XR experiences. As you develop your projects, consider how these interactions can be used to create engaging and natural user experiences in your virtual environments.
For more detailed information on VR interaction in Unreal Engine, refer to the Unreal Engine VR Development Documentation.
5.3 Spatial Platform Capabilities (2025)
Contemporary headsets and glasses ship with increasingly rich spatial understanding out of the box. Designers can now assume that most platforms offer at least anchors, surface reconstruction, and semantic understanding—with notable nuances by vendor.
5.3.1 Core Capability Checklist
- Anchors & Persistence: Anchor systems let virtual objects stay attached to real-world positions. Niantic’s 2025 Spatial SDK update extends centimeter-accurate Visual Positioning System (VPS) anchors from phones to Quest 3 headsets, so a task board you pin in a lobby remains in place across sessions and devices.(Niantic Labs 2024)
- Meshing & Scene Understanding: Live meshing now runs locally on consumer headsets. Niantic demonstrates near-field meshes for living rooms and lobby-scale reconstructions, while Meta’s Depth API powers instant placement without full scans.(Niantic Labs 2024; Lang 2024)
- Semantics & Object Labels: Semantic segmentation (walls, floors, furniture) feeds more context into your UX logic—trigger hand-off guides only when a “table” is detected or scale UI to fit actual wall dimensions.
- Occlusion & Depth: Depth sensors or reconstructed meshes allow virtual content to hide behind real objects. This is essential for believable MR portals, spatial UI, and colocation-heavy multiplayer.
- Instant placement (Meta Quest SDK v71): Drop objects directly on detected surfaces using the Depth API, reducing the onboarding flow from a 60-second scan to a single tap.
- Keyboard cutouts: Quest now supports passthrough around any Bluetooth keyboard, so productivity apps can expose physical peripherals without custom calibration.
- Automatic colocation discovery: Nearby Quest headsets can find each other over Bluetooth, allowing same-room multiplayer to start without room codes—pair this with shared anchors for rapid collaborative setup.
5.3.2 Planning for Cross-Device Deployments
Android XR’s cross-device strategy and Niantic’s shared SDK suggest a practical baseline.(Google LLC 2024; Niantic Labs 2024)
- Design with feature tiers: Assume anchors + basic depth everywhere, with semantics and meshing as optional enhancements.
- Build shared scene graphs: Use platform services (Niantic VPS, Meta Shared Spatial Anchors) to sync object placement across phones, standalone headsets, and future smart glasses.
- Prototype friction flows: Test how quickly someone can place an object, join a colocated session, or reveal a keyboard. Small latency improvements drastically affect perceived polish.
Grounding design decisions in these capabilities keeps experiences portable across the full form-factor spectrum introduced in Chapter 2.
5.4 Locomotion Techniques in Virtual Reality
Locomotion in virtual reality (VR) presents unique challenges and opportunities. The ability to move within virtual spaces larger than the physical reality is crucial for creating immersive experiences. However, implementing movement in VR requires careful consideration to maintain user comfort and prevent motion sickness.
5.4.1 The Challenge: Motion Sickness
While locomotion is essential for immersive VR experiences, it presents a significant challenge: motion sickness. This issue arises from what is known as visual-vestibular conflict.
5.4.1.1 Visual-Vestibular Conflict
This conflict occurs when there’s a mismatch between what the user sees in the VR headset and what their inner ear (vestibular system) senses. As
You see this environment that feels real and you see yourself moving there, but you don’t feel it in your inner ears—the vestibular system that senses acceleration and helps with balance.
This discrepancy can lead to the body reacting as if something is wrong, potentially triggering nausea as a defense mechanism. One theory suggests that this reaction might be evolutionary, similar to the body’s response to ingesting poison.
5.4.2 Individual Variation
Susceptibility to VR-induced motion sickness varies greatly among individuals. Some people may experience discomfort from merely watching a car ride on a large screen, while others can handle complex movements in VR without significant issues.
5.4.3 The Phenomenon of “VR Legs”
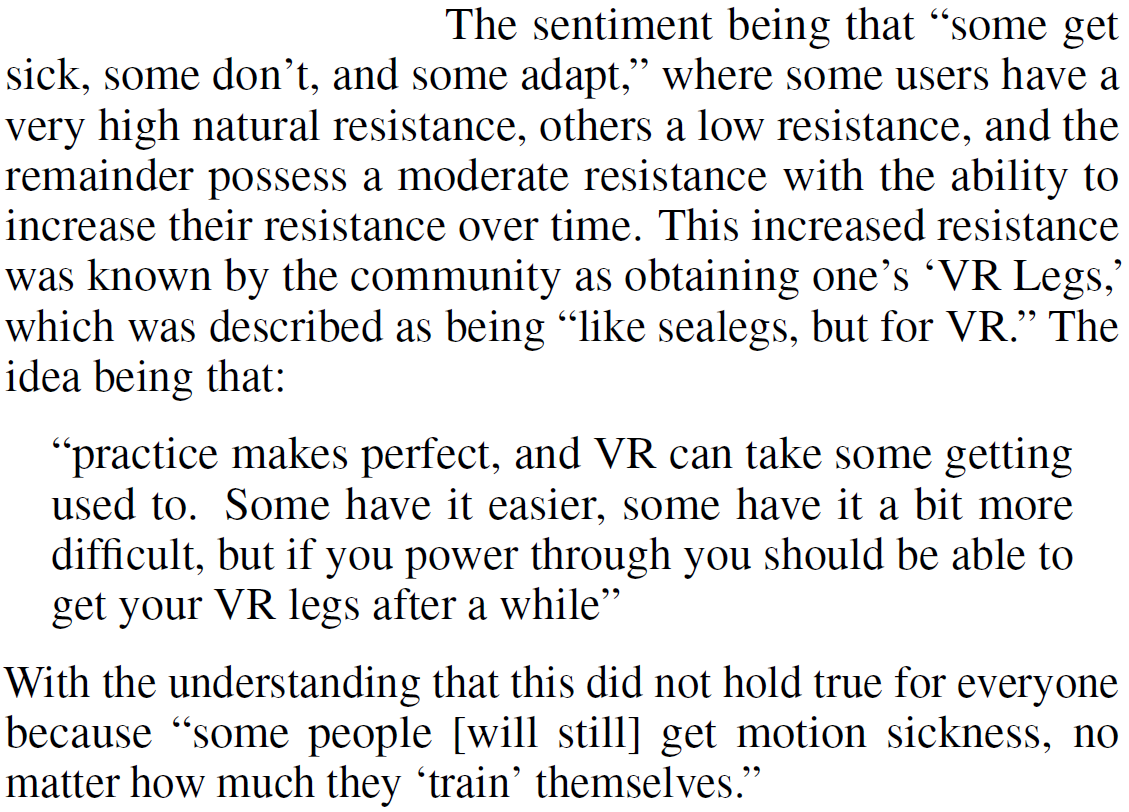
A common sentiment in the VR community is the concept of developing “VR legs” - the idea that users can acclimate to VR environments and reduce motion sickness over time. Porter and Robb (2019) explored this phenomenon, finding that while some users do indeed adapt, this is not universal.
You can, to a certain degree, develop what we call “VR legs” as you get used to using virtual reality. You can tolerate more of these kinds of motions over time, but this adaptation isn’t true for everyone.
5.4.4 Solutions to VR Locomotion Challenges
Developers have devised various solutions to address motion sickness in VR, each with its own advantages and limitations:
5.4.4.1 1. No Visual Motion (or Acceleration)
- Teleportation/Dashing: Users instantly move to a new location without showing the transition.
- Reduces visual-vestibular conflict by eliminating perceived motion.
- Most effective when avoiding acceleration visuals.
5.4.4.2 2. Reduced Visible Motion
- Tunneling: Narrows the field of view during movement.
- Exploits the fact that we’re most sensitive to motion in our peripheral vision.
- Morphing: Alters the world in ways that the brain doesn’t interpret as typical movement.
5.4.4.3 3. Setting Expectations
Running in Place: Encourages physical movement that aligns with virtual motion. If you’re running in place while moving in VR, that physical action really helps the brain accept that the movement you’re seeing is reasonable and makes sense.
Pulling the World: Allows users to grab and move the virtual environment directly. This sets expectations to moving the world, not to you moving through the world.
5.4.4.4 4. Combining Approaches
Developers often combine these techniques, creating narratives or tools within the virtual world to explain and facilitate movement. This approach can help direct user attention and make locomotion feel more natural within the context of the experience.
5.4.5 Locomotion Options in Unreal Engine VR Templates
Unreal Engine provides several built-in locomotion options for VR experiences, designed to enhance user comfort and reduce motion sickness.
5.4.5.1 Teleportation with Parabolic Pointing
Teleportation is a popular VR movement technique that allows users to instantly transport to a new location. The Unreal Engine template implements this with parabolic pointing.
Key Features: - Uses a parabolic trajectory to determine teleport destination - Allows reaching higher positions - Limits teleportation range for better control
5.4.5.2 Snap Turning
Snap turning is a technique to reduce motion sickness when rotating in VR.
Key Features: - Turns the view by 45 degrees in one quick motion - Can be pressed multiple times for larger rotations - Helps prevent disorientation caused by smooth rotation
5.4.5.3 Snap/Blink Movement
This technique allows for short, controlled movements in VR space.
Key Features: - Moves the user 1 meter forward or backward in one quick motion - Can be used multiple times for longer distances - Doesn’t require pointing to a specific location each time
5.4.5.4 Quick Fade Transition
All locomotion techniques in the template use a quick fade to black and back during movement.
Purpose: - Helps the brain ignore the sudden change in position - Reduces the likelihood of motion sickness
Each of these locomotion techniques is implemented with a quick fade to black and back. This helps the brain ignore the movement because it becomes less aware of—or doesn’t detect—the actual switch from one place to another when there’s a brief blackout in between.
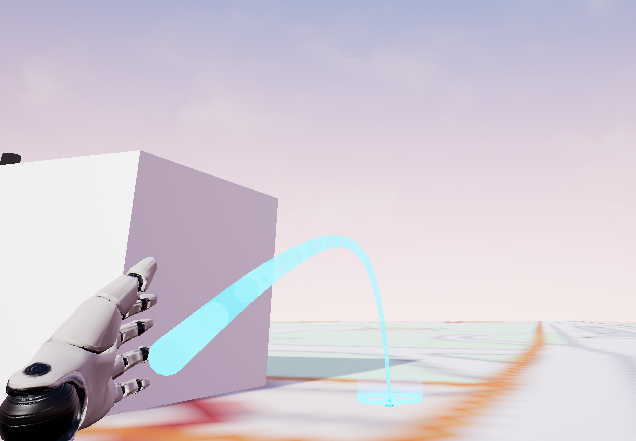
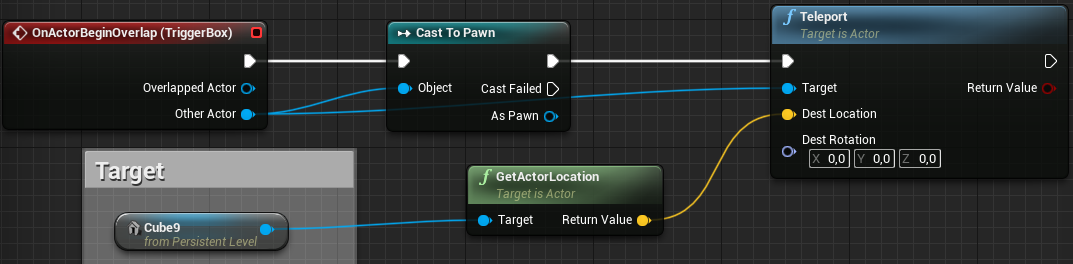
5.4.6 Implementing Teleportation in Exercises
For simple teleportation exercises, students can use a streamlined approach:
- Check if the player enters a trigger box acting as a teleporter
- Use the teleport blueprint node to move the player to a new location
- Optionally, teleport to another level using the “Open Level” blueprint node
Tip for Targeting: Use the position of an actor as the teleport target for more dynamic teleportation.
5.4.7 Advanced Locomotion Techniques
For more advanced applications, researchers and developers have explored innovative locomotion techniques:
5.4.7.1 Redirected Walking and the Unlimited Corridor
Redirected walking is a technique that allows users to explore seemingly infinite virtual spaces within a limited physical area. This is achieved by subtly manipulating the user’s perception of movement.
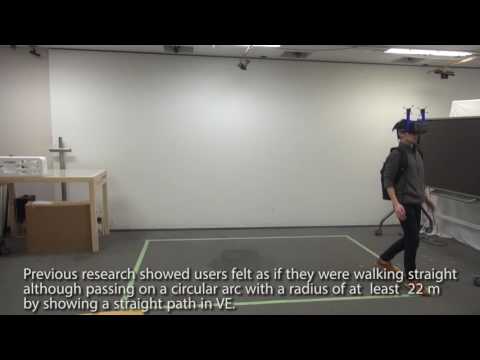
This is one of the more impressive recent developments I’ve encountered. By constructing this particular wall shape, you can fool users into thinking they’re walking along an infinitely long straight wall when they’re actually walking in a curve.
5.4.7.2 Galvanic Vestibular Stimulation
To address the issue of motion sickness in VR, researchers are exploring ways to directly stimulate the vestibular system, which is responsible for our sense of balance and spatial orientation.
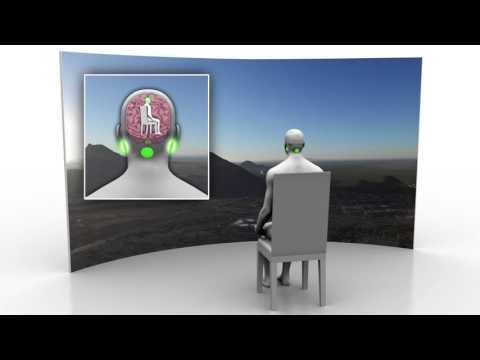
This technique is called Galvanic Vestibular Stimulation (GVS), where you essentially apply controlled electrical signals to stimulate the vestibular system, making you feel as if you’re accelerating and turning in different directions. This is a potential “holy grail” for solving VR motion issues, as the only suggestion that might completely remove it.
This technology, while still in research stages, could potentially solve one of the major challenges in VR by aligning the user’s sense of movement with the visual input from the VR environment.
5.4.8 Conclusion
Locomotion in VR remains an active area of research and development. While various techniques have been developed to mitigate motion sickness and enhance user comfort, the choice of locomotion method often depends on the specific application and target audience. As VR technology continues to evolve, we can expect to see further innovations in this crucial aspect of virtual reality experiences.
For more information on locomotion in Unreal Engine, refer to the Unreal Engine VR Locomotion Documentation.
5.5 Designing User Interfaces for 3D Spaces
Creating effective user interfaces (UI) for 3D spaces in Extended Reality (XR) presents unique challenges and opportunities. This section explores the principles and techniques for designing UI elements that seamlessly integrate with virtual environments.
5.5.1 The Challenge of 2D UI in VR
Traditional 2D user interfaces do not translate well to virtual reality (VR) environments. There are two main issues:
Stereo Effect Distortion: Simply projecting a 2D interface onto the VR screens results in an incorrect stereo effect, making the UI difficult to perceive properly.
Lack of Natural Interaction: Without proper placement in 3D space, users cannot interact with the UI using natural body movements, which is a key aspect of VR experiences.
In short, showing ordinary UI overlays does not work in VR.
5.5.2 Unreal Engine’s Solution: Placing UI on 3D Surfaces
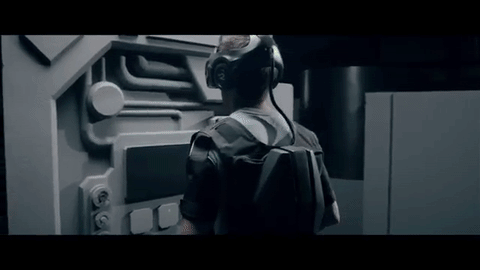
To address these challenges, Unreal Engine adopts an approach of placing 2D interfaces on surfaces within the 3D environment. This solution involves creating a virtual screen that exists as part of the VR world, allowing for proper depth perception and intuitive interaction.

The image above demonstrates how a 2D interface can be integrated into a 3D VR environment, complete with hand controllers for interaction.
5.5.3 Required Components for 2D UI in VR
To implement a 2D user interface in VR using Unreal Engine, three key components are necessary:
Menu Actor: This is a Blueprint actor that serves as the container for the 2D surface in 3D space. It allows you to position and manipulate the UI within the virtual environment.
UMG Widget: UMG (Unreal Motion Graphics) is Unreal Engine’s system for creating 2D user interfaces. The UMG Widget is connected to the Menu Actor and contains the actual UI design.
Widget Interaction Component: This component is attached to the player’s Pawn (usually the hand or controller) and acts as a pointer, enabling interaction with the 2D interface elements like buttons.
5.5.4 Creating UIs with UMG
UMG provides a familiar environment for designing 2D interfaces within Unreal Engine. It offers a range of common UI widgets and allows for hierarchical construction of interfaces.
Key features of UMG include:
- A variety of widgets common to 2D UIs
- Ability to build interfaces hierarchically (e.g., adding a text label as a child of a button)
- Visual editor for easy UI design
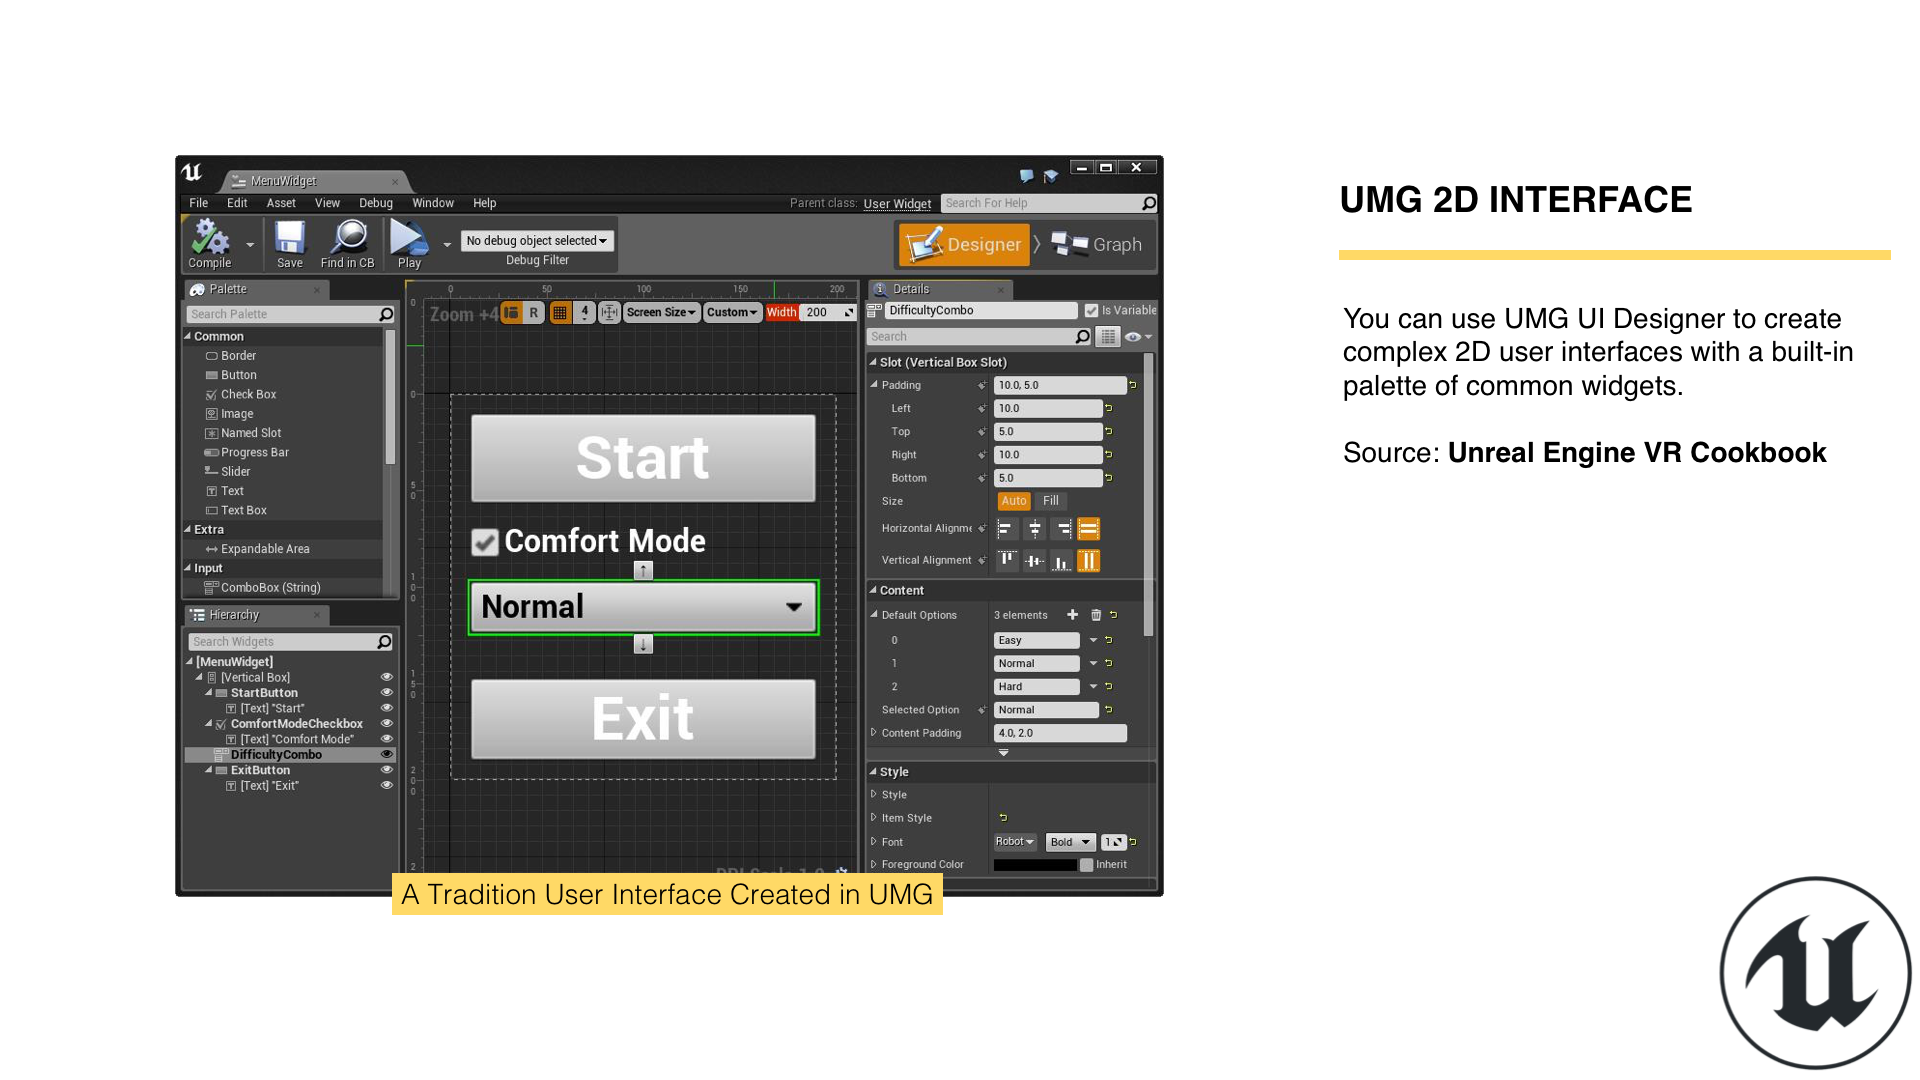
For more detailed information on using UMG, refer to the UMG UI Designer Quick Start Guide.
5.5.6 Connecting UI Events to the Game World
While UMG UI provides a powerful system for creating interfaces, it’s important to understand that these UI elements cannot directly interact with the game world. This is because the UMG UI is not an actor in itself within the level.
To enable interaction between your UI and the game world, there are two primary methods:
- Connect UMG events to events in the menu actor
- Set variables on the UMG UI to allow it to act in the world
In both cases, you need to cast to your UI class to access the necessary functions or variables. This involves getting the widget, calling GetUserWidgetObject, and then casting to your specific UI class. Note that this process does not work in the Construction Script; you should perform it in the BeginPlay event instead to ensure the widget is created before you attempt to access it.
5.5.6.1 Connecting to Events in the Menu Actor
To connect events from your UMG UI to events in your menu actor:
- Cast to your widget class.
- Get the button (or similar UI element) you want to interact with.
- Bind the button’s event to a custom event in your menu actor.
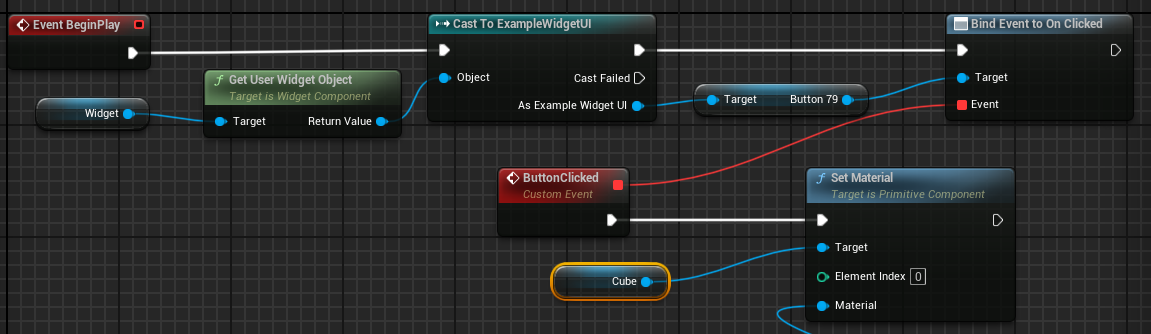
This approach allows you to handle UI events, such as button clicks, directly within your menu actor, facilitating interaction with the game world.
5.5.6.2 Setting Variables and Using Events in UMG
Alternatively, you can set variables on your UMG UI to enable it to act in the world:
- Make the necessary variables in your UMG UI public.
- Cast to your widget class and set these variables from your menu actor.
- Handle events within your UMG UI, using the variables you’ve set to affect the game world.
In the Menu Actor: 
In the UMG Widget Blueprint: 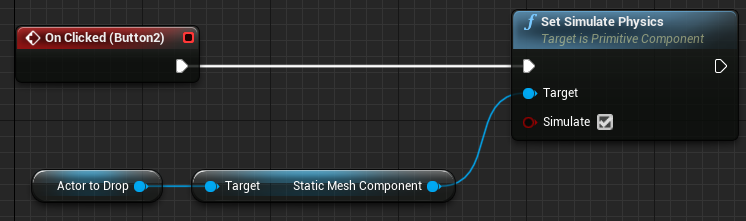
By setting variables on your UMG UI, you allow the UI to perform actions in the game world based on user interactions, enhancing the interactivity of your application.
5.6 Principles of 3D UI Design
When designing UI for 3D spaces, consider the following principles:
Spatial Awareness: UI elements should be placed in logical locations within the 3D space. For example, a menu might appear on a virtual wall or float in front of the user at a comfortable distance.
Depth and Layering: Utilize depth to create hierarchy and organization in your UI. Important elements can be brought closer to the user, while less critical information can be pushed further back.
Interaction Paradigms: Design UI elements that can be interacted with using natural gestures. For example, buttons that can be pressed with virtual hands or laser pointers.
Scale and Readability: Ensure that text and UI elements are large enough to be read comfortably in VR. Consider the resolution limitations of current VR headsets.
Field of View: Remember that VR headsets have a limited field of view. Avoid placing crucial UI elements at the extreme edges of the user’s vision.
Context-Sensitive UI: Consider implementing UI elements that appear or become more prominent based on the user’s context or actions within the virtual environment.
5.6.1 Importance of Collision in 3D UI
Collision detection plays a crucial role in creating interactive 3D UIs. It allows users to interact with UI elements as if they were physical objects in the virtual space.
Key points about collision in 3D UIs:
- Enable collision for UI elements: This allows them to be “touched” by the user’s virtual hands or pointers.
- Use overlap events: These can trigger actions when the user’s hand or pointer enters the UI element’s collision volume.
- Consider different collision shapes: Some UI elements might benefit from more complex collision shapes than simple boxes or spheres.
For more detailed information on implementing collision in Unreal Engine, refer to the next chapter which covers this topic in depth.
5.6.2 Triggering Actions Upon Touch
3D buttons in VR can be implemented using collision and overlap events. Here’s a basic approach:
- Create a 3D mesh for your button (e.g., a simple cube).
- Enable collision on the button mesh.
- Implement an overlap event that triggers when the user’s hand or pointer enters the button’s collision volume.
- In the overlap event, trigger the desired action (e.g., change a scene, open a menu, etc.).
This approach allows for intuitive, physical-feeling interactions with UI elements in 3D space.
5.6.3 Advanced UI Concepts
5.6.3.1 Diegetic UI
Diegetic UI elements are those that exist within the game world itself. For example, a health meter on the player’s in-game wrist device, or ammunition count displayed on the weapon itself. These UI elements can greatly enhance immersion by blending seamlessly with the virtual environment.
5.6.3.2 Spatial UI
Spatial UI takes advantage of the 3D environment to present information in a way that’s impossible in 2D interfaces. For example, a 3D scatter plot that the user can walk through and examine from different angles.
5.6.3.3 Adaptive UI
Consider implementing UI that adapts to the user’s position and orientation in the virtual space. This could involve UI elements that follow the user at a comfortable distance, or rearrange themselves based on the user’s viewing angle.
5.6.4 Conclusion
Designing effective user interfaces for 3D spaces in XR requires a shift in thinking from traditional 2D UI design. By leveraging the unique capabilities of VR and AR, designers can create intuitive, immersive interfaces that enhance the overall user experience. As XR technologies continue to evolve, we can expect to see even more innovative approaches to UI design in 3D spaces.
For more information on UI design in Unreal Engine, refer to the Unreal Engine UMG UI Designer Documentation.
5.7 Haptics and Tactile Feedback
Haptic feedback plays a crucial role in creating immersive experiences in Extended Reality (XR). By providing tactile sensations, haptics enhance the sense of presence and interaction in virtual environments. This section provides a comprehensive exploration of haptic technologies in XR, from simple vibrations to advanced tactile technologies.
Note: While Section 2.5 introduces haptic technologies as part of emerging XR innovations, this chapter serves as the definitive guide to understanding, implementing, and designing haptic feedback in XR applications.
5.7.1 The Importance of Touch in XR
Haptics, the sense of touch in virtual reality (VR), plays a crucial role in creating immersive experiences. The ability to physically interact with virtual objects significantly enhances the realism and engagement of VR applications. This concept builds upon the famous “rubber hand illusion,” which demonstrates how our brains can be tricked into perceiving an artificial limb as part of our body.
5.7.2 Types of Haptic Feedback
5.7.2.1 1. Controller Vibration
The most common form of haptic feedback in current VR systems is controller vibration. This provides a basic level of tactile feedback for interactions such as:
- Touching or colliding with virtual objects
- Firing a virtual weapon
- Receiving in-game notifications
While simple, controller vibration can significantly enhance the sense of interaction in VR when used effectively.
5.7.2.2 2. Advanced Haptic Controllers
More sophisticated haptic controllers are being developed to provide more nuanced and realistic tactile sensations. For example:
These advanced controllers can provide:
- Variable resistance when grasping objects
- Texture simulation
- Pressure sensations
Some of these advanced haptic devices are probably available, but they’re not targeted at consumers. They tend to be really expensive and focus on enterprise applications.
5.7.2.3 3. Passive Haptics
Passive haptics refers to the use of physical objects that correspond to virtual elements in a VR environment. This technique allows users to touch and feel virtual objects, greatly enhancing the sense of presence and immersion.
One notable example came from a company called The Void (which unfortunately closed in 2021). They created experiences where you walk around with VR equipment in spaces with physical constructions built to match the virtual environment. You could reach out to touch virtual objects and actually feel their physical counterparts.
This approach allows users to physically interact with their surroundings while experiencing a virtual overlay, creating a powerful blend of digital and physical realities.
5.7.3 Passive Haptics in Mixed Reality (MR)
In Mixed Reality applications, passive haptics can be particularly effective. By matching virtual objects to real-world counterparts, developers can create convincing tactile experiences. For example:
- A virtual table that corresponds to a physical table in the user’s environment
- Virtual walls that align with the real walls of a room
This approach not only enhances the sense of immersion but also contributes to user safety and confidence in movement within the virtual space. As users can physically feel the boundaries of their environment, they can move more freely and naturally within the virtual world.
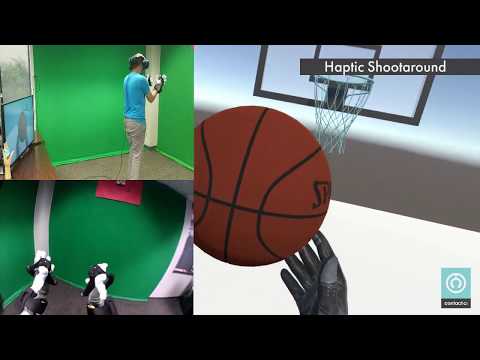
5.7.4 Haptic Gloves
Haptic gloves represent a significant advancement in tactile feedback for VR interactions. These gloves incorporate motors and mechanisms that provide resistance and sensations to the user’s fingers, allowing them to:
- Feel the sensation of grasping virtual objects
- Experience resistance when squeezing or pulling items
- Receive varied haptic feedback based on different virtual textures and materials
While currently aimed at enterprise applications due to their cost, haptic gloves represent a promising direction for enhancing the tactile dimension of VR experiences.
5.7.5 Implementing Haptic Feedback in Unreal Engine
While Unreal Engine doesn’t directly support advanced haptic devices, it does provide ways to implement basic haptic feedback through controller vibration. Here’s a simple approach:
- Detect Collision: Use collision events to detect when a user interacts with a virtual object.
- Trigger Haptic Feedback: Use the “Play Haptic Effect” node in Blueprints to trigger a vibration on the controller.
- Customize Feedback: Adjust the intensity and duration of the vibration based on the type of interaction.
For more advanced haptic implementations, you may need to use plugins or custom C++ code to interface with specific haptic devices.
5.7.6 Best Practices for Haptic Design
When designing haptic feedback for XR experiences, consider the following:
Subtlety: Haptic feedback should enhance the experience, not overwhelm it. Use varying intensities based on the importance of the interaction.
Consistency: Establish a consistent haptic language across your application. Similar interactions should have similar haptic feedback.
Latency: Minimize the delay between visual events and haptic feedback to maintain the illusion of physical interaction.
Context: Consider the context of the interaction. A soft object should provide different feedback compared to a hard object.
User Comfort: Provide options for users to adjust or disable haptic feedback, as some may find strong vibrations uncomfortable.
5.7.7 Future of Haptics in XR
The field of haptics in XR is rapidly evolving. Some promising areas of development include:
- Ultrasonic Haptics: Creating tactile sensations in mid-air using focused ultrasound waves.
- Thermal Feedback: Simulating temperature changes to enhance realism in virtual environments.
- Force Feedback: Advanced systems that can simulate the weight and resistance of virtual objects.
As these technologies mature and become more accessible, we can expect XR experiences to become increasingly tactile and immersive.
5.7.8 Conclusion
Haptics and tactile feedback are crucial elements in creating truly immersive XR experiences. From simple controller vibrations to advanced haptic gloves and passive haptics, these technologies bridge the gap between the virtual and physical worlds. As XR continues to evolve, we can expect haptic feedback to play an increasingly important role in creating convincing and engaging virtual environments.
For more information on implementing basic haptic feedback in Unreal Engine, refer to the Unreal Engine Force Feedback Documentation.
5.8 Gesture and Voice Recognition in XR
Gesture and voice recognition technologies are becoming increasingly important in XR (Extended Reality) applications, offering more natural and intuitive ways for users to interact with virtual environments. These input methods can complement or even replace traditional controller-based interactions, enhancing immersion and accessibility in XR experiences.
Note: This chapter provides comprehensive coverage of gesture and voice recognition fundamentals, implementation techniques, and design best practices for XR applications. For AI-enhanced gesture and voice recognition technologies, see Section 8.6.2.
5.8.1 Gesture Recognition in XR
Gesture recognition allows users to interact with virtual objects and interfaces using natural hand movements and poses. This technology has seen significant advancements in recent years, particularly in the context of XR applications.
5.8.1.1 Types of Gesture Recognition
Controller-based Gestures: These rely on the motion and orientation of handheld controllers to interpret gestures.
Camera-based Hand Tracking: Uses external or headset-mounted cameras to track hand and finger movements without the need for controllers.
Glove-based Systems: Specialized gloves with sensors that provide precise finger tracking and sometimes haptic feedback.
5.8.1.2 Common Gestures in XR
Some commonly implemented gestures in XR applications include:
- Pinch to grab or select
- Swipe to scroll or navigate menus
- Open hand to release objects
- Point for UI interaction
- Thumbs up/down for quick feedback
5.8.1.3 Implementing Gesture Recognition
In Unreal Engine, gesture recognition can be implemented through:
- Motion Controller Components: For controller-based gestures
- Vision-based Plugins: For camera-based hand tracking (e.g., Oculus Hand Tracking plugin)
- Custom Gesture Recognition Systems: Using Blueprint or C++ to define and recognize specific hand poses and movements
5.8.2 Voice Recognition in XR
Voice commands offer a hands-free way to interact with XR environments, which can be particularly useful when the user’s hands are occupied or when accessibility is a concern.
5.8.2.1 Applications of Voice Recognition in XR
- Navigation: Using voice commands to move through virtual spaces or menus
- Object Manipulation: Selecting, moving, or modifying virtual objects
- System Control: Adjusting settings or launching applications
- Text Input: Dictating text for messaging or search functions
- AI Assistants: Interacting with virtual AI assistants within the XR environment
5.8.2.2 Implementing Voice Recognition
While Unreal Engine doesn’t have built-in voice recognition capabilities, developers can integrate third-party solutions:
- Platform-specific SDKs: Using voice recognition APIs provided by VR/AR platforms (e.g., Oculus Voice SDK)
- Cloud-based Services: Integrating services like Google Cloud Speech-to-Text or Amazon Transcribe
- Middleware Solutions: Using plugins that provide voice recognition functionality
5.8.3 Challenges in Gesture and Voice Recognition
- Accuracy: Ensuring reliable recognition across different users and environments
- Latency: Minimizing delay between user input and system response
- User Training: Familiarizing users with available gestures and voice commands
- Privacy Concerns: Addressing user concerns about voice data collection and processing
- Multilingual Support: Providing recognition for multiple languages and accents
5.8.4 Best Practices for XR Gesture and Voice Interactions
- Intuitive Design: Design gestures and voice commands that feel natural and are easy to remember
- Visual Feedback: Provide clear visual cues to confirm recognized gestures and voice commands
- Multimodal Input: Combine gesture and voice input with traditional controls for flexibility
- Customization: Allow users to customize gesture and voice commands to their preferences
- Fallback Options: Provide alternative input methods for all gesture and voice-controlled functions
5.8.5 Future Trends
The field of gesture and voice recognition in XR is rapidly evolving. Some emerging trends include:
- Improved AI and Machine Learning: Enhancing recognition accuracy and adapting to individual users
- Haptic Feedback: Combining gesture recognition with haptic feedback for more immersive interactions
- Brain-Computer Interfaces: Exploring direct neural interfaces for even more intuitive control
- Emotional Recognition: Interpreting user emotions through voice tone and facial expressions
- Context-Aware Systems: Adapting gesture and voice interactions based on the user’s current activity or environment
5.8.6 Conclusion
Gesture and voice recognition technologies offer exciting possibilities for creating more natural, intuitive, and immersive XR experiences. As these technologies continue to advance, we can expect to see increasingly sophisticated and seamless interactions between users and virtual environments. Developers should consider incorporating these input methods to enhance the usability and accessibility of their XR applications, while being mindful of the challenges and best practices associated with their implementation.
For more information on implementing motion controls in Unreal Engine, which can be a starting point for gesture recognition, refer to the Unreal Engine Motion Controller Documentation.
5.9 Advanced Avatar Technologies and Digital Humans
The rapid advancement of avatar technologies is revolutionizing how we represent ourselves in virtual and augmented reality spaces. From Meta’s high-end codec avatars to freely available tools like Epic Games’ Metahuman, the push for photorealistic digital representations is gaining momentum.
This section focuses on the technical implementation and practical tools for creating advanced avatars. For the foundational psychological principles underlying virtual embodiment—including the Rubber Hand Illusion, body ownership, and the Proteus Effect—see Section 1.4.
5.9.1 Meta Codec Avatars: Pushing the Boundaries of Realism
Meta (formerly Facebook) has demonstrated some of the most advanced avatar technology to date with their codec avatars.These highly realistic digital representations showcase the potential for lifelike interactions in virtual environments.

Key features of Meta Codec Avatars:
- Photorealistic rendering: The avatars achieve a level of detail that closely mimics real human faces.
- Real-time animation: Facial expressions and movements are captured and rendered in real-time.
- Custom scanning process: Currently, users need to visit a Meta lab for precise facial scanning.
This clip shows an interview between Mark Zuckerberg and Lex Fridman where both faces you see are actually computer-generated graphics. These avatars are created in real-time based on recorded data and tracking capabilities of advanced headsets that understand how the eyes, mouth, and other facial features move.
While incredibly impressive, it’s important to note that this technology is not yet generally available to the public. The requirement for specialized scanning equipment limits its current accessibility.
5.9.2 Epic Games’ Metahuman: Democratizing Realistic Avatar Creation
Epic Games, known for their Unreal Engine technology, has released Metahuman Creator, a tool that aims to make highly realistic avatar creation more accessible to developers and content creators.

Metahuman Creator offers:
- Browser-based creation: Users can craft detailed human avatars directly in their web browser.
- Extensive customization: A wide range of facial features, hairstyles, and other attributes can be adjusted.
- Integration with game engines: The created avatars can be easily imported into Unreal Engine for use in games or other interactive experiences.
Metahuman Creator is one of the tools that’s freely available for creating realistic digital humans, and it represents how Epic Games is pushing this technology forward. You can explore it yourself at the link provided.
For those interested in exploring Metahuman Creator, you can access it at https://metahuman.unrealengine.com/.
5.9.3 Live Link Face: Bringing Avatars to Life
Building upon the Metahuman technology, Epic Games has also introduced Live Link Face, an iPhone app that enables real-time facial animation capture.
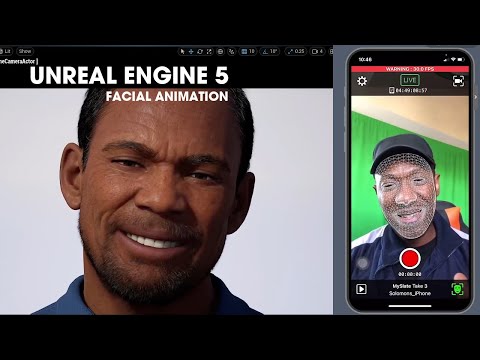
This technology allows developers to:
- Capture facial expressions in real-time using an iPhone’s front-facing camera.
- Apply the captured animations to Metahuman avatars instantly.
- Create high-quality facial animations without the need for expensive motion capture equipment.
You can achieve this level of quality now with freely available tools and software, using just an iPhone or similar device.
This combination of Metahuman and Live Link Face represents a significant step towards making high-quality avatar creation and animation accessible to a broader range of creators and developers.
5.9.4 GaussianAvatars: The Future of Photorealistic Avatars
Recent research has explored the application of Gaussian Splatting techniques to avatar creation, resulting in the development of GaussianAvatars.
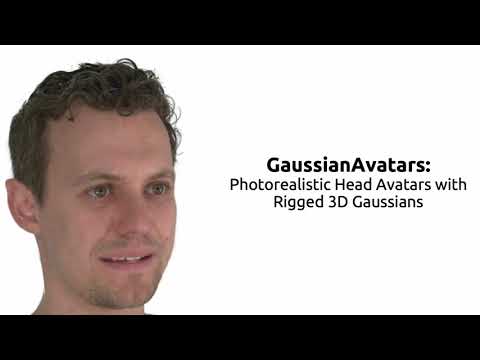
Key aspects of GaussianAvatars:
- Photorealistic rendering: Achieves an unprecedented level of realism in digital human representation.
- Efficient performance: Leverages Gaussian Splatting for improved rendering speed and quality.
- Rigged 3D Gaussians: Allows for realistic deformation and animation of the avatar.
This is a very interesting development for creating photorealistic avatars that could become more readily available to developers and content creators.
While still in the research phase, GaussianAvatars represent a promising direction for the future of avatar technology, potentially offering even more realistic and efficient avatar representations for immersive environments.
5.9.5 Implementation Considerations and Cross-Platform Compatibility
As avatar technologies become more sophisticated, several practical considerations emerge for developers and content creators:
Technical Integration: - Cross-platform compatibility between different VR systems - Performance optimization for real-time rendering - Integration with existing game engines and development pipelines
Accessibility and Inclusivity: - Ensuring avatar creation tools are accessible to users with different technical skills - Providing diverse representation options in avatar creation systems - Accommodating users with disabilities in avatar design
Ethical Design Principles: The psychological effects of avatar embodiment (covered in detail in Section 1.4) raise important ethical considerations for developers:
- Informed Consent: Users should understand how avatar characteristics might influence their behavior and self-perception
- Representation: Avatar systems should offer inclusive options for diverse user populations
- Privacy: Biometric data used for avatar creation and animation should be handled responsibly
For a comprehensive understanding of the psychological foundations underlying these design considerations, see the discussion of virtual embodiment principles in Section 1.4.
Future Technical Directions: - Integration with haptic feedback systems for enhanced embodiment - Real-time emotion recognition and expression mapping - AI-driven avatar behavior and personality simulation
5.10 Further Reading
Chapter 5 focused on designing interactions for 3D spaces in XR, covering topics such as input methods, locomotion techniques, 3D user interfaces, and haptic feedback. We explored how to create intuitive and comfortable ways for users to navigate and interact with virtual environments. To deepen your understanding of spatial interaction design, consider these resources:
5.10.1 Additional Resources
- Meta Design docs: https://developers.meta.com/horizon/design/
- Design guidelines and best practices for VR interactions from Meta.