3 Creating Virtual Worlds
3.1 Introduction to Game Engines
Game engines are powerful software frameworks that serve as the foundation for creating interactive 3D environments. As noted by Matthew Ball, “Think of the game engine as establishing the virtual universe’s laws—the ruleset that defines all interaction and all possibility.” While originally designed for game development, these engines have evolved to become central tools for creating all kinds of virtual experiences, from architectural visualization to urban planning.
3.1.1 Understanding Game Engines
Game engines provide a comprehensive set of tools and technologies for handling various aspects of virtual environment development:
- Graphics rendering and real-time visualization
- Physics simulation and interaction handling
- Sound processing and spatial audio
- Input management (keyboard, mouse, VR/AR devices)
- Asset management and scene organization
- Programming and logic systems
This technology has increasingly moved beyond gaming into “serious” applications. As Ball (2022) notes, “As the global economy continues to shift toward virtual worlds, these cross-platform and cross-developer technologies will become a central part of global society. Particularly the next wave of virtual world builders—not game developers, but retailers, schools, sports teams, construction companies, and cities—will likely use these solutions.”
3.1.2 The Two Primary Platforms: Twinmotion and Unreal Engine
In our context, we focus on two related but distinct platforms: Twinmotion and Unreal Engine. Both are developed by Epic Games, with Twinmotion being built on Unreal Engine technology but optimized for different use cases.
3.1.2.1 Twinmotion
Twinmotion is a powerful, real-time 3D visualization tool designed for architecture, construction, urban planning, and landscaping professionals. Developed by Epic Games, Twinmotion leverages the Unreal Engine to provide high-quality, interactive visualizations with ease of use.
When you open Twinmotion, you’ll find an intuitive interface with direct access to: - A comprehensive asset library of furniture, vegetation, and materials - Simple drag-and-drop functionality for placing objects and applying materials - Real-time lighting and weather controls - Basic navigation tools using WASD keys and mouse control - A straightforward object manipulation system with an easy-to-use gizmo for moving, rotating, and scaling
Twinmotion comes with built-in support for VR, enabling immersive walkthroughs of your projects. It is, however, not possible to implement specific VR interaction designs - for that you need Unreal Engine.
3.1.2.2 Unreal Engine
Unreal Engine is a powerful and versatile game engine that has become a cornerstone in the world of interactive 3D content creation. To truly appreciate the potential of Unreal Engine, it’s essential to see it in action.
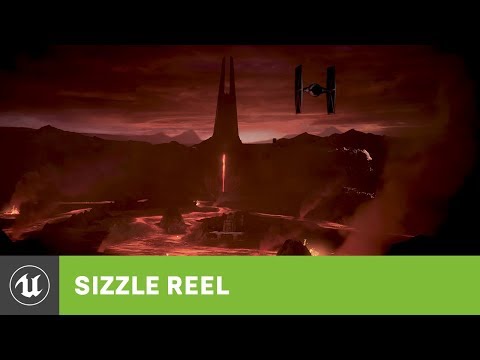
These videos show what’s possible with this kind of technology. This is the enterprise sizzle reel from 2019, and all of these applications you see here are actual products that are being made by companies.
The sizzle reel showcases real-time computer graphics rendering, emphasizing Unreal Engine’s ability to create highly realistic environments and characters for various applications beyond just gaming. Since this video was created the capabilites of Unreal Engine have bee greatly developed, and the tightening integration with Twinmotion (as well as UEFN, Unreal Engine for Fortnite) provides easier entry points while giving access to full power in the Unreal Engine editor.
3.1.2.2.1 Why Unreal Engine?
Unreal Engine stands out for several reasons:
Competitive Alternative: While Unity is the primary alternative, Unreal Engine offers unique advantages in terms of visual quality and built-in features.
Licensing and Pricing: As of March 2024, Unreal Engine uses a tiered licensing model:
- Games: Free to use until reaching $1 million in revenue, then 5% royalty
- Non-games: Requires a commercial license with annual fees
- Education: Free for educational institutions and students for learning purposes
Focus on High-End Applications.
Unreal Engine is more focused on high-end usage, I would say. Unity has a bigger community, but if you’re looking at how many experts you have using Unity or Unreal Engine, it’s a lot more even.
- Comprehensive Offerings:
- Extensive marketplace of assets and tools
- Access to source code
- Quixel Megascans integration (high-quality photogrammetry assets)
- Twin Motion (architecture and city planning software)
- Industry Standard: Widely used in film, television, and enterprise visualization, making it valuable for career development in these fields.
By mastering these fundamental concepts of 3D graphics and game engine technology, developers can create rich, interactive environments for a wide range of applications beyond just video games.
For more detailed information on using Unreal Engine, refer to the Unreal Engine Documentation.
3.1.3 Fundamental Components of 3D Objects
Whether working in Twinmotion or Unreal Engine, all 3D objects consist of two primary elements:
- Mesh: The structural framework that defines the shape of the object.
- Surface Materials: The visual properties applied to the mesh.
3.1.3.1 Mesh
The mesh serves as the structural framework or “wireframe” of a 3D object. Think of it as the skeleton or scaffolding that defines the object’s shape. For curved or complex objects, a higher number of polygons is required to achieve a smooth appearance.
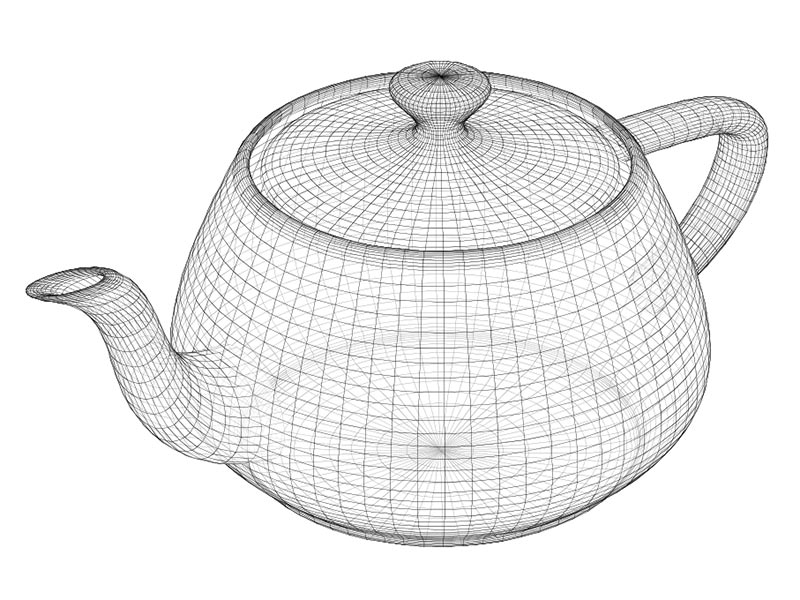
A wireframe representation of the classic teapot model used in computer graphics
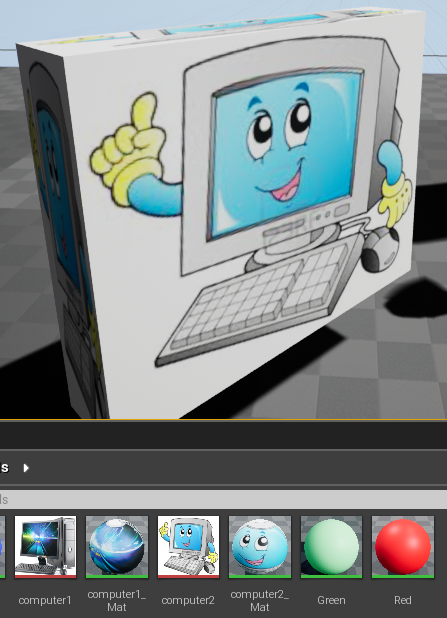
3.1.3.2 Surface Materials
Surface materials give objects their visual characteristics, analogous to paint or wallpaper in the physical world. At its most basic, a material might simply be a solid color. However, materials can become highly complex, incorporating various properties to achieve realistic or stylized appearances.
Textures can be used to map or drape images onto a surface, much like applying wallpaper to a wall. This process allows for intricate details and patterns to be added to the material, making the 3D object look more realistic and visually appealing. These textures can represent various surface properties such as color, roughness, metallicity, and normal maps to simulate surface details. By applying textures, you can create materials that mimic real-world surfaces like wood, metal, fabric, or stone, enhancing the visual fidelity of your 3D objects.
3.1.3.3 Lighting
Lighting plays a crucial role in creating realistic virtual environments. Both Twinmotion and Unreal Engine offer sophisticated lighting systems. More about that later.
3.1.4 Working with 3D Space
To position and manipulate 3D objects within a virtual environment, we use a coordinate system and transformations. There are several common coordinate systems used in 3D graphics:
Left-Handed Coordinate System: In this system, the thumb, index, and middle fingers of the left hand represent the X, Y, and Z axes, respectively. This system is commonly used in DirectX.
Right-Handed Coordinate System: Here, the thumb, index, and middle fingers of the right hand represent the X, Y, and Z axes, respectively. This system is often used in OpenGL.
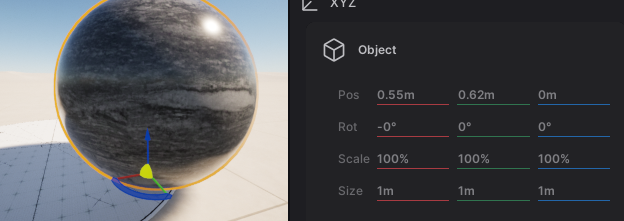
Unreal Engine and Twinmotion Coordinate System: Both Unreal Engine and Twinmotion use a right-handed coordinate system where the Z-axis is up. This means: - X-axis: Left to right - Y-axis: Forward and backward - Z-axis: Up and down
Understanding these coordinate systems is crucial for accurately positioning and transforming objects in 3D space. In many 3D applications, including Twinmotion and Unreal Engine, these axes are color-coded for easy identification.
3.1.4.1 Transformations
Transformations allow for the positioning and manipulation of objects in 3D space. They consist of three main operations:
- Translation: Moving the object along the X, Y, or Z axes.
- Rotation: Rotating the object around each axis.
- Scaling: Changing the size of the object along each axis.

The combination of these transformations determines an object’s final position, orientation, and size within the 3D environment.
3.1.5 Getting Started
For those new to these tools, start with Twinmotion for its more approachable interface and workflow, then progress to Unreal Engine as your needs grow more complex. Remember that while these platforms share underlying technology, they serve different purposes and offer different levels of control and customization.
3.2 Building in Twinmotion and Unreal Engine
The modern workflow for creating virtual environments often involves using both Twinmotion and Unreal Engine, leveraging each tool’s strengths. While both are based on the same underlying technology, they serve different purposes and offer different workflows.
3.2.1 Getting Started with Twinmotion
Twinmotion excels at rapid visualization and intuitive environment creation, making it an ideal starting point for many projects.
3.2.1.1 Navigation and Basic Controls
Learning to navigate in Twinmotion is straightforward: - WASD keys for “flying” around the environment - Q and E keys for moving up and down - Mouse for looking around - F key to focus on selected objects - Hold mouse over the “gizmo” and drag to move or rotate objects - Drag along specific axes (X, Y, Z) for precise control - Use the yellow center point to anchor objects to the ground
3.2.1.2 Setting Up the Environment
To build up the larger structure of the environment, like terrain and buildings, there are a few options in Twinmotion.
- Import Your Model: If you have existing 3D models from design software like SketchUp, Revit, or ArchiCAD, you can easily import them into Twinmotion. You might also find models you can use on digital marketplaces such as Fab (operated by Epic Games, creators of Twinmotion and Unreal Engine).
- Use Primitive Shapes: If you don’t have detailed models, you can use Twinmotion’s primitive shapes (such as boxes, spheres, and cylinders) to block out buildings and other structures. This is useful for prototyping and planning your environment.
- Create Terrains: Twinmotion provides tools for creating and modifying terrains to fit your project needs. You can:
- Use the terrain tool to sculpt the landscape, adjusting elevation and creating hills, valleys, and other features.
- Apply different textures and materials to the terrain to simulate grass, dirt, sand, or other surfaces.
- Add vegetation, such as trees and plants, to enhance the realism of your environment.
- Utilize the water tool to create bodies of water like lakes, rivers, and ponds, adding another layer of detail to your scene.
3.2.1.3 Furnishing the Environment
- Materials and Textures: Apply materials and textures to your primitive shapes to give them a more realistic appearance. Twinmotion offers a wide range of materials that can be customized to fit your needs.
- Objects and Vegetation: Populate your environment with furniture, vehicles, trees, characters, and other objects from Twinmotion’s asset library. This helps create a more immersive and detailed scene.
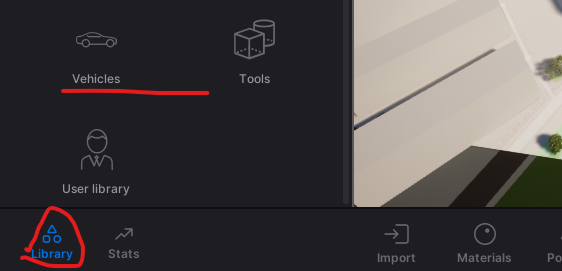
Twinmotion provides an extensive library of ready-to-use assets:
- Access the library through the sidebar
- Browse categories including:
- Furniture and decorations
- Vegetation and landscapes
- Characters and vehicles
- Materials and textures
- Drag and drop items directly into your scene
- Use the Properties panel to adjust object settings
3.2.1.4 Scene Organization
Effective scene management is crucial for larger projects. Build hierarchies to be able to move, rearrange and show/hide groups of objects as a unit.
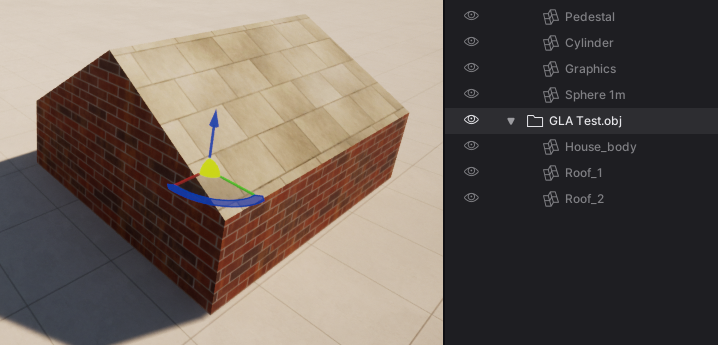
- Use the scene list to organize objects and groups
- Click the eye icon to show/hide elements
- Create hierarchies to manage complex scenes
- Select groups to move multiple objects together
3.2.1.5 Environment Controls
Twinmotion offers robust environment customization:
- Adjust weather conditions and time of day
- Control atmospheric effects
- Modify seasonal vegetation changes
- Set up specific lighting scenarios
3.2.1.6 Working with User Libraries
The User Library system in Twinmotion allows for easy resource sharing: 1. Add objects and materials using “Add to User Library” 2. Access saved resources through the User Library panel 3. Share the library directory with team members - You may also locate and share individual .tmi files within your UserLibrary folder. The recipient can place these in their own UserLibrary folder to access them in Twinmotion. 4. You can point the User Library to another folder, e.g., a shared folder, under Preferences -> Custom Paths.
3.2.1.7 Exporting to Unreal Engine
Once you have set up and furnished your environment in Twinmotion, you can export it to Unreal Engine for further development. This allows you to take advantage of Unreal Engine’s advanced features and capabilities.
- Export the Environment: Use Twinmotion’s export functionality to save your environment as a file that can be imported into Unreal Engine.
- Import into Unreal Engine: Open Unreal Engine and import the exported file. You can then continue to refine and develop your environment using Unreal Engine’s powerful tools.
Note that the Twinmotion to Unreal Engine Export+Import does not work with animated characters or objects, and requires additional work for terrains. With these lomitations, Twinmotion’s ease of use and extensive asset library can be leveraged to quickly set up and furnish 3D environments. By exporting to Unreal Engine your flexibility and potentials to push your project further is greatly enhanced.
For more detailed information and tutorials, visit the Twinmotion Documentation for general information. You can also find more information on the Twinmotion to Unreal Engine Workflow. This documentation includes the extra steps you need to do if you want to import Twinmotion landscapes (terrains) into Unreal Engine. In the TwinmotionOverview of the Twinmotion to Unreal Engine Workflow you can read more about the workflow, including details on what is supported.
3.2.2 Building in Unreal Engine
When projects require more complex interactions or custom functionality, Unreal Engine provides the necessary tools and flexibility.
3.2.2.1 Importing Models
One of the primary ways to populate your levels is by importing models. In addition to the path via Twinmotion described above, there are several other methods.
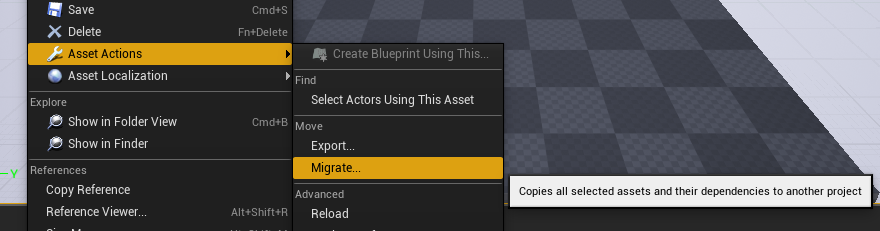
3.2.2.1.1 Migrating from Other Projects
The “Migrate” function in Unreal Engine allows you to copy assets with all their dependencies from one project to another. This is particularly useful when you want to reuse assets across different projects, or when you want to use a few objects from a large Asset pack (see below). Or, perhaps, when you want to integrate work from several students into one project.
To migrate assets:
- Open the source project containing the desired assets.
- Locate the asset in the Content Browser.
- Right-click on the asset and select “Asset Actions” > “Migrate”.
- Choose the Content folder of your target project as the destination.
3.2.2.1.2 Using Asset Packs
For larger collections of assets, such as those available on Fab:
- Create an empty project or use a minimal template.
- Add the asset pack to this project.
- Select specific assets you need.
- Migrate these selected assets to your main project.
This approach helps keep your main project lean and manageable.
I recommend not adding asset packs directly to your exercises project because then you add everything in that pack to your project. Instead, create an empty project or use a copy of a minimal project and add the asset pack to that one. Then go into that project and pick the particular models or assets that you want to use and migrate them from there over to your exercise project.
3.2.2.1.3 Using Simple Included Shapes
As with Twinmotion, Unreal Engine comes with a set of basic geometric shapes that can be quickly added to your level:
- Boxes
- Spheres
- Cylinders
- And more
These simple shapes are useful for blocking out levels, creating placeholder objects, or even as building blocks for more complex structures.
3.2.2.2 Building Levels
Once you have assets in your project, you can start building your level using various tools and interfaces within Twinmotion or Unreal Engine.
3.2.2.2.1 The Transform Gizmo
The transform gizmo is a crucial tool for manipulating objects in your scene. Simlilar gizmos exist in both Twinmotion and Unreal Engine. They allow you to:
- Translate (move) objects
- Rotate objects
- Scale objects
3.2.2.2.2 World Outliner
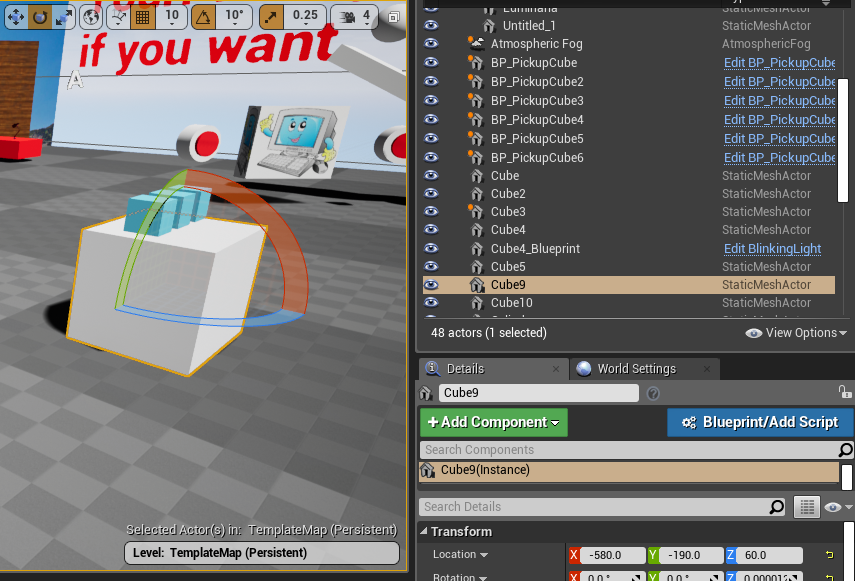
The World Outliner provides a hierarchical list of all actors (objects) in your level. It allows you to:
- View all objects in the level in a hierarchy
- Quickly search and filter objects
- Select and/or rename objects
- Organize your level structure
One useful function is to go directly to an object by either double-click it in the Outliner or selecting it and pressing “F” (as in Twinmotion).
3.2.2.2.3 Actor Details Panel
The Actor Details panel displays properties and settings for the currently selected actor. Here you can adjust:
- Transform values (position, rotation, scale)
- Material properties
- Lighting settings
- And many other object-specific properties
3.2.2.3 Composite Objects in Unreal
In Unreal Engine, Blueprints are a powerful tool for creating composite objects by combining multiple components into a single actor. This approach allows for flexible and reusable design, making it easier to manage complex objects within your virtual environment. While materials can be set for component meshes within these Blueprints, the primary focus here is on the construction and configuration of these composite objects.
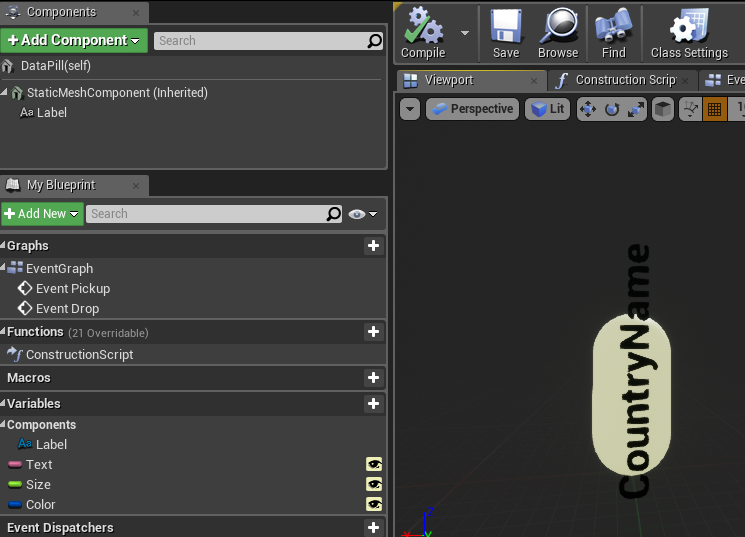
In this example, we see a Blueprint that constructs a labeled object. It combines a mesh (the “pill” shape) with a text component, allowing for easy customization through variables. This is a simple initial use of Blueprints in Unreal Engine, with more advanced applications to be covered in the next chapter.
3.2.2.4 Reality-Capture
It is also possible to populate your virtual 3D environment by creating digital copies of real objects. Reality capture involves digitizing real-world objects or environments to create 3D models for virtual use. This enhances the authenticity of virtual environments by incorporating realistic assets. Common methods include photogrammetry, 3D scanning, and depth sensors. These techniques will be discussed in more detail in a later chapter.
3.2.2.5 Unreal Engine Best Practices
- Keep projects lean: Only migrate the assets you need to keep your project manageable and performance-friendly.
- Organize before migrating: Rename folders and assets before migration if you want a specific structure in your target project.
- Use placeholders: Start with simple shapes to block out your level before adding detailed assets.
By mastering these techniques and tools, you’ll be well-equipped to create rich, detailed environments in Unreal Engine, whether you’re working on a small prototype or a full-scale project.
For more information on 3D modeling and asset creation in Unreal Engine, check out the official Unreal Engine documentation on Content Creation.
3.2.3 Best Practices for Tool Selection
Choose the appropriate tool based on your project needs:
- Use Twinmotion When:
- Rapid visualization is priority
- Working with architectural or urban planning projects
- Creating quick iterations of design concepts
- Collaborating with non-technical stakeholders
- Basic VR walkthroughs are needed
- Switch to Unreal Engine When:
- Custom interactions are required
- Complex behaviors need to be implemented
- Advanced VR experiences are being developed
- Specific performance optimizations are needed
- Custom shaders or effects are required
3.2.4 Tips for Efficient Workflow
- Start in Twinmotion
- Block out basic environments
- Test different design options
- Get stakeholder feedback early
- Prepare for Unreal Engine
- Keep scene organization clean
- Document material and object settings
- Plan for feature requirements
- Optimize Your Process
- Use shared User Libraries for common assets
- Maintain consistent naming conventions
- Create templates for repeated elements
- Use characters as scale reference
- Consider Performance
- Start with simple shapes for blocking
- Add detail progressively
- Test performance regularly
- Use the measurement tool (F1 for help)
By understanding when and how to use each tool, you can create efficient workflows that leverage the strengths of both Twinmotion and Unreal Engine. This combined approach allows for rapid iteration and visualization while maintaining the ability to develop more complex features when needed.
3.3 Working with Materials and Lighting
Creating realistic and visually appealing virtual environments relies heavily on understanding and effectively implementing materials and lighting. Both Twinmotion and Unreal Engine provide powerful tools for controlling these aspects, though with different levels of complexity and control.
3.3.1 Basic Material Concepts
Materials consist of several key components:
- Base Color
- RGB (Red, Green, Blue) color values
- Can be solid colors or image-based textures
- Additional alpha channel (RGBA) for transparency
- Textures
- Images applied to surfaces
- Control various surface properties
- UV coordinates determine how textures map onto surfaces
- Surface Properties
- Roughness (how smooth or rough a surface appears)
- Metallic (how metal-like the surface behaves)
- Opacity (transparency level)
- Emissive (self-illumination)
3.3.2 Working with Materials in Twinmotion
Twinmotion provides an intuitive interface for material management and application.
3.3.2.1 Basic Material Application
- Using the Material Library
- Browse pre-made materials categorized by type (wood, metal, glass, etc.)
- Drag and drop materials directly onto objects
- Switch between “Apply to Surface” and “Apply to Object” modes
- Creating Materials from Images
- Navigate to Materials -> + (Standard)
- Access Properties -> Color -> Details -> Texture -> Open
- Select your image file
- Adjust scale and tiling through UV properties
3.3.2.2 Adjusting Material Properties
To fine-tune materials in Twinmotion: 1. Select the material 2. Access Properties panel 3. Adjust UV scaling for texture size 4. Use the Material Picker to sample existing materials 5. Modify basic properties like color tint and glossiness
3.3.2.3 Working with Decals
Decals are images that can be “stamped” onto surfaces, adding detail without modifying the base material:
- Access decals through Library/Objects/Decals
- Place and position on any surface
- Create custom decals:
- Modify existing decals through Properties -> Color -> Details -> Texture
- Save to User Library with new name
- Use for signage, weathering, or surface details
3.3.3 Materials in Unreal Engine
Unreal Engine offers more advanced material creation and editing capabilities through its Material Editor.
3.3.3.1 Material Editor Interface
The Material Editor uses a node-based system for creating complex materials:
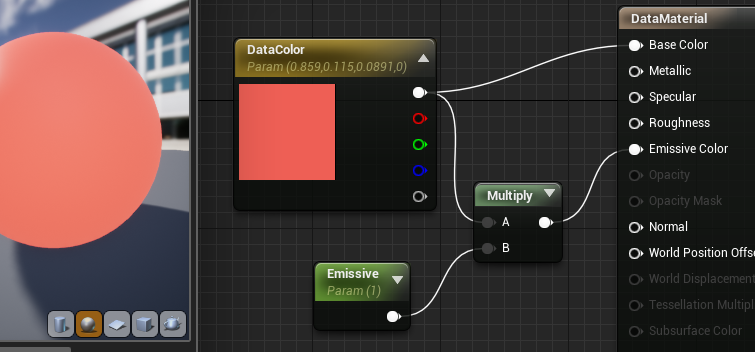
Creating New Materials
Right-click in Content Browser
Select Create Basic Asset > Material
Double-click to open Material Editor
Material Instances
- Create variations of base materials
- Adjust parameters without rebuilding shaders
- Enable runtime material modifications
3.3.3.2 Creating Materials from Images
Creating materials from images in Unreal Engine is straightforward and efficient. Here’s how you can do it:
- Import the Image as a Texture
- Drag and drop your image file (e.g., JPG, PNG) directly into the Content Browser within Unreal Engine.
- The image will be imported and appear as a Texture asset.
- Apply the Texture to an Object
- Locate the imported texture in the Content Browser.
- Simply drag the texture onto the object in your scene viewport.
- Unreal Engine will automatically create a new Material using the texture and assign it to the object.
- Reuse and Modify the Material
- The newly created material is saved alongside your assets in the Content Browser.
- You can apply this material to other objects by dragging it onto them.
- To further customize the material, double-click it to open the Material Editor, where you can adjust properties like color, roughness, metallicness, and more.
This quick process allows you to turn any image into a usable material, enhancing your objects with custom textures efficiently.
3.3.4 Lighting Systems
Lighting is crucial for creating atmosphere and depth in virtual environments. Both platforms offer different approaches to lighting.
3.3.4.1 Basic Lighting Concepts
Light interacts with surfaces in several ways: - Direct illumination from light sources - Indirect bounced light - Surface reflections and scatter - Color interactions between lights and materials
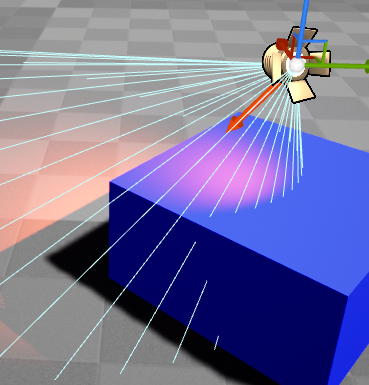
3.3.4.1.1 Simple Lighting Example: Blue Surface + Red Light = Purple
The final color displayed on the screen is a result of the interaction between the surface material properties and the lighting conditions in the scene.
3.3.4.1.2 Advanced Lighting: Light Bouncing and Global Illumination
- Indirect Lighting: Light doesn’t just illuminate surfaces directly; it also bounces off surfaces, carrying color information with it.
- Color Bleeding: A red wall illuminated by light can cast a reddish hue onto adjacent surfaces due to reflected light.
- Multiple Bounces: Each bounce can further mix colors, adding to the scene’s realism.
3.3.4.1.3 Surface Material Properties
- Diffuse Reflection: Determines how much light is scattered uniformly in all directions.
- Specular Reflection: Controls the intensity and color of sharp reflections.
- Ambient Occlusion: Simulates soft shadows in creases and cavities, affecting the perceived color.
- Subsurface Scattering: Allows light to penetrate a surface and scatter internally, influencing the color output.
By accurately simulating these interactions, rendering engines create realistic visuals where materials and lights combine to produce the final colors perceived by the viewer.
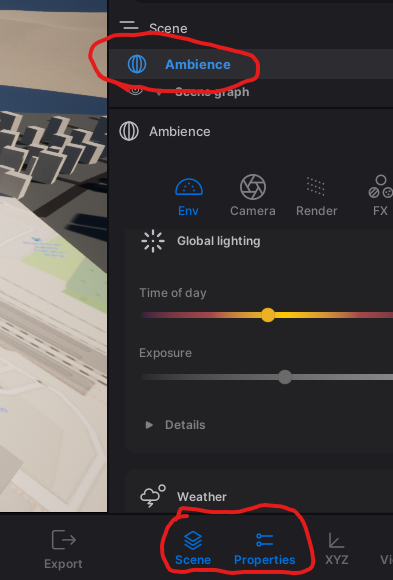
3.3.4.2 Lighting in Twinmotion
Twinmotion emphasizes ease of use with its lighting system:
- Time of Day
- Real-time sun position adjustment
- Dynamic shadows and lighting changes
- Atmospheric effects
- Artificial Lighting
- Simple light placement
- Basic intensity and color controls
- Automatic indoor/outdoor adjustment
- Tips for Twinmotion Lighting
- Artificial lights are subtle during daylight
- Switch to night view to adjust artificial lighting
- Use Post Process settings for overall exposure
3.3.4.3 Advanced Lighting in Unreal Engine
Unreal Engine provides more comprehensive lighting control, allowing developers to tailor lighting techniques to their specific needs. The engine supports both baked lighting and real-time global illumination through Lumen.
Baked Lighting vs. Lumen
Baked Lighting: This technique precomputes lighting information and stores it in lightmaps. It offers high-quality visuals with minimal runtime performance impact, making it ideal for VR applications where maintaining high frame rates is critical. However, baked lighting is static and doesn’t support dynamic lighting changes during gameplay.
Lumen: Lumen is Unreal Engine’s real-time global illumination system. It provides dynamic lighting effects without precomputed lightmaps, allowing for more interactive and responsive environments. While Lumen offers greater flexibility, it comes with increased performance costs and is currently not recommended for VR projects due to these demands.
For VR applications, baked lighting remains the preferred method to ensure optimal performance. More detailed discussions on baking and Lumen will be covered later.
Light Types
Unreal Engine offers a variety of light types to simulate different real-world lighting scenarios. The actual light sources that you can place in your environment are:
Directional Light: Mimics sunlight or moonlight, casting parallel rays in a specified direction. It illuminates all objects equally, ideal for outdoor scenes.
Point Light: Emits light uniformly in all directions from a single point, like a bare light bulb. Useful for simulating localized light sources with spherical influence.
Spot Light: Projects a cone-shaped beam of light, similar to a flashlight or stage spotlight. Allows control over beam angle and falloff for focused lighting effects.
Sky Light: Provides ambient lighting by capturing the sky’s illumination, simulating indirect light from the environment. Enhances realism with soft shadows and subtle lighting variations.
Rect Light: Emanates light from a rectangular area, producing soft, diffused illumination. Ideal for simulating light from windows, screens, or luminous panels.
In addition to the standard light sources, Unreal Engine offers functionalities to enhance the realism and flexibility of your lighting:
IES Profiles: Use Illuminating Engineering Society profiles to replicate the precise light patterns of real-world fixtures, adding authenticity with realistic light distribution.
Emissive Materials: Apply materials that emit light to create self-illuminating surfaces, ideal for neon signs, screens, or glowing elements.
Light Functions: Apply dynamic materials to lights to create effects like flickering, pulsating, or patterned illumination, adding interest with animated light behaviors.
Volumetric Effects: Enable lights to interact with particles or fog, creating atmospheric effects like light shafts or beams, and enhancing depth and mood in scenes.
Sky Atmosphere and Fog: Simulate atmospheric scattering for realistic skies, sunsets, and sunrises when used with Directional Lights, adding environmental depth to outdoor scenes.
These features allow you to design rich and immersive lighting environments, tailoring illumination to your project’s specific needs.
Light Mobility
The light mobility setting only affects baked lighting. For Lumen, all lights should be treated as movable. Static lights may be automatically ignored when using Lumen, but are key for getting nice lighting when Baking.
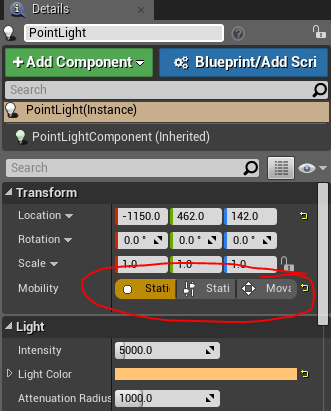
- Stationary: Partially baked, can change color/intensity
- Static: Fully baked, highest quality but fixed
- Moveable: Fully dynamic, most flexible but costly
Bake Lighting
In 5.4 you need to do the following to bake lighting, or check that it has already been done, depending on which template you are starting out with.
- Disable Lumen:
- Go to Edit > Project Settings
- Under the Rendering category, set Dynamic Global Illumination Method to None
- Set Reflections Method to None
- Ensure Lights are Static:
- Select your lights in the level and set their Mobility to Static
- You can have a few dynamic lights for interactivity, but most lights should be static.
- Build Lighting:
- Go to Build > Build Lighting Only to bake the lighting
To use GPU Lightmass for baking, you need to enable additional settings and ensure your computer meets certain requirements:
- Enable GPU Lightmass Plugin:
- Go to Edit > Plugins
- Search for GPU Lightmass and enable it
- Restart the engine to apply changes
- Turn on Virtual Texture Support:
- Go to Edit > Project Settings
- Under the Rendering category, enable Virtual Texture Support
Computer Requirements for GPU Lightmass: * A compatible GPU with sufficient VRAM (typically 8GB or more) * Updated graphics drivers * Adequate cooling and power supply to handle the increased load during the baking process
These steps and requirements ensure that GPU Lightmass can function correctly and efficiently, providing high-quality baked lighting for your project.
3.3.4.4 Post-Processing
Both platforms offer post-processing effects to enhance the final image:
- Exposure Control
- Auto-exposure adaptation
- Manual exposure adjustment
- High Dynamic Range (HDR) effects
- Color Grading
- Overall color temperature
- Contrast and saturation
- Color balance adjustments
- Additional Effects
- Bloom and lens flares
- Depth of field
- Ambient occlusion
3.3.5 Best Practices
- Material Organization
- Use clear naming conventions
- Create material libraries for reuse
- Document complex material setups
- Lighting Setup
- Start with basic lighting
- Build lighting frequently to check results
- Consider performance implications
- Use reference images for comparison
- Performance Considerations
- Limit dynamic lights
- Optimize texture sizes
- Use material instances for variations
- Balance quality and performance
By understanding and effectively implementing these material and lighting concepts, you can create more convincing and visually appealing virtual environments. Remember to start simple and gradually add complexity as needed for your specific project requirements.
3.4 Optimization for XR Experiences
Creating compelling XR experiences requires careful attention to performance optimization. Unlike traditional desktop applications, XR applications must maintain consistently high frame rates and low latency to provide a comfortable user experience. Modern VR headsets typically require a minimum of 90 frames per second, with some demanding up to 120 fps, while keeping motion-to-photon latency under 20 milliseconds. These requirements exist because any inconsistency in performance can lead to user discomfort or motion sickness.
3.4.1 Performance Considerations Across Platforms
When beginning development, it’s important to understand how performance considerations differ between Twinmotion and Unreal Engine. Twinmotion, while excellent for rapid prototyping, handles many optimization decisions automatically but can struggle with complex scenes. Large numbers of unique assets, extensive vegetation, or complex landscapes can impact performance, particularly in VR. When working in Twinmotion, focus on efficient scene organization and be selective with real-time effects like weather systems, which can significantly impact performance.
Moving from Twinmotion to Unreal Engine allows for more precise control over optimization, but requires a deeper understanding of performance factors. The transition process should begin with identifying performance-critical elements in your Twinmotion prototype, then planning how to optimize them in Unreal Engine. This might involve restructuring complex areas, optimizing materials, or implementing more efficient lighting solutions.
3.4.2 Understanding Rendering Optimization
Rendering optimization forms the cornerstone of XR performance. In Unreal Engine, the rendering pipeline must handle creating two views of the scene (one for each eye) at high resolution while maintaining target frame rates. This process can be optimized through several key techniques.
Level of Detail (LOD) systems play a crucial role in managing rendering complexity. Rather than maintaining high detail across all distances, objects can use simpler models when viewed from afar. In VR, LOD transitions need particular attention as users may notice sudden changes in detail more easily than in traditional applications. The key is to balance visual quality with performance, adjusting LOD distances and transition zones to maintain immersion without overwhelming the renderer.
Occlusion culling represents another vital optimization technique. By only rendering objects that are actually visible to the user, significant performance gains can be achieved. Unreal Engine provides tools for setting up occlusion volumes and hierarchical LOD systems, which are particularly effective in complex architectural or urban environments. When implementing occlusion culling, it’s important to test in VR specifically, as the wider field of view and head movement can affect what needs to be rendered at any given moment.
3.4.2.1 Note on Nanite
Nanite is Unreal Engine’s virtualized geometry system that allows for the real-time rendering of highly detailed assets with massive polygon counts. It eliminates the need for traditional Level of Detail (LOD) models by automatically adjusting the level of detail based on the camera’s view, providing unprecedented visual fidelity.
In general, Nanite isnot performant enough for virtual reality (VR) applications. The demanding computational requirements of Nanite can make it challenging to maintain the high frame rates necessary for comfortable VR experiences, typically 90 frames per second or higher. However, in special cases where a powerful computer is available and lower framerates may be acceptable, it is possible to use Nanite in VR.
3.4.3 Asset and Material Management
Efficient asset management dramatically impacts XR performance. While both Twinmotion and Unreal Engine handle asset loading differently, the principles remain similar. Complex meshes should balance detail with performance requirements, using appropriate polygon counts for their purpose and visibility. Texture resolution and compression settings need careful consideration, especially for standalone VR devices with limited memory.
Materials in XR applications require special attention. Complex material functions that work well on desktop may cause performance issues in VR due to the need to render them twice (once for each eye) at high frame rates. When working with materials, consider using material instances instead of unique materials where possible, and be particularly mindful of expensive operations like dynamic parameters or complex transparency effects.
The material workflow often begins in Twinmotion with simple, effective materials that establish the visual direction. When moving to Unreal Engine, these materials can be refined and optimized, taking advantage of more advanced features while maintaining performance. This might involve combining textures into atlas maps, simplifying complex material functions, or creating more efficient shader variants for VR rendering.
3.4.4 Memory and Resource Management
Memory management becomes particularly crucial in XR applications, especially for standalone VR devices. Unlike desktop applications, VR experiences must maintain high performance while managing resources for two views, often at high resolutions. This requires careful attention to asset loading and unloading, texture streaming, and resource allocation.
Unreal Engine provides powerful tools for monitoring and optimizing resource usage. The built-in profiler allows developers to analyze CPU and GPU usage patterns, identify performance bottlenecks, and monitor memory allocation in real-time. Using these tools effectively requires understanding how to interpret the data they provide and how to address the issues they reveal.
For example, when the profiler reveals that draw calls are impacting performance, you might need to combine static meshes, implement instancing for repeated elements, or adjust the level streaming volume setup. These decisions should be guided by data from the profiling tools rather than assumptions about where performance issues might lie.
3.4.5 Development Best Practices
Optimization should be considered from the beginning of development, not treated as a final polish step. When starting a new XR project, establish performance benchmarks early and test frequently on target devices. This approach helps identify potential issues before they become deeply embedded in the project structure.
Understanding your target platform’s capabilities and limitations is crucial. Different VR systems have varying performance characteristics and requirements. For example, standalone VR headsets might require more aggressive optimization of assets and effects compared to PC-tethered systems. Testing on the lowest-spec target device helps ensure a consistent experience across all platforms.
Regular testing in VR throughout development is essential. What works well on a traditional display might present unexpected issues in VR, from performance problems to usability concerns. By maintaining a regular testing schedule in the target VR environment, these issues can be identified and addressed early in development.
Remember that optimization is an ongoing process that requires regular attention and adjustment as your project evolves. By understanding these fundamental concepts and applying them thoughtfully throughout development, you can create XR experiences that maintain both visual quality and performance, providing users with comfortable and immersive experiences.
3.4.6 XR Optimization Checklist
When optimizing your XR experience, verify these key aspects:
✓ Performance Targets - [ ] Maintains 90+ fps consistently - [ ] Motion-to-photon latency under 20ms - [ ] No stuttering or frame drops in VR view
✓ Rendering Efficiency - [ ] LOD system properly configured for VR - [ ] Occlusion culling implemented - [ ] Draw calls optimized and monitored - [ ] Static meshes combined where appropriate
✓ Asset Optimization - [ ] Textures properly sized and compressed - [ ] Material complexity appropriate for VR - [ ] Mesh polygon counts optimized - [ ] Asset loading/streaming configured
✓ Testing Protocol - [ ] Regular testing in target VR device - [ ] Performance profiling data reviewed - [ ] Testing across different VR movement patterns - [ ] Testing in most complex scene areas
Use this checklist during development to ensure you’re maintaining optimal performance for your XR experience.