4 Dynamic Virtual Environments
4.1 Physics Simulations in XR
Physics simulations play a crucial role in creating immersive and realistic virtual reality (VR) experiences. By implementing accurate physics, developers can create environments that feel natural and intuitive to users, enhancing the overall sense of presence in the virtual world.
4.1.1 The Importance of Physics in VR
Physics in VR is not just about creating realistic environments; it’s about providing users with a familiar and intuitive way to interact with virtual objects. As demonstrated in early VR applications and games, the ability to pick up, move, and manipulate objects in a physically realistic manner greatly enhances the user experience.
These physics-based interactions allow users to:
- Explore and experiment freely
- Apply real-world knowledge to virtual scenarios
- Engage in rich, multi-faceted interactions
4.1.2 Testing the World Model
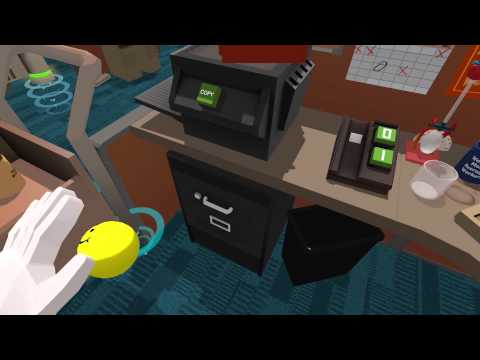
One of the most compelling aspects of physics in VR is the ability for users to test their understanding of the virtual world. This concept is beautifully illustrated in the following example:
In this scenario, users can attempt actions that aren’t explicitly programmed but should theoretically work based on real-world physics. When these interactions succeed, it significantly enhances the sense of realism and immersion.
4.1.3 Fundamental Concepts of Physics in VR
To create these realistic interactions, VR developers must implement several key physics concepts:
4.1.3.1 Force and Velocity
The foundation of physics simulation in VR revolves around forces and velocity:
- Force leads to acceleration, which in turn affects velocity
- Velocity is defined by both speed and direction
Forces can be applied through:
- Collisions between objects
- Scripted events (e.g., programmatically applying force to an object)
4.1.3.2 Types of Forces
Two primary types of forces are commonly used in VR physics:
- Impulse: A momentary push or impact (e.g., hitting an object)
- Constant Force: A continuous application of force (e.g., gravity)
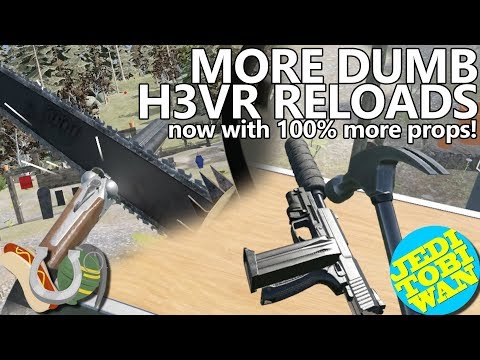
Illustration of impulse force applied to an object
Here I’m applying an impulse force—hitting it once (well, twice, but one at a time). You can also have constant forces like gravity, which continuously pushes objects downward.
4.1.3.3 Gravity and Collisions
Gravity plays a crucial role in making virtual environments feel natural. It’s typically implemented as a constant downward force on all objects. Collisions, on the other hand, allow objects to interact realistically with each other and the environment.
4.1.4 Vectors in 3D Environments
In 3D environments and game engines, vectors play a crucial role in defining direction and magnitude. They are essentially coordinates (X, Y, Z) that specify both the direction and length of an “arrow” in 3D space. This concept is particularly important when dealing with velocity and force in physics simulations.
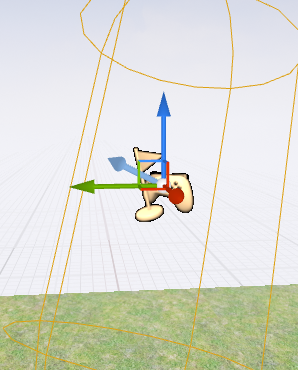
As illustrated in the image above, a vector is represented as an arrow pointing in a specific direction relative to the X, Y, and Z axes. This visual representation helps designers and developers understand and manipulate directional forces within the 3D environment.
In practical applications, such as applying an impulse to an object, vectors are used to determine both the direction and magnitude of the force. For example, in Unreal Engine, you might see something like this:
Here, we can see a large number associated with the vector.
The reason this is such a large number is because I’m not applying this force over a longer time period. I’m essentially giving the object one big hit.
This demonstrates how vectors are used to apply instantaneous forces in physics simulations, allowing for realistic interactions between objects in the virtual environment.
4.1.5 Implementing Physics in Unreal Engine
Unreal Engine provides a robust physics simulation system that can be easily integrated into VR projects. Here are some key points to consider when implementing physics in Unreal Engine:
- Physics Asset Editor: Use this tool to set up complex physics bodies for skeletal meshes.
- Physical Materials: Define how surfaces react to collisions and friction.
- Constraints: Use physics constraints to create joints and connections between objects.
- Force and Torque: Apply forces and torques to objects using Blueprints or C++.
For more detailed information on implementing physics in Unreal Engine, refer to the Unreal Engine Physics Documentation.
4.1.6 Collision Meshes in Unreal Engine
Before you can create interactive physics-based experiences, you need to understand collision meshes—the invisible geometry that determines how objects interact physically in your virtual world.
4.1.6.1 What Are Collision Meshes?
When you place a 3D object in Unreal Engine, you’re actually working with two distinct pieces of geometry:
- Visual Mesh: The detailed, textured model you see rendered on screen
- Collision Mesh: An invisible, simplified shape that the physics engine uses for calculations
These are separate because physics calculations on complex visual meshes would be computationally expensive. Using simpler collision shapes allows the physics engine to run efficiently while still providing believable interactions.
4.1.6.2 Simple vs. Complex Collision
Unreal Engine provides two main approaches to collision geometry:
Simple Collision uses basic geometric primitives:
- Box
- Sphere
- Capsule
- Auto-generated convex hulls
Simple collision is fast and works well for most objects. A crate doesn’t need a perfectly accurate collision mesh—a box-shaped collision volume will feel right to users and perform well.
Complex Collision uses the actual mesh geometry:
- More accurate representation of intricate shapes
- Significantly more expensive to calculate
- Useful for detailed architectural elements or mechanical parts where precision matters
For most physics interactions in XR—picking up objects, knocking things over, creating chain reactions—simple collision is the right choice. Reserve complex collision for situations where the extra accuracy justifies the performance cost.
4.1.6.3 Verifying Collision Meshes
A common frustration when setting up physics: you enable simulation, press Play, and nothing happens. The usual culprit? The object lacks a collision mesh entirely.
To check whether an object has collision:
- In the viewport, go to Show > Collision
- Objects with collision will display their collision geometry as colored wireframes
- Objects without collision won’t show anything
This simple visualization step can save considerable debugging time. Get in the habit of checking collision meshes early when setting up interactive objects.
4.1.6.4 Adding Collision to Imported Assets
Many 3D models imported from sources like Sketchfab or Twinmotion arrive without collision meshes. Here’s how to add collision to these objects:
- Locate the mesh asset: Right-click the object in your level outliner and select Browse to Asset
- Open the mesh editor: Double-click the asset to open it in the Static Mesh Editor
- Generate collision: In the top menu, go to Collision > Auto Convex Collision
- Apply settings: The default settings work well for most objects—click Apply
- Save: Don’t forget to save the asset (Ctrl+S or File > Save)
You can verify the collision was created by toggling collision visibility in the mesh editor viewport. You should now see a simplified hull wrapping your object.
The auto-generated collision may not be perfect for every object, but it provides a functional starting point. You can refine collision shapes manually if needed, but for physics experiments and prototyping, auto-generated collision is typically sufficient.
4.1.7 Practical Implementation: Setting Up Physics Chain Reactions
One of the most compelling uses of physics in XR is creating chain reactions—where one collision triggers a cascade of events. Think of dominoes falling, explosive sequences, or Rube Goldberg machines. Building on the physics concepts above, let’s explore how to implement these patterns. The remarkable thing about implementing these in Unreal Engine is how little setup they require. The physics engine handles all the complexity; you just need to configure the objects correctly.
4.1.7.1 The Setup Checklist
Before chain reactions will work, each object needs specific settings configured. Work through this checklist for every object that should participate in physics simulation:
Essential Settings:
- Mobility: Set to Movable (in the Details panel under Transform)
- Static and Stationary objects cannot be moved by physics
- Collision mesh exists: Verify using Show > Collision in the viewport
- If you don’t see collision geometry, add it using the workflow described above
- Simulate Physics: Enable this checkbox (in the Details panel under Physics section)
- This tells Unreal to apply physics forces and gravity to the object
- Collision Preset: Set to PhysicsActor (in the Details panel under Collision section)
- This preset ensures the object blocks other physics objects and generates hit events
- You can customize these settings, but PhysicsActor works well for most cases
- More on collision presets and settings in the next section
- Mass: The auto-calculated mass based on volume usually works well
- You can override mass manually if needed (in the Physics section)
- Unrealistic mass ratios (a tiny object that’s extremely heavy) can cause unexpected behavior
4.1.7.2 Setting Up a Simple Chain
Let’s create a basic domino chain to see these principles in action:
Place objects: Add several cube static meshes to your level, positioning them in a line with small gaps between them
Apply the checklist: For each cube, verify all five settings above are configured correctly
Spacing matters: Leave a small gap between objects—they shouldn’t be touching at rest, but should be close enough that when one falls, it contacts the next
Test positioning: You can temporarily enable Simulate Physics and press Play to test if objects fall correctly—they should all fall straight down without tipping yet
Create the initial impulse: For the first object in the chain, you need to give it a push to start the reaction:
- In the first object’s blueprint, create a simple Event BeginPlay node
- Connect it to an Add Impulse node
- Set the impulse vector (try something like X:500, Y:0, Z:0 to push it sideways)
- Or manually rotate/position the first object to be tipping toward the next
Press Play: Watch as the first object falls, strikes the second, which falls and strikes the third, and so on
The physics engine handles everything—force transfer, rotations, realistic timing. Your role is just setting up the initial conditions correctly.
4.1.7.3 Troubleshooting Common Issues
“Nothing happens when I press Play”
- Verify Simulate Physics is checked on the objects
- Confirm objects have collision meshes (use Show > Collision)
- Check that you’ve applied an initial force to the first object
“Objects fall through the floor”
- The floor needs collision too—verify it has a collision mesh
- Check the floor’s collision settings—it should block PhysicsBody objects
- If using a Landscape, collision is automatically generated
“The chain stops partway through”
- Objects might be too far apart—reduce spacing
- Mass might be mismatched—very heavy objects won’t be moved by light ones
- Initial impulse might be too weak—increase the force value
- Check each object has Simulate Physics enabled (easy to miss one)
“Can’t see collision meshes in viewport”
- Verify Show > Collision is enabled (check the Show menu carefully)
- Some objects genuinely lack collision—follow the steps above to add it
4.1.7.4 Looking Ahead
This basic setup demonstrates pure physics simulation—objects interacting through physical contact alone. Later in this chapter (Section 4.4), after we explore collision types and overlap events in Section 4.2, we’ll look at more complex triggered behaviors. For example, you could have an overlap trigger that spawns a new object mid-chain, or unlocks a constrained object to drop into the sequence. These programmed triggers extend simple physics into rich interactive mechanisms, but they build on the foundation of proper collision and physics setup covered here.
4.1.8 Conclusion
Physics simulations are essential for creating immersive and interactive VR experiences. By implementing accurate physics, developers can create virtual environments that feel natural and intuitive to users, enhancing the overall sense of presence. As VR technology continues to evolve, we can expect even more sophisticated physics simulations that blur the line between virtual and physical realities.
4.2 Collision Detection and Response
Collision detection and response are fundamental aspects of creating interactive and realistic virtual reality (VR) experiences. These systems determine how objects interact with each other in the virtual world, providing the basis for physics simulations and user interactions.
4.2.1 Understanding Collisions in Unreal Engine
In Unreal Engine, collisions are a core component of physics simulations and object interactions. They determine whether objects block each other, overlap, or ignore each other entirely.
While Unreal Engine provides presets for collision settings, it’s crucial to understand what these presets actually do to effectively implement and customize collision behavior.
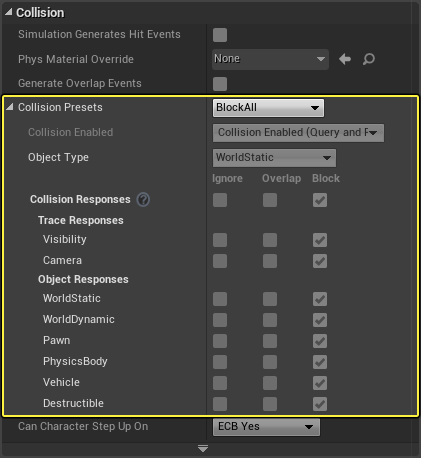
4.2.1.1 Collision Types: To Block or Not to Block
The core of collision behavior in Unreal Engine revolves around whether objects should block each other, overlap, or ignore each other entirely. This is determined by the collision settings for each object type.
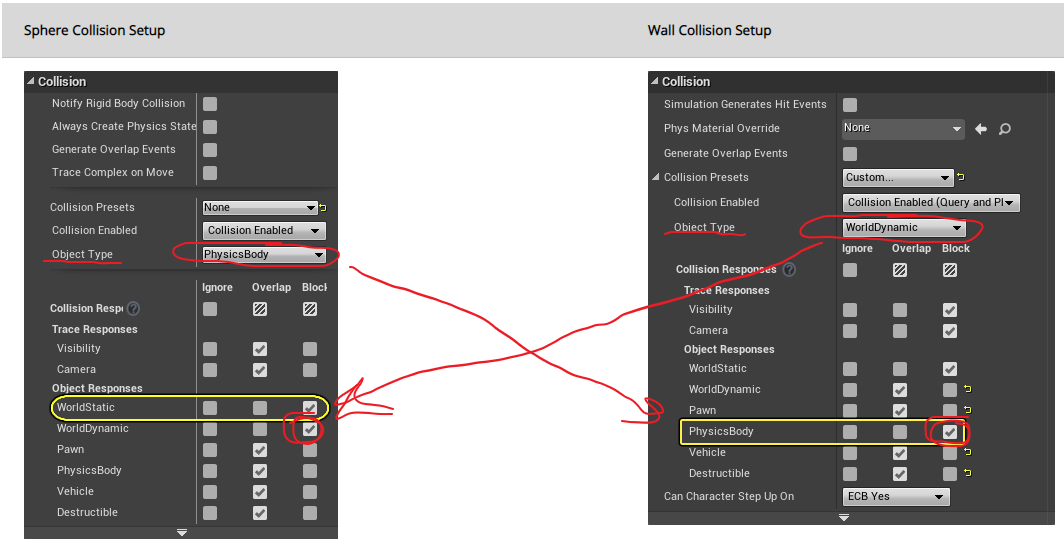
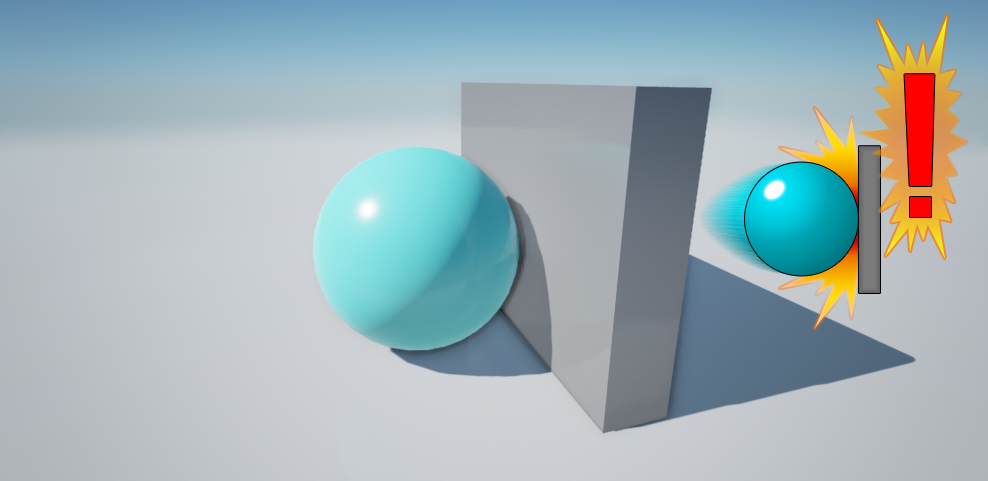
For a true collision to occur, where objects physically impact and stop each other, both objects need to be set to block each other. For example:
- A wall might be set as “WorldDynamic” (an object in the world that could move but isn’t physically simulated)
- A sphere might be set as “PhysicsBody” (an object that moves with gravity and can be pushed around)
If the wall is set to block PhysicsBody objects, and the sphere is set to block WorldDynamic objects, they will collide and block each other when they meet.
4.2.1.2 Object Types
Unreal Engine defines several object types for collision purposes:
- WorldStatic: Objects that never move (e.g., immovable walls)
- WorldDynamic: Objects with scripted movement
- PhysicsBody: Objects with physics-based movement
- Pawn: Objects under user control (typically player characters)

Additional object types can be found in the Unreal Engine documentation.
4.2.2 Implementing Collision Detection
4.2.2.1 Hit Events
Hit events are crucial for detecting and responding to collisions in your game logic. To enable hit events:
- Check the “Simulation Generates Hit Events” option in the object’s collision settings.
- Ensure the objects are set to block each other.
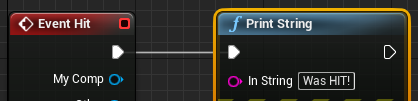
When both conditions are met, you can use Blueprint scripting to perform actions when a collision occurs. For example:
In this example, when a collision occurs, the text “it was hit” is displayed.
It’s important to note that if objects are set to overlap instead of block, hit events won’t be generated as the objects pass through each other without collision.
4.2.2.2 Overlap Events
Overlap events allow objects to intersect without physically blocking each other. To implement overlap events:
- Enable “Generate Overlap Events” for all objects involved in the interaction.
- Set collision responses appropriately (Overlap or Block).
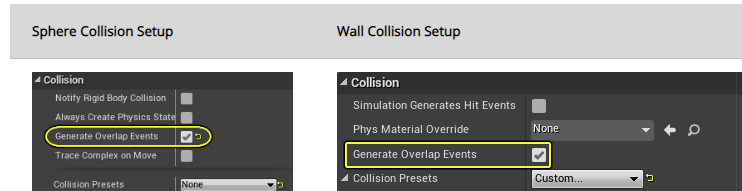
In this case, both the wall and the square need to have ‘generate overlap events’ enabled.
4.2.3 Event Handling Contexts
Unreal Engine provides multiple contexts for handling collision and overlap events:
- Level Context:
- Connect events to any Actor in the level.
- Triggered when something hits a specified Actor (whole object).
- Actor Context:
- Triggered when something hits this Actor (whole object).
- Applies to all components of the Actor.
- Component Context:
- Triggered when something hits a specific Component (part of an Actor).
- Useful for complex Actors with multiple interactive parts.
To add events to specific components:
- Right-click the component in the Unreal Editor.
- Select “Add Event”.
- Choose the appropriate event type (e.g., overlap, hit).
4.2.4 Collision Response
Once a collision or overlap is detected, you can implement various responses:
- Physical Response: Objects react based on their physical properties (mass, velocity, etc.).
- Gameplay Events: Trigger specific game events (e.g., damage, pickup items).
- Visual/Audio Feedback: Play particle effects, sounds, or animations on collision.
Implement these responses using Blueprints or C++ in Unreal Engine.
4.2.5 Best Practices for Collision Implementation
- Optimize Collision Shapes: Use simple collision shapes for performance, detailed shapes only when necessary.
- Layer Collision Channels: Organize objects into collision channels to manage interactions efficiently.
- Use Trace Functions: For complex scenarios, use trace functions to detect collisions along specific paths.
- Balance Accuracy and Performance: More accurate collisions can be computationally expensive. Find the right balance for your project.
4.2.6 Conclusion
Effective collision detection and response are crucial for creating interactive and believable VR environments. By understanding and properly implementing these systems in Unreal Engine, developers can create rich, physically accurate interactions in their VR projects.
For more detailed information, refer to the Unreal Engine Collision Documentation.
For a comprehensive video tutorial on collisions in Unreal Engine, watch this:

4.3 Blueprints and Visual Scripting
Blueprints are a crucial feature in Unreal Engine, providing a visual scripting system for game developers to create interactive functionality without diving into traditional code. This section explores the key aspects of Blueprints, their applications, and how they compare to other programming methods.
4.3.1 What are Blueprints?
Blueprints in Unreal Engine are:
- A visual scripting/programming system
- Used for Actor and Level behavior
- Employed for dynamic construction and configuration
They offer a more accessible alternative to C++ programming within the Unreal Engine environment, making it easier for developers of all skill levels to create complex interactions and behaviors.
4.3.2 Applications of Blueprints
4.3.2.1 1. Actor and Level Scripting
Blueprints can be attached to individual actors or entire levels, allowing for:
- Specific behaviors for objects within the game world
- Global scripts that affect an entire level or world
4.3.2.2 2. Dynamic Construction and Configuration
One of the powerful features of Blueprints is their ability to dynamically construct and configure objects. This is particularly useful for:
- Data-driven design
- Creating flexible, reusable components
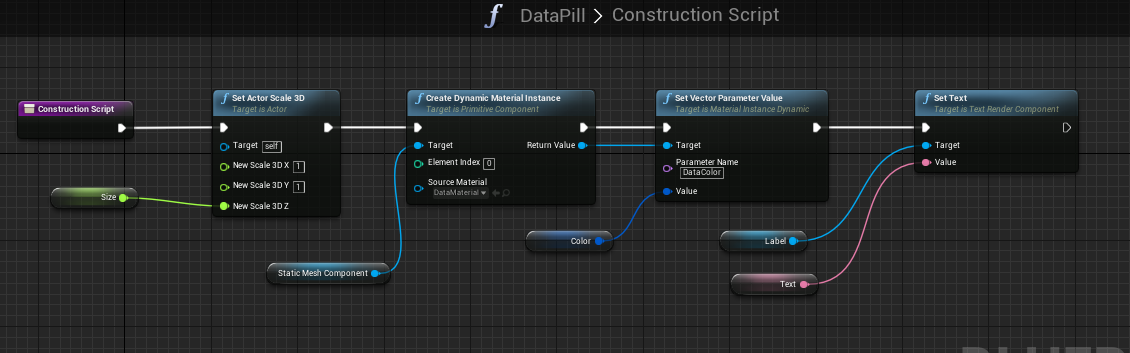
The image above demonstrates a typical Blueprint workflow. The white lines represent the execution flow, similar to lines of code in traditional programming languages. Each node represents a function or action, with arguments flowing between them.
4.3.2.3 3. Complex and Composite Actors
Blueprints excel at creating more intricate actors:
- Combining multiple components into a single actor
- Similar to “Prefabs” in Unity
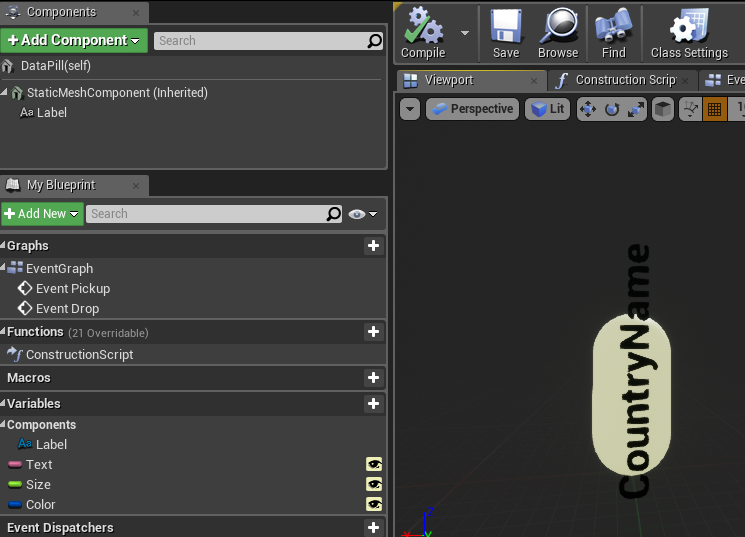
In this example, we can see a Blueprint that creates a labeled object. It combines a mesh (the “pill” shape) with a text component, allowing for easy customization through variables.
4.3.3 Blueprint Interface
When working with Blueprints, developers interact with several key elements:
- Event Graph: Where most of the scripting occurs, typically triggered by events.
- Construction Script: Defines how the actor is built or modified at runtime.
- Components List: Shows the various parts that make up the actor.
- Viewport: Provides a 3D view of the actor for visual reference.
4.3.4 Blueprints vs. Traditional Programming
To understand how Blueprints compare to more traditional programming methods, it’s helpful to see them in context. The following video provides a comparison between Blueprints in Unreal Engine and C# in Unity:
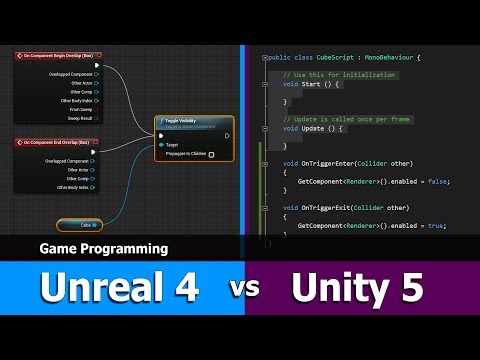
This video demonstrates how a simple event handling task is implemented using: - Blueprints in Unreal Engine - C++ in Unreal Engine - C# in Unity
It provides valuable insight into how the visual scripting of Blueprints relates to traditional coding paradigms. The video is for Unreal Engine 4 but it works very similarly in Unreal Engine 5.
4.3.5 Types of Blueprints
Unreal Engine primarily uses two types of blueprints:
Actor Blueprints: These are reusable objects that can be placed in levels. They’re ideal for creating interactive elements like doors, switches, or any object that needs specific behavior.
Level Blueprints: These are specific to a single level and are used for level-wide events and interactions. They’re great for quick prototyping and setting up level-specific logic.
4.3.6 Actor Blueprints
- Easily reusable across different levels
- Can be instantiated multiple times
- Ideal for objects with consistent behavior across the game
4.3.7 Level Blueprints
- Quick and easy setup for one specific level
- Cannot be reused in other levels
- Useful for level-specific events and interactions
4.3.8 Working with Events in Blueprints
Events are a crucial part of blueprint programming. They allow you to trigger specific actions in response to in-game occurrences. Here’s how you can work with events:
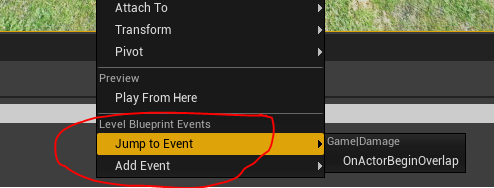
Adding Events: Right-click on an actor in the level and select “Add Event” or “Jump to Event” if an event already exists.
Level Events: These are quick to set up and ideal for prototyping. However, consider refactoring into Actor Blueprints later for better reusability.
Event Types: Common events include “Begin Overlap”, “End Overlap”, and “Hit Event”.
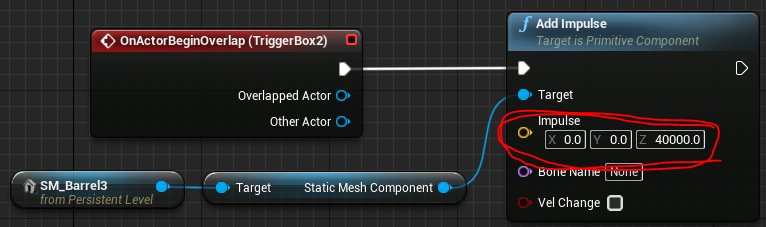
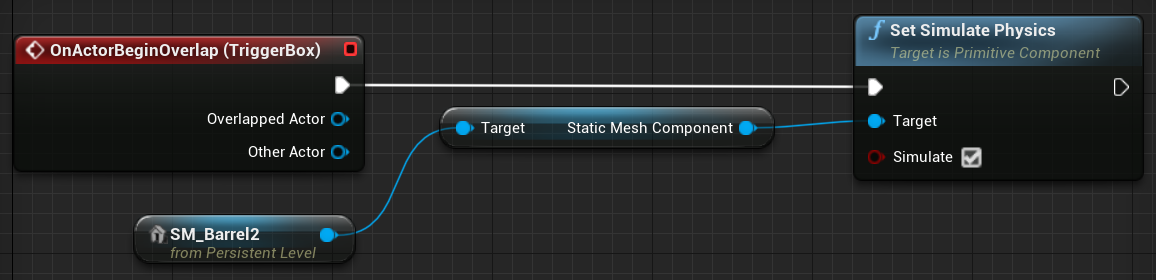
Once you’ve added an event, you can implement its functionality in the Blueprint editor. For example, you might add an impulse to an object when it overlaps with a trigger volume:
4.3.9 Blueprint Optimization
While Blueprints are powerful, they can be less efficient than C++ in performance-critical scenarios:
- Convert frequently used Blueprints to C++ for better performance
- Minimize the use of tick events in Blueprints
- Use Blueprint nativization for improved performance
4.3.10 Conclusion
Blueprints in Unreal Engine offer a powerful and flexible way to create game logic and interactivity. They bridge the gap between design and programming, allowing for rapid prototyping and complex behavior creation without the need for extensive coding knowledge. While they can be used for almost any game development task, they are particularly suited for:
- Quick iterations and prototyping
- Designer-friendly logic implementation
- Creating reusable actor templates
- Implementing level-specific behaviors
As you delve deeper into Unreal Engine development, mastering Blueprints will become an essential skill, enabling you to bring your game ideas to life efficiently and effectively.
For more detailed information on Blueprints, refer to the Unreal Engine Blueprint Documentation.
4.4 Event-Driven Programming in XR
Event-driven programming is a crucial paradigm in XR development, particularly in virtual reality (VR) applications. This approach allows developers to create responsive, interactive environments that react to user actions and changes in the virtual world.
4.4.1 Understanding Events in XR
In XR applications, events can be triggered by various sources:
- User interactions (e.g., button presses, gestures)
- Collisions between objects
- Changes in the environment (e.g., time-based events, proximity triggers)
- System-level occurrences (e.g., application state changes)
Events serve as the bridge between user actions or environmental changes and the application’s response, enabling dynamic and interactive experiences.
4.4.2 Implementing Events in Unreal Engine
Unreal Engine provides a robust system for handling events, particularly through its Blueprint visual scripting system.
4.4.2.1 Types of Events
- Input Events: Triggered by user input (e.g., button presses, motion controller movements)
- Collision Events: Occur when objects collide or overlap
- Timer Events: Triggered after a specified time interval
- Custom Events: Developer-defined events for specific gameplay mechanics
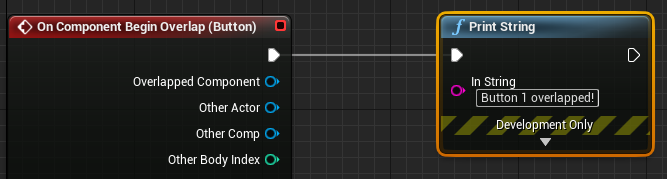
4.4.2.2 Event Handling in Blueprints
In Unreal Engine’s Blueprint system, events are represented as nodes with execution pins. Here’s an example of how events are structured:
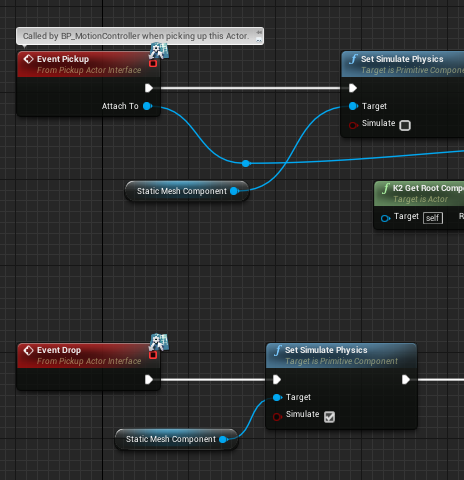
You can also create custom events with specific functions. We’ll explore this further when we look at implementing functionality for actors that can be picked up and dropped, for instance.
4.4.2.3 Adding Events to Actors
To add events to actors in your level:
- Right-click on an actor in the level
- Select “Add Event” or “Jump to Event” if an event already exists
- Choose the type of event you want to add (e.g., Begin Overlap, Hit Event)
4.4.3 XR-Specific Event Handling
In XR applications, certain types of events are particularly important:
4.4.3.1 1. Motion Controller Events
These events are triggered by actions performed with VR controllers. For example:
Event Motion Controller Thumb Left X
Event Motion Controller Thumb Left Y
Event Motion Controller Trigger
These events allow you to respond to user input through VR controllers, enabling interactions like grabbing objects or activating UI elements.
4.4.3.2 2. Head Movement Events
Tracking the user’s head movement is crucial in VR. You can use events to respond to changes in the user’s viewpoint:
Event Tick
-> Break HMDRotation
-> Compare Rotation
This setup allows you to detect when the user looks in a certain direction, which can be used to trigger interactions or change the environment.
4.4.3.3 3. Collision and Overlap Events in VR
In VR, collision and overlap events are essential for creating interactive environments. For example:
In this case, both the wall and the square need to have ‘generate overlap events’ enabled.
These events can be used to trigger actions when the user’s hand (represented by a motion controller) interacts with virtual objects.
4.4.4 Custom Events and Blueprint Functions
Custom events and Blueprint functions are essential tools for creating complex interactions and reusable logic in Unreal Engine. They allow developers to encapsulate functionality and trigger specific actions within their Blueprints.
4.4.4.1 Custom Events
Custom events are user-defined events that can be called to execute a series of actions. They are useful for organizing and reusing logic within a Blueprint.
Creating a Custom Event: 1. Open your Blueprint and navigate to the Event Graph. 2. Right-click and select “Add Custom Event.” 3. Name your event (e.g., “Check Object Placement”). 4. Implement the logic you want to execute when the event is called.
Example:
Custom Event "CheckPuzzleSolution"
-> Get All Actors of Class (PuzzlePiece)
-> For Each Loop
   -> Check Piece Position
   -> Branch (If Correct)
      -> Increment Correct Pieces Counter
-> Branch (If All Pieces Correct)
   -> Update Text component "Puzzle Solved"
   -> Trigger Puzzle Solved Event
4.4.4.2 Blueprint Functions
Blueprint functions are similar to custom events but are designed to return a value or perform a specific calculation. They help in creating modular and reusable code.
Creating a Blueprint Function: 1. Open your Blueprint and navigate to the Functions section. 2. Click the “+” button to create a new function. 3. Name your function and define its inputs and outputs. 4. Implement the logic within the function.
Example:
Function "Calculate Distance"
Inputs: Vector A, Vector B
Outputs: Float Distance
-> Subtract Vectors (A - B)
-> Vector Length
-> Return Distance
By using custom events and Blueprint functions, you can create more organized, modular, and reusable Blueprints, enhancing the overall efficiency and maintainability of your projects.
4.4.5 Simple Animation in Unreal
Unreal Engine provides extensive animation systems—skeletal animation for characters, animation blueprints for complex state machines, control rigs for procedural animation, and more. This section focuses on a much simpler subset: animating objects like doors, platforms, and interactive mechanisms. For these cases, two tools are particularly useful: Timeline and Level Sequencer.
4.4.5.1 Timeline Component
Timeline is the primary tool for script-driven animations within Blueprint actors. It provides a visual keyframe editor that handles smooth interpolation automatically, eliminating the need for manual lerp calculations or tick-based updates.
Key Features:
- Visual keyframe editor embedded directly in Blueprint
- Multiple track types: Float, Vector, Event, Color, Linear Color
- Built-in playback controls: Play, Stop, Reverse, Play From Start, Reverse From End
- Easing curves: Linear, ease in/out, or custom curves for natural motion
- Update output: Fires every frame during playback, providing interpolated values
When to Use Timeline:
- Simple object movement (doors, platforms, drawers)
- Gameplay-triggered animations (respond to player interaction)
- Quick prototyping of animated behaviors
- Single-object animations where logic lives in the Blueprint
Timeline is fast to set up and keeps animation logic close to the Blueprint that uses it. For a sliding door triggered by player proximity, Timeline provides everything you need.
4.4.5.2 Level Sequencer
Level Sequencer is Unreal’s cinematic animation tool, but it can also be used for simple object animations similar to Timeline. Sequencer provides a more powerful editing environment with better support for complex timing and multi-object coordination.
Key Features:
- Multi-object animation: Coordinate multiple actors in a single sequence
- Rich track types: Transform, materials, visibility, events, and more
- Visual timeline editor: Easier to adjust timing and preview animation
- Reusability: One sequence can be triggered from multiple Blueprints
- Blueprint integration: Use Level Sequence Player component to trigger sequences
When to Use Sequencer:
- Animations that might grow more complex later
- Multi-object coordinated movement
- When you want powerful visual editing tools
- Reusable animations across multiple actors
Sequencer has more overhead for simple cases, but offers flexibility for future expansion. If you think your door animation might later include lighting changes, camera movements, or coordinated sounds, starting with Sequencer saves refactoring later.
4.4.5.3 Choosing Between Timeline and Sequencer
For most simple cases—a door opening, a platform moving—either tool works. Timeline is quicker to set up and keeps everything in one Blueprint. Sequencer provides more editing power and flexibility. Both can be triggered from the same Blueprint events and controlled with similar logic.
The practical example below uses Timeline, as it represents the most common workflow for simple interactive animations. The same result can be achieved with Sequencer using a Level Sequence asset and Level Sequence Player component instead.
4.4.6 Practical Implementation: Animated Sliding Door
Let’s create a sliding door that opens when the player approaches and closes when they leave—a common pattern for interactive environments. This example uses Timeline to handle the smooth animation between open and closed positions.
This example follows the workflow demonstrated in the video above, adapted for XR applications.
4.4.6.1 Setting Up the Blueprint Structure
Create Blueprint Actor: In the Content Browser, create a new Blueprint Class derived from Actor. Name it “SlidingDoor.”
Add Static Mesh components:
- Add a Static Mesh component for the door piece that will move (name it “DoorPiece”)
- Add additional Static Mesh components for the door frame (stationary parts)
- Set the root component to something stationary (like the frame) or a Scene component
Add trigger volume: Add a Box Collision component (name it “TriggerVolume”). This invisible box will detect when the player enters and exits.
Position and scale: In the viewport, position the door frame and door piece to form a complete door. Scale the Box Collision to cover the area in front of the door where you want it to trigger.
4.4.6.2 Creating the Timeline Animation
Add Timeline node: In the Event Graph, right-click and add a Timeline node. Name it “DoorSlide.”
Open Timeline editor: Double-click the Timeline node to open the Timeline editor panel.
Create Float track: Click the “+ Track” button and select “Add Float Track.” Name it “SlideAmount.”
Add keyframes:
- At time 0.0 seconds: Right-click the timeline and “Add Key.” Set value to 0.0 (door closed)
- At time 1.0 seconds: Add another key at 1.0s with value 1.0 (door open)
- These values represent the animation progress: 0 = closed, 1 = fully open
Set animation length: Adjust the timeline length (default 1.0 seconds works well for a quick slide; use 2.0 for slower movement)
Optional - adjust curve: Select the keyframes and change the curve type (Auto, Linear, Curve) for different easing feels
4.4.6.3 Connecting the Movement Logic
Now connect the Timeline’s output to actually move the door:
Get Timeline Update output: From the Timeline node, drag out the Update execution pin. This fires every frame while the Timeline plays.
Add Set Relative Location node: Add a “Set Relative Location” node and set the target to your “DoorPiece” component.
Split the Vector: Right-click the “New Location” pin on Set Relative Location and select “Split Struct Pin.” This exposes X, Y, and Z separately.
Add Multiply node: From the Timeline’s “SlideAmount” data output (the float track), drag out and add a “Multiply (float)” node. Set the multiplier value to your desired movement distance (e.g., 200 for 200cm slide upward).
Connect to movement axis: Connect the Multiply result to the Z pin of the split vector (for vertical slide). Use X or Y for horizontal sliding.
Preserve other axes: Leave the other vector components (X and Y if sliding on Z) unconnected—they’ll maintain the door’s starting position on those axes.
The logic flow: Timeline outputs 0-1 → Multiply by 200 → Results in 0-200 range → Applied to Z position → Door slides 200cm up.
4.4.6.4 Adding Trigger Events
Connect the trigger volume to control the Timeline:
Select trigger volume component: In the Components panel, select “TriggerVolume.”
Add overlap event: Right-click and select “Add Event → Add On Component Begin Overlap.”
Add Cast to Character: From the “Other Actor” pin of the overlap event, add a “Cast to Character” node. This ensures only the player triggers the door, not other objects.
Connect to Timeline: From the successful cast output (the execution pin below the Character pin), connect to the Timeline’s Play From Start input.
Add end overlap event: Right-click TriggerVolume again and add “Add On Component End Overlap.”
Add second Cast: Add another “Cast to Character” from this event’s “Other Actor” pin.
Connect to Reverse: From the successful cast, connect to the Timeline’s Reverse From End input.
This creates the behavior: player enters trigger → door slides open; player exits trigger → door slides closed.
4.4.6.5 Testing Your Door
Place door instance in level: Drag your SlidingDoor Blueprint into the level.
Adjust trigger volume: Select the instance, and in the viewport, scale the Box Collision component to cover the desired trigger area in front of the door.
Press Play: Walk toward the door. It should slide open as you approach and close as you move away.
4.4.6.6 Common Variations
Rotating door (hinged door): Instead of Set Relative Location, use Set Relative Rotation. Connect the multiply result to the Z component of the split rotation vector. This rotates the door around its pivot point.
Horizontal slide: Connect the multiply result to the X or Y component of the split location vector instead of Z.
Multiple moving pieces: Add multiple Set Relative Location nodes (one per moving component) connected to the same Timeline Update output.
One-way door: Remove the End Overlap event entirely. The door opens but stays open.
Delay before closing: After the Timeline finishes playing forward, add a Delay node before calling Reverse.
4.4.6.7 Using Sequencer Instead
To achieve the same result with Sequencer:
- Create a Level Sequence asset in the Content Browser
- Add your door actor to the Sequencer and keyframe its Transform track
- In your Blueprint, add a Level Sequence Player component
- Replace the Timeline Play/Reverse calls with Level Sequence Player Play and Reverse nodes
- The trigger logic remains identical
Sequencer provides more flexibility for adjusting the animation visually without reopening the Blueprint.
4.4.6.8 Troubleshooting
“Door doesn’t move when triggered”
- Verify the Timeline is playing: Add a Print String after “Play From Start” to confirm execution reaches it
- Check the Update pin is connected to Set Relative Location
- Ensure you’re modifying the correct component (DoorPiece, not the root or frame)
“Door moves in wrong direction or axis”
- Check which vector component (X, Y, or Z) you’re driving with the multiply output
- Try inverting the multiply value (e.g., use -200 instead of 200) to reverse direction
“Door doesn’t trigger”
- Verify “Generate Overlap Events” is enabled on the Box Collision component
- Check the Box Collision’s collision preset (should overlap Pawn)
- Confirm the Cast to Character succeeds (the player is a Character)
“Door moves too far or not far enough”
- Adjust the multiply value: higher = more movement, lower = less movement
- The multiply value is in Unreal units (centimeters)
“Animation feels too fast/slow or jerky”
- Change the Timeline length (longer = slower animation)
- Adjust the curve type on keyframes (ease in/out for smoother motion)
“Door jumps to wrong position or animates from wrong starting point”
- This often happens when the door mesh has a non-zero initial relative position and your Timeline animation assumes it starts from zero
- Solution: Use a Scene Component wrapper pattern:
- Add an empty Scene Component as the parent of your door mesh
- Zero out the door mesh’s relative position (set it to 0,0,0) first
- Now position the Scene Component where you want the door in the level—you’ll see the door mesh move with it, providing visual feedback
- Your Timeline animation now works from zero, and the Scene Component provides the world-space offset
- This pattern keeps animation logic simple while allowing flexible positioning
4.4.7 Blueprint Variables and References
The door example above demonstrates Timeline animation and overlap events, but to create truly interactive systems, you need a way to store and manage state. Does the door stay locked until a switch is pressed? Has the player already triggered this checkpoint? Which specific door should this button control? These questions require variables and references—fundamental concepts that enable Blueprints to remember information and communicate with each other.
4.4.7.1 What Are Variables?
A variable is a named container that stores a piece of information during gameplay. Think of it as a labeled box where you can put data, check what’s inside, and change the contents as needed.
Reading a variable means checking its current value—“Is the door locked?” Writing (or setting) a variable means changing its value—“Set the door to unlocked.”
Variables in Blueprints persist while the game runs. If you set a door to unlocked, it stays unlocked until something explicitly locks it again or the level reloads.
4.4.7.2 Common Variable Types
Blueprint variables have specific types that determine what kind of information they can hold:
- Boolean: True or false. Perfect for on/off states like “IsDoorLocked” or “HasPlayerEnteredArea.”
- Integer: Whole numbers (0, 1, 2, 100, -5). Used for counts like “CurrentCheckpoint” or “EnemiesDefeated.”
- Float: Numbers with decimal points (3.14, 0.5, 100.0). Used for health values, timers, or any measurement needing precision.
- String: Text like “Welcome Player” or “KeyCardBlue.” Useful for names, messages, or identifiers.
- Vector: 3D position (X, Y, Z coordinates). Stores locations in 3D space.
- Rotator: 3D rotation (Pitch, Yaw, Roll angles). Stores orientations.
For interactive triggers and state management, Boolean and Integer types are most common. A pressure plate might use a Boolean “IsActivated,” while a multi-step puzzle might use an Integer “CurrentStep.”
4.4.7.3 Creating Variables in Blueprints
Variables are created in the My Blueprint panel:
- In the Blueprint editor, find the Variables section in the My Blueprint panel (typically left side)
- Click the + Variable button
- Name your variable descriptively (e.g., “IsDoorLocked” not “Var1”)
- Select the variable type in the Details panel (Boolean, Integer, etc.)
- Set the default value—the initial state when the Blueprint spawns
Once created, the variable appears in your variables list and can be dragged into the Event Graph.
4.4.7.4 Using Variables in Event Graphs
To use a variable in your Blueprint logic, drag it from the Variables list into the Event Graph. You’ll be prompted to choose:
- Get: Read the current value without changing it. Use this to check state in conditions.
- Set: Change the value. Use this to update state when events occur.
A Get node outputs the variable’s current value—you might connect it to a Branch node’s condition to check “if door is locked.” A Set node has an input where you specify the new value—you might connect this to an overlap event to mark “checkpoint reached = true.”
Variables are what make your interactive systems remember state between events. Without variables, the door wouldn’t know it was unlocked, and the switch wouldn’t know it had been pressed.
4.4.7.5 What Are References?
Variables let one Blueprint remember its own state, but what if a floor switch needs to unlock a door? That requires a reference—a variable whose type is another Blueprint class. This allows one Blueprint to access and modify another Blueprint’s variables or call its functions.
In the upcoming example, you’ll create a switch Blueprint that holds a reference to a specific door Blueprint. When the player steps on the switch, it uses that reference to tell the door “set your IsDoorLocked variable to false.”
References are set up similarly to other variables, but their type is a Blueprint class (like “Door” or “Light”) instead of Boolean or Integer. Once you place both Blueprints in your level, you manually assign which specific door instance this switch controls via the Details panel.
4.4.7.6 Public vs. Private Variables
By default, variables are private—only the Blueprint that owns them can access them. To allow other Blueprints to read or change a variable through a reference, make it public by clicking the eye icon next to the variable in the My Blueprint panel. The eye icon turning solid indicates the variable is now Instance Editable, meaning:
- Other Blueprints with a reference can access it
- You can set its value per-instance in the Details panel when placing the Blueprint in a level
The upcoming practical example demonstrates all these concepts in action—creating variables, using Get/Set nodes, establishing references between Blueprints, and building interactive trigger systems that maintain state.
4.4.8 Practical Implementation: Switch Controlling Door
Building on the animated door from the previous section, let’s add interactivity through variables and references. You’ll create a floor switch that unlocks the door when stepped on—a fundamental pattern for triggers, pressure plates, buttons, and any mechanism where one object controls another’s state.
This example extends the door Blueprint from the previous section and introduces a new switch Blueprint that controls it.
4.4.8.1 Modifying the Door Blueprint
First, add state management to your existing door:
- Add IsDoorLocked variable:
- Open your Door Blueprint from the previous example
- In the My Blueprint panel, click + Variable
- Name it IsDoorLocked
- In the Details panel, set variable type to Boolean
- Set the default value to True (door starts locked)
- Click the eye icon to make it public (Instance Editable)
- Add locking logic with Branch nodes:
- In the Event Graph, find where your overlap events trigger the Timeline (Play From Start)
- Before the Timeline node, add a Branch node
- Drag the IsDoorLocked variable into the graph and choose Get
- Connect the Get node’s output to the Branch’s Condition input
- Connect the False branch output to the Timeline’s Play From Start (door opens only if unlocked)
- The True branch does nothing (door stays closed if locked)
- Repeat for the close logic on End Overlap
This conditional check ensures the Timeline only plays when the door is unlocked. Without it, overlap events would always trigger the door regardless of lock state.
- Optional - Add status display:
- Add a Text Render component to your door for visual feedback
- In Event Graph, use Event Tick with a Branch to check IsDoorLocked
- If True: Set Text to “Locked”
- If False: Set Text to “Unlocked”
- This constantly updates the display based on current state
Note: Event Tick runs every frame and can impact performance. For a production project, update the text only when the lock state changes rather than every frame. For learning purposes, this approach clearly demonstrates continuous state checking.
4.4.8.2 Creating the Switch Blueprint
Now create the floor switch that controls the door:
- Create new Blueprint Actor:
- In Content Browser, create Blueprint Class → Actor
- Name it FloorSwitch
- Build visual components:
- Add Static Mesh components for the switch platform (e.g., cylinders for base and button)
- Add a Box Collision component named SwitchCollider
- Position and scale the collision to cover the switch area
- Add door reference variable:
- Click + Variable, name it MyDoor
- In Details panel, set variable type to object reference → Door (your door Blueprint class)
- Make it public (click eye icon) so you can assign specific door instances
- Add switch trigger logic:
- Select SwitchCollider component
- Right-click → Add Event → On Component Begin Overlap
- From the overlap event, add a Cast to Character node to verify it’s the player
- From successful cast, drag out MyDoor reference and choose Get
- From the MyDoor output pin, search for “Set Is Door Locked”
- Connect the execution flow and set the Boolean value to False (unlock)
- Optional: Add Play Sound at Location for audio feedback
The key here is the Set node—it modifies a variable on a different Blueprint through the reference. The switch reaches into the door’s variables and changes its locked state.
4.4.8.3 Connecting Switch to Door in the Level
The reference variable creates the connection, but you must assign which door instance:
- Place your Door Blueprint in the level
- Place your FloorSwitch Blueprint in front of the door
- Select the FloorSwitch instance
- In the Details panel, find the MyDoor variable
- Click the dropdown and select the specific Door instance from your level
This manual assignment lets you create multiple switch-door pairs with different connections. One switch unlocks Door A, another unlocks Door B—the Blueprint logic is reusable, the specific relationships are configured per-instance.
4.4.8.4 Testing Your Switch
- Press Play
- Walk toward the door—it should remain closed (locked)
- Step on the switch—you should hear the click sound
- Return to the door—it should now open when you approach (unlocked)
4.4.8.5 Common Variations
Temporary unlock: Add a Timer after setting IsDoorLocked to False. After 5 seconds, set it back to True.
Toggle switch: Instead of setting to False, add a Get → NOT Boolean → Set pattern to invert the current state each time.
Multiple switches required: Add an Integer “SwitchesActivated” to the door. Each switch increments it. Door only unlocks when SwitchesActivated >= RequiredCount.
One-time trigger: Add a Boolean “HasBeenActivated” to the switch. Check it in the overlap event—if True, do nothing. If False, unlock door and set HasBeenActivated to True.
4.4.8.6 Troubleshooting
“Switch doesn’t unlock door”
- Verify MyDoor reference is assigned in the Details panel (not None)
- Check that IsDoorLocked is public (eye icon solid) on the door Blueprint
- Confirm the Cast to Character succeeds—print a debug string to verify
“Door unlocks but won’t open”
- Check the Branch logic in the door—False branch should lead to Timeline Play
- Verify IsDoorLocked is actually set to False by the switch (add a Print String showing the value)
“Switch triggers for objects other than player”
- Ensure you’re using Cast to Character and only continuing execution on successful cast
- Check collision settings on SwitchCollider (should overlap Pawn/Character)
“Multiple switches all control the same door”
- This is correct if you assigned the same door reference to all switches
- To have switches control different doors, assign different door instances to each switch’s MyDoor variable
This pattern—trigger volume, Boolean variable, Branch node, Blueprint reference—forms the foundation for most interactive mechanisms in Unreal. Pressure plates, buttons, levers, and puzzle elements all build on these concepts.
4.5 From Physics to Interaction: Looking Ahead
The foundational concepts of physics simulations, collision detection, and event-driven programming we’ve explored in this chapter form the basis for creating rich, interactive experiences in XR. In this final section, we’ll look ahead to how these concepts enable more complex interactions and mechanisms, which we’ll explore in depth in later chapters.
4.5.1 Bridging Physics and Interaction
The physical properties and behaviors we’ve discussed don’t exist in isolation; they serve as the building blocks for user interactions in XR environments. For example:
- Physics simulations allow objects to behave realistically when manipulated
- Collision detection enables precise interaction between the user and virtual objects
- Event-driven programming ties user actions to object responses
These elements combine to create a sense of presence and immersion that is crucial to effective XR experiences.
4.5.2 The Power of Grabbing in VR
One of the most fundamental interactions in VR is the ability to grab and manipulate objects. While we’ll delve into implementation details in a later chapter, it’s worth noting how this interaction ties together the concepts we’ve covered:
- Physics determines how objects move when grabbed and released
- Collision detection recognizes when a user’s hand is near a grabbable object
- Events trigger the grabbing action and subsequent object behavior
Grabbing mechanics demonstrate the power of combining these elements to create intuitive, immersive interactions that mirror real-world experiences.
4.5.3 Complex Mechanisms and Environmental Interactions
Looking ahead, we’ll explore how to create more complex interactive systems:
- Levers and Buttons: Using physics and events to create interactive control mechanisms
- Dynamic Environments: Creating responsive environments that change based on user actions
- Multi-step Interactions: Designing puzzles or tasks that require a series of physics-based interactions
These advanced interactions build directly on the foundations laid in this chapter.
4.5.4 The Role of AI in Interactive Environments
Artificial intelligence can significantly enhance the interactivity of XR environments through AI-controlled characters, intelligent objects, and dynamic environments that evolve based on physics simulations and AI decision-making.
For comprehensive coverage of AI applications in XR environments, including intelligent characters, adaptive behaviors, and dynamic content generation, see Chapter 8.
4.5.5 Looking Forward
In the coming chapters, we’ll delve deeper into:
- Specific interaction techniques like grabbing, pointing, and locomotion
- User interface design for XR environments
- Advanced interaction paradigms that build on physics and events
- The integration of AI to create more dynamic and responsive experiences
Each of these topics will build upon the fundamental concepts of physics, collisions, and events that we’ve covered in this chapter.
4.5.6 Conclusion
The physics simulations, collision systems, and event-driven programming we’ve explored form the foundation of interactive XR environments. As we move forward, we’ll see how these elements combine with more advanced concepts to create truly immersive and engaging XR experiences. The journey from basic physics to complex, intelligent interactions is what makes XR development so exciting and full of potential.
4.6 Further Reading
Chapter 4 explored the creation of dynamic and interactive virtual environments, focusing on physics simulations, collision detection, and event-driven programming in XR. We delved into how these elements contribute to creating more realistic and engaging virtual worlds. To further your understanding of these topics and their practical applications, consider the following resources:
4.6.1 Additional Resources
- Unreal Engine Physics Documentation: https://dev.epicgames.com/documentation/en-us/unreal-engine/physics-in-unreal-engine
- Detailed guides on implementing physics in Unreal Engine.