---
author:
- Daniel Sjölie
authors:
- Daniel Sjölie
date: 2025-07-31
title: Immersive Futures
toc-title: Table of contents
---
# Preface {#preface .unnumbered}
Welcome to "Immersive Futures," a comprehensive guide to immersive
technologies and their applications. This book explores the world of
Extended Reality (XR), including Virtual Reality (VR), Augmented Reality
(AR), and Mixed Reality (MR), and examines how these technologies are
reshaping our interaction with digital content.
## What This Book Covers
This book provides a thorough exploration of immersive technologies,
covering:
- The fundamentals of immersive media and the concept of presence
- The reality-virtuality continuum and various XR technologies
- Methods for creating and designing virtual environments
- Dynamic simulations and interactive virtual worlds
- Spatial interaction design principles
- Applications of XR across various industries
- Reality capture techniques
- The integration of artificial intelligence with XR technologies
Whether you're a student, researcher, developer, or industry
professional, this book offers valuable insights into the current state
and future potential of immersive technologies.
## How to Use This Book
Each chapter builds upon concepts introduced in previous sections, but
they can also be read independently based on your interests. Practical
examples, case studies, and references to current research are included
throughout to provide context and deepen understanding.
This book serves both as a textbook for courses on immersive
technologies and as a reference for professionals working in XR-related
fields.
# Updates {#updates .unnumbered}
This section tracks significant changes and additions made to *Immersive
Futures* to keep the content current with rapidly evolving XR
technologies and teaching practices.
## November 2025: Practical Implementation Additions
Based on comprehensive feedback from university teaching use, new
practical implementation sections were added to
[Section 4](#sec-dynamic-environments){.quarto-xref} and
[Section 5](#sec-spatial-interaction){.quarto-xref} to provide concrete,
testable Unreal Engine Blueprint workflows.
**Chapter 4: Dynamic Virtual Environments**
- **Collision Meshes**: New subsection explaining collision mesh
concepts, simple vs. complex collision, and workflow for adding
collision to imported assets from sources like Twinmotion. Addresses
common student issue where physics "doesn't work" due to missing
collision meshes.
- **Simple Animation in Unreal**: New section introducing Timeline
component and Level Sequencer for animating interactive objects.
Includes YouTube tutorial showing sliding door implementation with
Timeline keyframes, overlap events, and Blueprint node connections.
- **Blueprint Variables and References**: New section introducing
variable fundamentals (Boolean, Integer, Float types) with practical
switch-controlling-door example. Includes YouTube tutorial
demonstrating variable creation, Get/Set nodes, public vs. private
variables, and Blueprint-to-Blueprint communication through
references.
**Chapter 5: Spatial Interaction Design**
- **Constrained Manipulation**: New major section on levers, switches,
and sliders using manual hand tracking approach. Covers Event
Tick-based continuous tracking, constraint mathematics, and
step-by-step rotational lever implementation. Includes links to
complete Blueprint examples for rotational and linear controls.
**Impact**: Over 750 lines of new practical content added, focusing
exclusively on Unreal Engine workflows. All sections include
troubleshooting guidance, common variations, and align with actual
course exercises. Two YouTube tutorials integrated with embedded players
and QR codes.
## 2025: New Content and Structural Additions
**Chapter 9: Societal Impact and Ethical Design**
New capstone chapter (see [Section 10](#sec-ethics){.quarto-xref})
consolidating previously fragmented ethics discussions:
- **Psychological Impact & Embodiment**: Virtual embodiment
implications, body ownership manipulation
- **Privacy, Consent & Data Governance**: GDPR considerations,
biometric data concerns, consent protocols
- **Bias, Fairness & Representation**: AI bias, stereotypes in
generated content, inclusion
- **Accessibility & Inclusive Design**: Physical and cognitive
accessibility for XR experiences
- **Emerging Concerns**: Deepfakes, BCIs, emotional AI, digital rights
- **Ethical Framework**: Practical guidance for XR developers
**Immersive Learning Theory**
New subsection bridging
[Section 1](#sec-introduction-to-immersive-media){.quarto-xref} presence
concepts with educational applications:
- Experiential Learning (Kolb's Cycle) and how VR uniquely enables it
- Situated Cognition and providing authentic learning contexts
- Cognitive Load Theory and VR's dual nature (reducing/increasing
load)
- Explicit cross-references to theoretical foundations
**AI Collaboration Documentation**
Guidance on documenting generative AI use in XR development, covered in
[Section 8](#sec-artificial-intelligence-in-xr){.quarto-xref} and
[Section 10](#sec-ethics){.quarto-xref}:
- Practical methods: conversation logs, iteration tracking, decision
documentation
- "Thought partner" vs. "thought substitute" distinction
- Professional practice framing (not just academic compliance)
- Cross-referenced between technical and ethical contexts
**Appendix: 2025 Technology Updates**
Tracking document for emerging technologies and hardware not yet
integrated into main chapters.
## 2025: Hardware and Technology Updates
**Android XR and Gemini Integration**
Updated coverage in [Section 2](#sec-xr-technologies){.quarto-xref}
emphasizing Google's Gemini AI as core component of Android XR
ecosystem, highlighting AI-native approach to XR platform design.
**Bigscreen Beyond Coverage**
Clarified coverage in [Section 2](#sec-xr-technologies){.quarto-xref} of
Bigscreen Beyond and Beyond 2, noting the high-end PCVR positioning and
custom-fit approach.
**XR Headset Landscape**
General updates in [Section 2](#sec-xr-technologies){.quarto-xref}
reflecting 2025 hardware landscape, including discontinued products and
new entrants.
## 2025: Narrative and Style Improvements
**First-Person Voice Revision**
Systematic revision removing third-person self-references throughout the
book. Changed "The author" or "we" to direct first-person "I" where
discussing personal experiences, research, or teaching approaches.
Maintains appropriate academic tone while improving clarity and reader
connection.
**Lecture Quote Integration**
Refined integration of lecture-based content, converting standalone
blockquotes into narrative flow. Preserves authentic teaching voice
while improving readability and maintaining context.
**Section Reference Updates**
Comprehensive cross-reference validation and updates across chapters,
improving navigation between related topics (gesture recognition, voice
interaction, volumetric video, medical training applications).
## 2025: Multimedia Integration
**YouTube Video Embedding System**
Implemented custom Quarto shortcode for YouTube video integration with:
- Comprehensive descriptions enabling content discovery
- Embedded players in HTML version and links in PDF version
- Consistent formatting across all video references
**Video Content Expansion**
Added AI-focused deep dive in
[Section 8](#sec-artificial-intelligence-in-xr){.quarto-xref} on audio
technologies, including spatial audio, voice recognition, and AI-driven
speech processing in XR contexts.
**Image Licensing Compliance**
Systematic review and replacement of images without clear licensing,
ensuring all visual content meets academic publication standards.
## Ongoing Development
This book continues to evolve with XR technology and teaching practice.
For the most current version and updates beyond this publication date,
visit
[github.com/dsjolie/ImmersiveFuturesBook](https://github.com/dsjolie/ImmersiveFuturesBook).
# Introduction to Immersive Media {#sec-introduction-to-immersive-media}
## Defining Immersive Technologies and XR
Immersive technologies enable us to interact with digital content in
natural, intuitive ways, often blurring the line between the physical
and virtual worlds. At its core is the concept of "presence" - the
feeling of being physically present in a non-physical world. This sense
of presence is a key factor in creating compelling and effective
immersive experiences.
The primary goal of immersive media is to create experiences where our
bodies and senses interact with digital environments as naturally as
they do with the physical world.
My fundamental approach to immersive media centers on a simple
principle: the goal is to get the brain to work "as if" in a real
environment.
This embodied interaction can be so compelling that users may
instinctively react to and interact with virtual objects as if they were
physical. This is the basis for the potential of VR in training,
education and engaging entertainment, as well as rich and natural
interaction and communication in all kinds of applications, including
social virtual worlds and professional meeting environments.
Immersive media encompasses a spectrum of technologies known as the
virtuality continuum, ranging from our familiar physical reality to
fully immersive virtual environments. More about this spectrum and
related concepts in [2.1 The Reality-Virtuality
Continuum](#21-the-reality-virtuality-continuum), but the key common
terms are, briefly:
1. **Augmented Reality (AR)**: Augments the real world by overlaying
digital information or objects onto it.
2. **Mixed Reality (MR)**: Mixing the real and virtual, in different
ways. (More later).
3. **Virtual Reality (VR)**: Immerses users in a completely virtual
environment, allowing for full-body interactions in a digital space.
**XR** is most commonly used as an umbrella term to cover all of these
technologies. As they have significant overlap the same people are often
interested in and working across these boundaries and we often want to
talk about them as one type of technology - XR.
The power of immersive media lies in its ability to engage our senses
and leverage our innate understanding of spatial relationships and
physical interactions. By doing so, it creates more intuitive and
engaging ways to interact with digital content, whether for
entertainment, education, training, or professional applications.
One of the key advantages of immersive technologies is their ability to
make complex digital interactions accessible to a wide range of users,
including those who may not be familiar with traditional computer
interfaces. For instance:
- In VR, users can navigate 3D spaces by simply walking and moving
your body, leaning in, bending down, rather than learning complex
keyboard and mouse controls.
- AR applications can overlay intuitive visual instructions onto
real-world objects, making tasks like assembly or repair more
straightforward for novices.
- Hand-based interactions can allow users to manipulate digital
objects as if they were physical, reaching out to touch or grab,
reducing the learning curve for 3D modeling or data visualization
tasks.
This natural interaction paradigm opens up new possibilities for digital
content creation and consumption, potentially democratizing access to
complex digital tools and experiences. As immersive technologies
continue to evolve, they promise to make digital interactions more
intuitive, engaging, and accessible to people of all backgrounds and
technical skill levels.
## The Evolution of Immersive Technologies
The journey of immersive technologies, particularly Virtual Reality
(VR), spans several decades, with roots tracing back to the 1960s. This
evolution has been marked by technological breakthroughs, changing
applications, and an expanding vision of what's possible in virtual
spaces.
### Early Experiments
- **1960s**: Ivan Sutherland's "Sword of Damocles" laid the groundwork
for modern VR systems. This early prototype, while bulky and
limited, demonstrated the potential for head-mounted displays in
creating immersive experiences.
- **1980s-1990s**: VR saw periods of hype and subsequent
disillusionment as the technology struggled to meet expectations.
Despite limitations in graphics and processing power, this era saw
the development of many foundational concepts in VR.
### Early Applications
For many years, VR remained primarily confined to specialized contexts.
Back when I first took a VR course in the late 1990s, VR was primarily
used in expensive and specialized contexts---research laboratories and
high-end simulators.
The main motivations for using VR traditionally were:
1. Training scenarios that are:
- Expensive
- Dangerous
- Impossible to recreate in reality
2. Flight simulators
3. Prototyping
4. Visualization
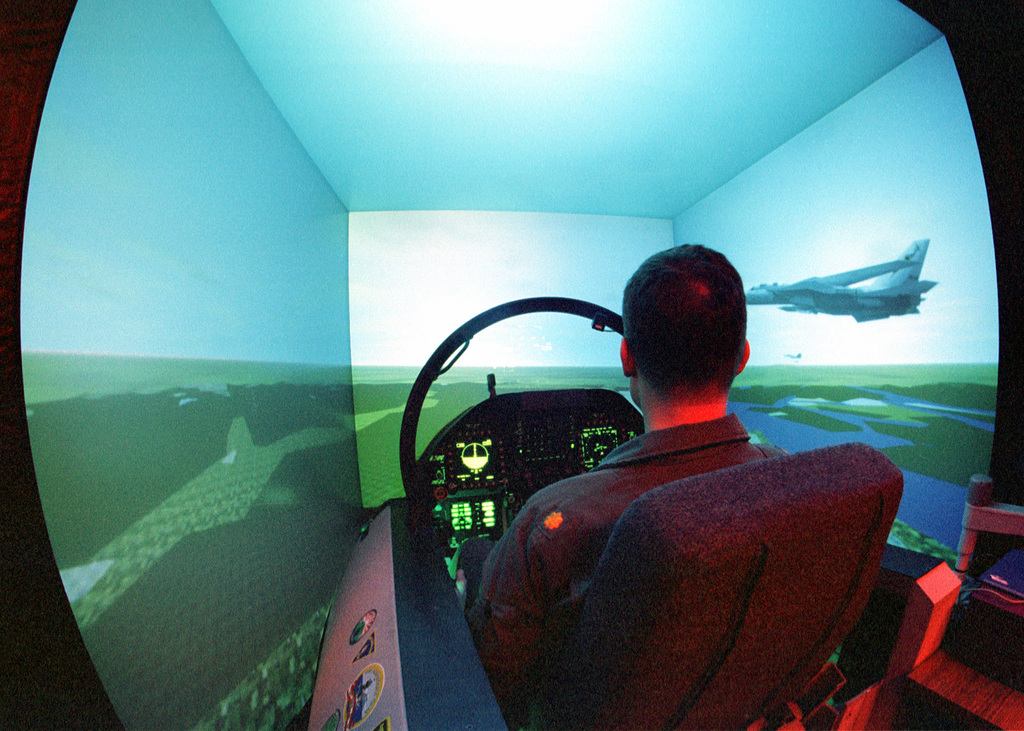
These early applications laid the groundwork for more widespread use of
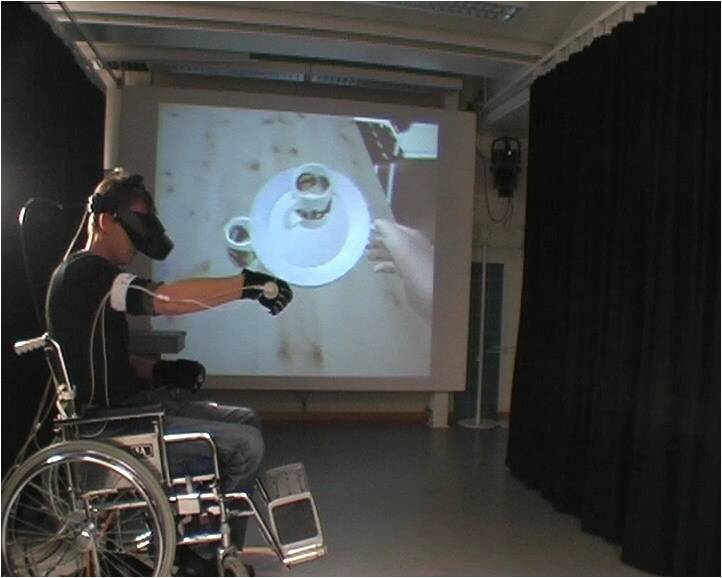
VR technology. For instance, the EasyADL project demonstrated how VR
could be used for prototyping and testing scenarios that couldn't be
replicated in reality due to sensor limitations.
In this project, I could create virtual sensors easily that would send
information when the user grabbed something, when something left a
cupboard, or when it was placed on the stove. I could easily create
these virtual sensors to pass that information to the systems that were
actually needed to implement the algorithms.
### The Rise of Commercial VR
The modern era of commercial VR began to take shape in the mid-2010s,
marking a significant shift that brought VR technology to a broader
consumer audience. This period saw the development of more affordable
and accessible VR hardware, setting the stage for widespread adoption.
### Parallel Evolution of AR
While VR was developing, Augmented Reality (AR) was also making
significant strides. The concept of overlaying digital information onto
the real world began to gain traction, with early applications in
heads-up displays for military aircraft and later in consumer mobile
devices.
### The Convergence of Technologies
As both VR and AR technologies advanced, the lines between them began to
blur, giving rise to the concept of Mixed Reality (MR) and the broader
field of Extended Reality (XR). This convergence has been driven by
improvements in:
- Display technology
- Motion tracking
- Computer vision
- Processing power
These advancements have enabled more seamless blending of virtual and
real-world elements, opening up new possibilities for immersive
experiences. With recent hardware AR and MR is starting to catch up, but
VR is still the more mature technology.
### The Impact of Mobile Technology
The widespread adoption of smartphones and tablets has played a crucial
role in the evolution of immersive technologies, particularly AR. The
ubiquity of powerful, sensor-rich mobile devices has made AR experiences
accessible to a wide audience, paving the way for applications in
gaming, education, and various industries.
### Looking Forward
The evolution of immersive technologies continues at a rapid pace, with
ongoing developments in areas such as:
- Haptic feedback
- Eye tracking
- Brain-computer interfaces
- Volumetric displays
These advancements promise to further enhance the realism and
interactivity of immersive experiences, potentially revolutionizing how
we interact with digital content and each other in virtual spaces.
As we move forward, the challenge lies in harnessing these technologies
to create meaningful, engaging, and accessible experiences that can
benefit various aspects of human life, from entertainment and education
to healthcare and professional training.
## Understanding Presence and Immersion
*Presence* is a fundamental concept in immersive media, particularly in
virtual reality (VR). It refers to the psychological state of feeling as
if you are actually ("bodily") present in a virtual environment, despite
knowing that you are not physically there.
### Defining Presence
Michael Abrash, now chief science officer at Meta since initially
working with VR at Valve, emphasized the importance of presence.
> Presence is: - Why we're excited - Unique to VR - The key to VR's
> success
![A slide from an early presentation on VR from Michael Abrash, then at
Valve, now Chief Science Officer at Meta, on the importance of presence
in VR. [@abrash2014vr]](images/base2018/presence_abrash.png)
Presence is more than just visual immersion; it's about convincing the
brain that the virtual environment is real.
As I've emphasized, the goal is to get the brain to work 'as if' in a
real environment.
### The Power of Presence
When presence is achieved, users may react to virtual stimuli as if they
were real.
At one time, I was testing a VR environment for several hours, lifting
containers and pouring virtual liquids from one to another. I'd been
seated at a virtual table, completely absorbed in the task. When my
hands grew tired, I instinctively tried to rest them on the virtual
table surface.
My hands passed straight through, and I felt a genuine chill down my
spine. This reaction showed how thoroughly my brain had accepted the
virtual environment as real---even knowing it was virtual couldn't
prevent the instinctive response.
This anecdote illustrates how powerful the sense of presence can be,
causing instinctive reactions to virtual objects.
### Factors Contributing to Presence
Several factors contribute to creating a sense of presence. The most
important are:
1. **Interaction**: The ability to interact with the virtual
environment in natural, intuitive ways strengthens the sense of
presence.
2. **Consistency**: The virtual world must behave consistently and
predictably to maintain the illusion of reality.
3. **Body Ownership**: Seeing a virtual representation of your body
that moves as you do can significantly enhance presence.
These can also contribute significantly, but are not as critical:
1. **Visual Fidelity**: High-resolution displays and realistic graphics
help convince the brain of the environment's reality.
2. **Audio**: Spatial audio that accurately represents the virtual
space enhances immersion.
### The McGurk effect
The McGurk effect is a perceptual phenomenon that demonstrates how our
brains integrate visual and auditory information to create a coherent
perception of speech. This effect is crucial for understanding how
presence is created in VR environments.
In the McGurk effect:
1. A person is shown a video of someone saying one sound (e.g.,
"ga-ga")
2. The audio is replaced with a different sound (e.g., "ba-ba")
3. The viewer often perceives a third, intermediate sound (e.g.,
"da-da")
This illusion occurs because the brain attempts to reconcile the
conflicting visual and auditory information, resulting in a perception
that matches neither the visual nor the auditory input alone.
\begin{tcolorbox}[colback=red!5!white,colframe=red!50!black,title=YouTube Video]
\textbf{The McGurk Effect - Auditory Visual Illusion}
This classic psychological demonstration shows how our brain processes conflicting visual and auditory information. In the video, you'll see a person saying one sound while hearing a different sound, yet perceiving a third, intermediate sound. This illusion is particularly relevant to VR because it persists even when you're aware of it, demonstrating how our perception can be reliably manipulated through coordinated sensory inputs.
\textit{Watch at: \url{https://www.youtube.com/watch?v=2k8fHR9jKVM&t=s}}
\end{tcolorbox}
What makes the McGurk effect particularly relevant to VR is its
persistence even when the viewer is aware of the illusion.
This is a kind of illusion that is not dependent on you being aware of
it. It works even though you know about it.
This demonstrates how our perceptual systems can be influenced by
multisensory input, even overriding our conscious knowledge. In VR, this
principle is leveraged to create a sense of presence by providing
coherent multisensory experiences that our brains interpret as real,
even when we know we're in a virtual environment.
### Understanding Different Types of Immersion
Immersion in virtual reality can be understood in two distinct but
complementary ways: technological immersion and narrative immersion.
Both contribute to the overall sense of presence in virtual environments
but operate through different mechanisms.
#### Technological Immersion
Technological immersion refers to the degree to which our senses are
enveloped by the virtual environment. This form of immersion is
primarily achieved through hardware and software capabilities that block
out the physical world and replace it with virtual stimuli. Key aspects
include:
1. Visual coverage (field of view)
2. Audio spatialization
3. Haptic feedback
4. Motion tracking accuracy
The more complete this sensory replacement, the higher the level of
technological immersion.
#### Narrative Immersion
While technological immersion focuses on sensory engagement, narrative
immersion relates to our psychological engagement with the virtual
environment's story, context, and unfolding events. This type of
immersion can occur even with relatively simple technology if the
narrative elements are compelling.
As you explore these kinds of environments, they build up stories and
narratives, which fit very well with how we generally remember things
and understand the world.
The interplay between these two types of immersion can create powerful
experiences in virtual environments. Later chapters will explore how
narrative immersion can be particularly effective in visualization and
educational applications, where engagement with content often matters
more than technological sophistication.
### The Future of Presence and Immersion
As VR technology continues to advance, we can expect even more
convincing experiences of presence. Future developments may include:
- Improved haptic feedback for more realistic touch sensations
- Advanced eye-tracking for more natural visual experiences
- Brain-computer interfaces for direct neural engagement
Understanding and enhancing presence and immersion remain central goals
in the development of immersive technologies, driving innovation in
hardware, software, and content creation.
## Avatars and Virtual Embodiment {#sec-avatars-and-virtual-embodiment}
Virtual avatars and the concept of embodiment play crucial roles in
immersive experiences, particularly in virtual reality (VR). They
significantly impact how users perceive themselves and interact within
virtual environments. This section explores the foundational
psychological principles underlying virtual embodiment, while practical
implementations and technical avatar creation systems are covered in
[Section 5.9](#sec-advanced-avatar-technologies){.quarto-xref}.
### The Rubber Hand Illusion
The concept of embodiment in virtual reality is closely related to the
psychological phenomenon known as the rubber hand illusion. This
illusion, first demonstrated by Botvinick and Cohen in 1998, shows how
easily our brains can be tricked into accepting an artificial limb as
part of our body.
In the classic rubber hand experiment: 1. A participant's real hand is
hidden from view. 2. A rubber hand is placed in a visible position. 3.
Both the real hand and the rubber hand are stroked simultaneously with a
brush. 4. After a short time, many participants begin to feel as if the
rubber hand is their own.
\begin{tcolorbox}[colback=red!5!white,colframe=red!50!black,title=YouTube Video]
\textbf{Rubber Hand Illusion Experiment}
This classic psychological experiment demonstrates how easily our brains can be tricked into accepting an artificial limb as part of our body. The video shows the experimental setup where participants' real hands are hidden while they observe a rubber hand being stroked simultaneously with their hidden hand. This illusion forms the foundation for understanding virtual embodiment in VR environments, showing how coordinated visual and tactile stimuli can manipulate our sense of body ownership.
\textit{Watch at: \url{https://www.youtube.com/watch?v=sxwn1w7MJvk&t=30s}}
\end{tcolorbox}
This illusion demonstrates the brain's remarkable plasticity in
constructing our sense of body ownership. It reveals that our perception
of our body is not fixed, but can be manipulated through coordinated
visual and tactile stimuli.
In VR, this effect is leveraged to create a sense of ownership over
virtual body parts or entire avatars. When users see virtual hands
moving in sync with their real hand movements, they quickly begin to
feel as if those virtual hands are their own. This principle extends
beyond just hands - entire virtual bodies can be embodied in VR, leading
to powerful immersive experiences. \### The Illusion of Body Ownership
Research conducted at the Karolinska Institute's Brain, Body and Self
Laboratory (Group Ehrsson) has demonstrated how easily our brains can be
tricked into accepting a virtual or artificial body as our own. This
phenomenon is closely related to the sense of presence in VR
environments.
A striking example comes from an experiment where a participant wearing
a VR headset had a strong reaction when a knife was brought near their
virtual body.
> - I viewed the manikins body as being my body. - Then researchers
> slid a knife across the dummy's body. - You have the reaction,
> because she's not, it's not like she's trying to stab me with it,
> but you do have the reaction to just sort of pull away a little
> bit because she, I mean, it really seems like she's about to put
> something sharp against my stomach.
>
> *- Quote from video*
This visceral response occurs even though the participant is consciously
aware they are looking at a mannequin body through a VR headset.
\begin{tcolorbox}[colback=red!5!white,colframe=red!50!black,title=YouTube Video]
\textbf{Body Ownership Illusion in VR}
This video demonstrates how VR can create powerful illusions of body ownership, showing participants' visceral reactions to virtual bodies being threatened or touched. The demonstration reveals how quickly our brains can accept virtual bodies as our own, even when we're consciously aware we're looking at a mannequin through a VR headset. This research forms the basis for understanding avatar embodiment in virtual environments.
\textit{Watch at: \url{https://www.youtube.com/watch?v=rawY2VzN4-c&t=s}}
\end{tcolorbox}
### Flexibility of Body Perception
Our perception of our own body is surprisingly flexible and can be
manipulated in VR environments. A study titled "Being Barbie: The Size
of One's Own Body Determines the Perceived Size of the World"
demonstrated how inhabiting different sized virtual bodies can alter our
perception of the world around us.
In this study, participants were asked to estimate how big a cube was.
You can see that they were now using their doll bodies as reference
points when showing with their own hands how big the cube was. The
actual cube, of course, was not that big.
This flexibility extends beyond just size. Researchers have experimented
with altering various aspects of virtual bodies, including:
- Body shape
- Sex
- Race
### Psychological Impact of Avatar Embodiment
The way we perceive our virtual bodies can have profound effects on our
psychology and behavior. A study by @peck2013putting explored how
embodying an avatar with dark skin color could affect implicit racial
bias.
If you get this experience of being in a virtual reality environment and
having a darkly colored body, then that affects how much racial bias you
have when evaluated before and after the experience.

The implications of this research extend far beyond just racial
attitudes.
Depending on how you perceive yourself, you might even become better at
math, for instance. This can really affect how you see the world, what
you believe yourself to be able to do, and what judgments you are
making.
#### The Proteus Effect
The Proteus Effect demonstrates how users may alter their behavior to
conform to expectations set by their avatar's appearance. For example,
users with taller avatars may negotiate more aggressively in virtual
environments.
### Implications for VR Design
Understanding the rubber hand illusion and its extensions in VR has
significant implications for VR design:
1. Avatar Design: Avatars that move in sync with user movements enhance
the sense of embodiment.
2. Interaction Design: Designing interactions that reinforce the
connection between user actions and avatar responses can strengthen
the illusion of body ownership.
3. Emotional Responses: Designers can leverage this illusion to create
more emotionally impactful experiences, as users may react to
virtual stimuli as if they were real.
4. Therapeutic Applications: The body ownership illusion in VR has
potential applications in therapy, such as treating phantom limb
pain or body dysmorphia.
**Ethical Considerations**: The power to manipulate users' sense of body
ownership and self-perception carries significant ethical
responsibilities. Research showing that virtual embodiment can influence
implicit bias, cognitive performance, and self-concept demonstrates both
the potential and the risks of these technologies. Questions of
psychological safety, age-appropriate design, and the long-term impacts
of virtual embodiment require careful consideration. We explore these
ethical implications in depth in
[Section 10](#sec-ethics){.quarto-xref}, examining how developers can
create transformative experiences while respecting user wellbeing and
autonomy.
By understanding and leveraging these principles, VR designers can
create more immersive, engaging, and potentially transformative
experiences. The rubber hand illusion and its VR extensions demonstrate
the power of our brains to adapt to new body schemas, opening up
exciting possibilities for virtual embodiment and presence in digital
worlds.
### Future Directions
As VR technology advances, we can expect more sophisticated avatar
systems that provide even more convincing experiences of embodiment.
This could lead to applications in:
- Therapy and mental health treatment
- Education and skill training
- Social interaction and collaboration in virtual spaces
The study of avatars and virtual embodiment remains a rich area for
research, with potential implications for our understanding of
consciousness, self-perception, and social interaction.
For those interested in exploring this topic further, the [Brain, Body
and Self Laboratory publications
page](http://www.ehrssonlab.se/publications.php) offers a wealth of
research papers on related experiments and findings.
## The Future of Immersive Technology
As immersive technologies continue to evolve at a rapid pace, the future
of this field promises exciting developments and widespread impact
across various sectors. This section explores potential advancements and
implications for the future of immersive media.
### General Trends
1. **Increased Accessibility**: As hardware becomes more affordable and
user-friendly, immersive technologies will likely become more
accessible to a wider audience.
2. **Enhanced Realism**: Advancements in display technology, haptics,
and sensory feedback systems will contribute to increasingly
realistic and immersive experiences.
3. **Seamless Integration**: The lines between physical and digital
realities will continue to blur, with AR and MR technologies
becoming more integrated into our daily lives.
4. **AI Integration**: Artificial intelligence will play a larger role
in creating dynamic, responsive immersive environments (see
[Section 8](#sec-artificial-intelligence-in-xr){.quarto-xref} for
comprehensive coverage).
5. **Social VR**: As virtual social interactions become more
sophisticated, we may see new forms of communication and
collaboration emerge.
### Potential Applications
While detailed discussions of applications will be covered in later
chapters, some key areas of interest for future immersive technology
include:
- Education and Training
- Healthcare and Therapy
- Design and Engineering
- Entertainment and Gaming
- Remote Work and Collaboration
- Tourism and Cultural Experiences
### Challenges and Considerations
As immersive technologies become more prevalent, several challenges will
need to be addressed:
1. **Privacy and Data Security**: Ensuring the protection of personal
data in increasingly connected immersive environments.
2. **Ethical Implications**: Addressing the psychological effects of
prolonged immersion and the potential for manipulation in virtual
environments.
3. **Accessibility**: Ensuring that immersive technologies are
inclusive and accessible to all, including those with disabilities.
4. **Content Creation**: Developing tools and platforms that allow for
efficient creation of high-quality immersive content.
### Skills and Opportunities
The growing importance of immersive technologies is creating new career
opportunities across various fields. As the technology evolves, there
will be an increasing demand for professionals skilled in:
- Immersive experience design
- 3D modeling and animation
- Spatial computing
- XR development
- Immersive storytelling
### Conclusion
The future of immersive media is bright and full of potential. As these
technologies continue to advance and integrate more seamlessly into our
lives, they have the power to transform how we work, learn, entertain
ourselves, and interact with the world around us. While challenges
remain, the opportunities for innovation and positive impact are vast.
Note: Detailed discussions of hardware evolution and specific
applications will be covered in subsequent chapters of this compendium.
## Further Reading
Chapter 1 introduced the fundamental concepts of immersive media,
including virtual reality (VR), augmented reality (AR), and mixed
reality (MR). We explored the importance of presence and immersion in
creating compelling XR experiences, and discussed the potential
applications of these technologies across various fields. To deepen your
understanding of these foundational concepts and their implications,
consider the following resources:
### Research Papers
- Sjölie, D., & Badylak, S. (2019). Mind tricks for presence. In
Proceedings of the 14th International Conference on the Foundations
of Digital Games (FDG '19). Association for Computing Machinery, New
York, NY, USA, Article 47, 1--7.
- This paper introduces concepts of synchronized reality and
grounded simulation as starting points for designing mixed
reality systems with optimal presence, providing case studies of
commercial VR applications.
- Sjölie, D. (2012). Presence and general principles of brain
function. Interacting with Computers, 24(4), 193-202.
- This paper explores the relationship between presence in virtual
environments and general principles of brain function, providing
foundational insights into the cognitive aspects of immersive
experiences.
- Slater, M. (2009). Place illusion and plausibility can lead to
realistic behaviour in immersive virtual environments. Philosophical
Transactions of the Royal Society B: Biological Sciences, 364(1535),
3549-3557.
- This paper introduces the concepts of place illusion and
plausibility illusion as key components of presence in virtual
environments, explaining how these factors can lead to realistic
behavior in immersive VR.
- Sanchez-Vives, M. V., & Slater, M. (2005). From presence to
consciousness through virtual reality. Nature Reviews Neuroscience,
6(4), 332-339. This paper provides an overview of presence in
virtual reality and its relationship to consciousness.
- This review paper explores the concept of presence in immersive
virtual environments, discussing how the sense of "being there"
is signaled by people acting and responding realistically to
virtual situations and events, and its relationship to
consciousness.
# XR Technologies and the Reality-Virtuality Continuum {#sec-xr-technologies}
## The Reality-Virtuality Continuum
The reality-virtuality continuum is a conceptual framework that
describes the full spectrum of experiences ranging from the completely
real to the fully virtual. This continuum provides a basis for
understanding different types of mixed reality experiences and how they
blend elements of the physical and digital worlds.
### Understanding the Continuum
At one end of the spectrum lies our familiar physical reality - the
tangible world we interact with daily. On the opposite end, we find
fully immersive virtual environments, such as fantastical realms like
the Lord of the Rings universe. Between these extremes, there exists a
range of mixed reality experiences:

I find it helpful to think about the spectrum in terms of mixing
approaches. At the augmented reality end, you still feel essentially
present in your physical reality, but you can add digital and virtual
elements to that world. At the other end, you can feel like you're on a
virtual moon base---something completely removed from your actual
physical reality---but where you can still add elements from the real
world, such as your physical desk or a view of someone else in the room.
Key concepts mapped onto the spectrum are:
1. **Real Reality (RR)**: Your everyday, familiar, physical
environment.
2. **Augmented Reality (AR)**: Closer to the physical reality end, AR
enhances our perception of the real world by overlaying digital
information or objects onto it. For example, a user might see
virtual navigation arrows overlaid on real city streets. Users can
interact with virtual elements while still feeling present in and
aware of their physical surroundings.
3. **Mixed Reality (MR)**: Can include everything between RR to VR,
with all possible mixings of the real and the virtual. In the
central part of the continuum, MR creates environments where
physical and digital objects coexist and interact in real time.
E.g., a virtual character that can interact with real-world objects
in your living room, an ordinary table turning into an interactive
touch display surface or the view out through a window changing to a
view onto Mars.
4. **Augmented Virtuality (AV)**: Augmenting your virtual world with
elements from physical reality. E.g., bringing real people from your
physical surroundings into your personal virtual office. Or making
sure you can see and use your physical mouse and keyboard while in
VR. Mostly an academic concept, not used much in the industry.
5. **Virtual Reality (VR)**: At the far end of the continuum, VR
immerses users in a completely synthetic environment. This could be
as fantastical as exploring a virtual Hogwarts castle or as
practical as a fully simulated surgical training environment. Allows
for full-body interaction in a digital space. Unlimited by the
physical space, although care is required when moving around
(navigating) in VR.
The reality-virtuality continuum is not a rigid classification but
rather a fluid spectrum. Many experiences blur the lines between these
categories. For instance, a virtual moon base experience might
incorporate a view of your real-world desk, creating a hybrid
environment that combines elements from different points on the
continuum.
Understanding this continuum is crucial for conceptualizing how
different technologies can blend the physical and digital worlds. It
opens up new possibilities for creating immersive experiences that can
range from subtle augmentations of our physical reality to complete
transportation into virtual worlds, with countless variations in
between.
As we explore each category in more depth in the following sections,
we'll examine how different technologies and applications leverage
various points along this continuum to create unique and engaging
experiences.
## Virtual Reality (VR) Systems
Virtual Reality (VR) systems represent the fully immersive end of the
reality-virtuality continuum, providing users with complete digital
environments that replace their physical surroundings. This section
explores the components, capabilities, and evolution of modern VR
systems.
### Key Components of VR Systems
Modern VR systems typically consist of several key components:
1. **Head-Mounted Display (HMD)**: The primary interface between the
user and the virtual world.
2. **Motion Controllers**: Allow users to interact with the virtual
environment.
3. **Tracking System**: Monitors the user's movements and position in
space.
4. **Computer or Console**: Generates the virtual environment and
processes user interactions.
### Brief History of VR
While VR has seen a significant resurgence in recent years, its roots
trace back to the 1960s. For decades, VR remained primarily confined to
specialized contexts.
The basic motivations for using VR remain fundamentally the same as when
I first took a VR course in the late 1990s: training scenarios where
it's expensive, dangerous, or impossible to practice in reality. This
core principle has remained consistent even as the technology has
advanced dramatically.
Early applications included flight simulators, military training, and
scientific visualization. However, limitations in technology and high
costs restricted widespread adoption.
### The Modern Era of VR (2016 onwards)
The modern era of commercial VR began in 2016 with the release of
several key headsets:
1. HTC Vive: Developed by Valve and manufactured by HTC
2. Oculus Rift: The first version from Oculus, now owned by Facebook
3. Microsoft's Windows Mixed Reality headsets: A cheaper alternative
4. Mobile VR solutions: Samsung Gear VR and Google Daydream
5. PlayStation VR: Sony's offering for the PlayStation console
**Image Attribution:** - HTC Vive:
"[CES2016_HTCVive_Pre_Winters](https://www.flickr.com/photos/92587836@N04/24177102722/)"
by [ETC-USC](https://www.flickr.com/people/92587836@N04) is licensed
under [CC BY 2.0](https://creativecommons.org/licenses/by/2.0/) - Oculus
Rift: Image by [KniBaron](https://www.flickr.com/people/23063899@N07)
from Bangkok, Thailand, licensed under [CC BY
2.0](https://creativecommons.org/licenses/by/2.0/)
These headsets ranged in price from around 4,000 to 10,000 crowns. The
mobile VR solutions, while innovative, have largely been discontinued
due to the friction involved in using a smartphone as the display.
### Recent Developments in XR Hardware
The XR landscape has continued to evolve rapidly:
1. **Meta Quest 3(S)**: A fully mobile, standalone headset that offers
6DoF (six degrees of freedom) tracking without the need for external
sensors or a connected PC. The Quest 3 is the better version with
advanced optics and comfort, while Quest 3S is the newest, using the
same chip and capable of running the same applications but otherwise
optimized to be as cheap as possible.
2. **Valve Index**: Developed as a high-end PC-connected headset
focusing on wide field of view, comfort, sounds and advanced
controller design. The Valve Index is one of the older headsets
still in use, as few newer headsets are developed specifically for
PC-desktop-VR.
3. **Bigscreen Beyond 2**: A 107 g, custom-fit SteamVR headset with
built-in eye tracking and optional comfort kits for longer
sessions.[@bigscreen_beyond2_2024] Like the original Beyond, it
relies on external base stations and controllers, but the new model
shows how aggressively PCVR rigs can shrink when every gram is
optimized around a single wearer's face.
4. **Pico 4**: The most direct competitor to Meta Quest 3(S), with
similar features. Also standalone. Includes enterprise versions with
eye tracking etc.
5. **Samsung Galaxy XR ("Project Moohan")**: Samsung's first Android XR
headset blends 4K-per-eye micro-OLED displays, Snapdragon XR2+ Gen 2
compute, and comprehensive inside-out tracking while leaning on
Google's Android XR stack for software continuity across phones,
tablets, and wearables.[@androidheadlines_galaxy_xr_2025]
6. **Apple Vision Pro**: A "prosumer", early-adpoter, headset from
Apple, providing high quality visuals and mixed reality with hand
and eye tracking for a hefty price.
7. **Varjo XR-4**: An ultra-high-resolution headset aimed at
professional applications, includes mixed reality with professional
hand and eye tracking.
8. **Meta Ray-Ban Display + Neural Band**: Lightweight smart glasses
with a monocular HUD paired with an sEMG wristband for precise text
input, showcasing how glasses-class wearables are adopting richer
interactions typically found in headsets.[@meta_rayban_display_2024]
### The Form-Factor Spectrum (2025)
To understand how these devices relate to one another, it helps to
visualize them along a spectrum that runs from fully tethered PCVR rigs
to lightweight smart glasses. Each rung of the spectrum balances compute
location, interaction methods, and ergonomics differently.
--------------------------------------------------------------------------------------------------------
Segment Representative Hardware Primary Compute Core Interactions Typical Use
Cases
--------------- -------------------------------------- --------------- ----------------- ---------------
**PCVR** Valve Index, **Bigscreen Beyond 2** External PC Controllers with Simulation
(107 g with discrete precise SteamVR labs,
custom-fit)[@bigscreen_beyond2_2024] GPU tracking, enthusiasts
optional finger seeking
sensing fidelity
**Performance Meta Quest 3/3S, Pico 4 On-headset Controllers, hand Consumer
Standalone** mobile SoC tracking, mixed gaming,
reality productivity MR
passthrough
**Premium Apple Vision Pro, Samsung Galaxy XR On-headset Eye and hand Prosumer
Standalone MR** mobile SoC with tracking, voice, productivity,
co-processors spatial video enterprise
passthrough collaboration
**Split Compute Meta's reported ultralight headset + Waist or pocket Eye tracking with Long-session
/ Tethered compute puck compute puck gaze-and-pinch, media viewing,
Ultra-light** sEMG bands travel-ready VR
**Smart Glasses Meta Ray-Ban Display + Neural Band, Paired Wrist-based sEMG, Assisted
& HUD** Samsung/Google HUD glasses phone/cloud voice, subtle reality,
gestures navigation, AI
companions
--------------------------------------------------------------------------------------------------------
The newest announcements are compressing weight and thermal budgets
without giving up expressiveness. Meta's reported ultralight puck-based
headset aims to deliver sub-110 gram eyewear with gaze-and-pinch as the
primary modality, while Bigscreen Beyond 2 demonstrates how far
miniaturized optics and custom fitting can push PCVR
hardware.[@uploadvr_meta_ultralight_2024; @bigscreen_beyond2_2024]
Samsung's Galaxy XR shows how manufacturers are pairing high-end
micro-OLED optics with Android XR to compete head-on with Apple's Vision
Pro in the standalone MR tier, while Google positions Gemini-powered
Android XR services as the connective AI tissue across both the headset
and future
eyewear.[@androidheadlines_galaxy_xr_2025; @google_android_xr_2024; @google_gemini_xr_2024]
On the glasses end of the spectrum, Meta's Ray-Ban Display (69 g) pairs
a monocular HUD with the Neural Band sEMG wristband for precise
finger-driven text input, signaling that lightweight devices can still
support fine-grained control.[@meta_rayban_display_2024]
> **Android XR as a cross-device layer**
>
> Google's 2025 Android XR announcement frames a single software stack
> that spans headsets and glasses, with Gemini multimodal AI handling
> perception, assistant behavior, and cross-device
> continuity.[@google_android_xr_2024; @google_gemini_xr_2024] Treat
> Android XR as connective tissue between the spectrum segments:
> developers can target one platform while deploying to puck-driven
> headsets, standalone devices, or future smart glasses, tapping Gemini
> for scene understanding, translation, and generative overlays.
#### Smart-Glasses Market Snapshot
- **Display strategies**: Meta opts for a high-brightness monocular
HUD in Ray-Ban Display, while Samsung and Google preview a waveguide
HUD slated for a 2026 launch to complement their Android XR headset
push.[@meta_rayban_display_2024; @uploadvr_samsung_google_glasses_2025]
- **Input diversity**: sEMG wristbands, gaze-and-pinch, and
always-listening voice agents are emerging to replace touchpad-only
interaction.
- **Battery and thermals**: 6-hour eyewear runtimes and IP-rated
accessories hint at expectations for all-day wear, but compute still
regularly offloads to phones or pucks.
- **Ecosystem bets**: Meta ties hardware to Meta AI services, while
Google positions Android XR as the open alternative, weaving Gemini
agents into Samsung's hardware roadmap and the broader Android
developer
base.[@meta_rayban_display_2024; @google_android_xr_2024; @google_gemini_xr_2024; @uploadvr_samsung_google_glasses_2025]
The spectrum perspective helps frame design decisions in later chapters:
interaction designers can map capabilities to expected hardware
constraints, while developers can plan how features degrade gracefully
across different compute locations.
Prices start around 4,000 SEK for the Meta Quest 3S, with different
configurations of consumer headsets up to around 10,000 SEK. Apple
Vision Pro is not yet available in Sweden but costs 4,000 EUR elsewhere
in Europe. The Varjo XR-3, aimed at professional users, is even more
expensive.
💰 **Professional-Grade Hardware**
Varjo, a Finnish company, produces exceptionally impressive high-end
virtual reality headsets. While these systems cost 50,000 SEK and
above---sometimes reaching over 100,000 SEK---they offer exceptionally
high resolution that enables users to see fine details in virtual
environments that would be impossible with consumer-grade hardware.
There are more options out there, including HTC who where the first to
release consumer VR and are still in the game but not as popular these
days.
### Key Technical Aspects
#### Field of View (FOV)
Field of View refers to the extent of the observable environment at any
given time. It's typically measured in degrees:
- Most consumer VR headsets offer an FOV between 90 and 110 degrees.
- Some high-end or experimental designs push this further but it has
not really taken hold.
- Some high-end or experimental designs push this further but it has
not really taken hold.
> I know how much ya'll love field-of-view and want more. I'm with you.
> I like it. I get it, I do. The tradeoffs are so bad. The tradeoffs on
> weight, form factor, compute, thermals... it's all bad,
>
> *- Quote from Meta CTO Andrew Bosworth*
[Meta Explains Why It Sees Wide Field-of-View Headsets as a 'bad
tradeoff'](https://www.roadtovr.com/meta-cto-wide-field-of-view-headsets-bad-tradeoff/)
#### Resolution
Higher resolution displays provide clearer, more detailed images,
enhancing realism and reducing the "screen door effect". Modern high-end
headsets offer resolutions exceeding 2000x2000 pixels per eye.
#### Tracking and Degrees of Freedom
- **3DoF (3 Degrees of Freedom)**: Only tracks rotational movement
(looking left/right, up/down, and tilting head)
- This was somewhat common in the cheapest headsets in the
beginning of commercial VR, but is now completely outdated.
- **6DoF (6 Degrees of Freedom)**: Tracks both rotational and
positional movement (including moving forward/backward, left/right,
and up/down)
There are two main approaches to tracking in VR:
1. **Inside-out tracking**:
- Cameras on the HMD look out into the world
- More portable and easier to set up in new locations
- This is the dominating approach with recent headsets like the
Meta Quest 3(S) and the Apple Vision Pro.
2. **Outside-in tracking**:
- Cameras or sensors in the room track the user
- Requires more setup but can be more precise
- Headsets using versions of this tracking include Valve Index and
Bigscreen Beyond.
### Conclusion
VR systems have evolved dramatically in recent years, becoming more
accessible, powerful, and versatile. From high-end professional systems
to consumer-friendly standalone headsets, VR technology is finding
applications in diverse fields such as entertainment, education,
training, and professional visualization. As these systems continue to
advance, we can expect even more immersive and realistic virtual
experiences in the future.
## Augmented Reality (AR) Technologies
AR technology overlays digital content onto our view of the real world,
enhancing our perception and interaction with our surroundings. This
section explores the devices, software, and applications that make AR
possible, focusing on current technologies and their applications.
### Types of AR Systems
AR systems can be broadly categorized into three types:
1. **Mobile AR**: Uses smartphones or tablets as the AR device.
2. **Head-Mounted Displays (HMDs)**: Wearable devices that provide a
see-through display.
3. **Projection-based AR**: Projects digital information directly onto
physical objects or surfaces.
### Mobile Augmented Reality
Mobile AR is currently the most accessible and widely used form of AR
technology. Major tech companies like Google and Apple have released
development toolkits (ARCore and ARKit respectively) that enable AR
experiences on smartphones. More recently companies such as Snapchat and
Niantic has made significant plays at AR.
\begin{tcolorbox}[colback=red!5!white,colframe=red!50!black,title=YouTube Video]
\textbf{Mobile AR Demonstration - Real-time Object Placement}
This demonstration showcases the core capabilities of mobile augmented reality using smartphones. Viewers will see how AR applications can detect surfaces and place virtual objects in real-world environments, illustrating the fundamental tracking and rendering technologies that make mobile AR possible. The video demonstrates the accessibility of AR technology that most viewers can experience on their own devices today.
\textit{Watch at: \url{https://www.youtube.com/watch?v=xCdjIDnCtps&t=s}}
\end{tcolorbox}
Most smartphones today have the capability to run mobile AR applications
where you can view the camera feed and add virtual content to the real
world. This technology has become remarkably accessible, with most users
having these capabilities right in their pocket.
Mobile AR applications typically use the device's camera to view the
real world and then overlay digital content onto this view. This
technology has found applications in various fields, including:
1. Gaming (e.g., Pokémon Go)
2. Navigation and wayfinding
3. Education and training
4. Marketing and advertising
### Advanced AR: HoloLens and Beyond
Moving beyond mobile AR, we encounter more sophisticated AR devices like
Microsoft's HoloLens. These devices offer a more immersive and
hands-free AR experience.
\begin{tcolorbox}[colback=red!5!white,colframe=red!50!black,title=YouTube Video]
\textbf{Microsoft HoloLens AR Demonstration - Spatial Computing}
This video demonstrates Microsoft's HoloLens capabilities, showing advanced AR features including spatial mapping, gesture-based interaction, and see-through holographic displays. Viewers will observe how the HoloLens creates immersive mixed reality experiences with 3D holograms that appear to interact with the physical environment, highlighting both the potential and current limitations of head-mounted AR displays, including the restricted field of view that constrains where virtual content can appear.
\textit{Watch at: \url{https://www.youtube.com/watch?v=cvLdbpICVGk&t=s}}
\end{tcolorbox}
Key features of advanced AR headsets include:
1. See-through displays
2. Spatial mapping and understanding
3. Natural gesture-based interactions
4. Voice commands
However, current limitations include a restricted field of view for
virtual content.
Current AR headsets face significant field of view limitations. In many
demonstrations, you can see that virtual augmentations are only visible
within a restricted rectangular area in the center of the user's vision,
rather than across their full field of view.
### Industrial Augmented Reality
One of the most promising applications of AR technology is in industrial
settings. Industrial applications represent one area where AR technology
can be genuinely useful with current capabilities. This practical
utility explains why Microsoft focused their later HoloLens releases on
enterprise markets rather than consumer sales.
\begin{tcolorbox}[colback=red!5!white,colframe=red!50!black,title=YouTube Video]
\textbf{Industrial AR Application - Manufacturing and Assembly}
This video showcases practical industrial applications of augmented reality in manufacturing and assembly environments. Viewers will see how AR technology provides real-time guidance and information overlay for workers, demonstrating assembly instructions, quality control procedures, and maintenance protocols. The demonstration illustrates why Microsoft focused HoloLens development on enterprise applications, showing how AR can improve efficiency, reduce errors, and enhance worker safety in industrial settings where the technology provides immediate practical value.
\textit{Watch at: \url{https://www.youtube.com/watch?v=m16XwuYfAGo&t=s}}
\end{tcolorbox}
Industrial AR applications include:
1. Assembly line assistance
2. Maintenance and repair guidance
3. Quality control
4. Training and skill development
These applications can significantly improve efficiency, reduce errors,
and enhance worker safety in various industrial settings.
### Recent Developments in AR
The AR hardware landscape has seen significant advancements in 2024,
with major tech companies pushing the boundaries of what's possible in
wearable AR devices. However, we have also seen Microsoft discontinuing
the Hololens line of products, as they seem to increasingly focus on
software in the XR space.
#### Meta Orion
Meta's Orion AR glasses prototype, showcased in September 2024,
represents a significant leap forward in AR technology. Key features
include:
- 70-degree field of view, substantially wider than competitors
- Advanced silicon-carbide lenses and micro LED projectors
- Resolution of 13 pixels per degree (with plans to increase to 26)
- Full sensor suite including:
- Eye tracking
- Hand tracking
- Room tracking cameras
- Wireless neural wristband for input
- Separate wireless processor puck for computing
- Capability to display multiple apps simultaneously
- AI integration for enhanced experiences
Please note that while Orion shows impressive technical achievements, it
remains a prototype focused on development and testing rather than
consumer release.
#### Snap Spectacles (5th Generation)
Snap's latest iteration of AR glasses, released in September 2024,
offers:
- 47-degree field of view
- Gesture control capabilities
- AR effects and entertainment features
- Developer-focused distribution (\$99/month developer kit)
- More robust but bulkier design compared to previous versions
While more limited in capabilities compared to Meta's Orion, Snap's
approach focuses on practical, entertainment-oriented AR applications.
#### Future Outlook
As AR technology continues to mature, we're seeing a trend toward: -
Smaller, more efficient form factors - Enhanced display technologies -
More sophisticated input methods - Stronger integration with AI and
spatial computing
While true consumer AR glasses may still be several years away, recent
developments from companies like Meta and Snap demonstrate significant
progress toward making immersive AR a practical reality.
Meta's Ray-Ban smart glasses, while not offering AR display
capabilities, hint at another potential track toward mainstream
adoption. By focusing on a fashionable form factor and integrating
AI-powered voice commands and camera features, these glasses demonstrate
how companies might bridge the gap between current technology
limitations and consumer expectations. This "walk before you run"
approach of creating socially acceptable smart glasses could help pave
the way for eventual AR integration once display technology catches up
with our ambitions for all-day wearable AR. The success or failure of
such interim products may provide valuable insights into how AR glasses
will need to evolve to achieve widespread adoption.
### The Future of AR: Towards Ubiquitous Computing
Industry leaders like Mark Zuckerberg envision a future where AR becomes
an integral part of our daily lives. The goal is to develop unobtrusive
AR devices that look and feel like normal glasses or even contact
lenses.
\begin{tcolorbox}[colback=red!5!white,colframe=red!50!black,title=YouTube Video]
\textbf{Mark Zuckerberg on the Future of Augmented Reality}
In this presentation, Meta's CEO Mark Zuckerberg outlines his vision for the future of augmented reality and its potential to transform daily life. Viewers will hear about the long-term goal of creating unobtrusive AR devices that could replace many physical objects with digital alternatives, making tools and experiences more accessible and affordable. The discussion explores how AR glasses might eventually become as common as smartphones, fundamentally changing how we interact with digital information and potentially reducing our dependence on physical manufacturing.
\textit{Watch at: \url{https://www.youtube.com/watch?v=BrBGHs-EThY&t=s}}
\end{tcolorbox}
Zuckerberg highlights the potential impact.
> Think about how many of the things that we have in our lives actually
> don't need to be physical. They can be digital and think about how
> much better and more affordable and accessible they're going to be
> when they are.
>
> *- Quote from Mark Zuckerberg*
This vision suggests a future where many physical objects could be
replaced by virtual counterparts, potentially leading to:
1. Reduced manufacturing and environmental impact
2. Increased accessibility to various tools and experiences
3. More affordable alternatives to expensive physical products
### Conclusion
Augmented Reality technology is rapidly evolving, offering new ways to
blend digital information with our physical world. From mobile AR
applications to sophisticated headsets and industrial solutions, AR is
finding its place in various sectors of our lives and work. As these
technologies continue to advance, we can expect to see even more
seamless integration of digital and physical realities, potentially
transforming how we interact with information and our environment on a
daily basis.
## Mixed Reality (MR) and Hybrid Systems
Mixed Reality (MR) represents a significant portion of the
reality-virtuality continuum, blending elements of both physical and
digital worlds to create new environments where physical and virtual
objects coexist and interact in real time. In recent years, MR
capabilities have become increasingly central to mainstream XR devices,
with major manufacturers integrating MR features into their flagship
headsets. This shift represents a growing recognition that the ability
to seamlessly blend virtual content with the physical world is crucial
for the future of immersive computing.
Where early MR systems were specialized devices focused solely on
augmented or mixed reality, modern XR headsets increasingly incorporate
robust MR capabilities alongside their VR features. This trend towards
integrated MR reflects a broader understanding that users need to be
able to smoothly transition between fully virtual experiences and mixed
reality interactions without changing devices.
Meta emphasizes this blending of realities in their latest headsets
through features like full-color passthrough, which allows users to see
their physical environment in high fidelity while interacting with
virtual objects. Their vision for MR includes practical applications
like virtual workspaces where multiple virtual screens can coexist with
physical desks and keyboards, or fitness applications where virtual
instructors can guide users through real-world workouts.
Apple's Vision Pro takes this concept further with what they term
"spatial computing," where virtual content is deeply integrated with the
physical space. Their approach includes features like the ability to
scale and position virtual screens anywhere in the physical environment,
eye and hand tracking for natural interaction with virtual elements, and
the ability to adjust the blend between virtual and physical reality
using a digital crown. Applications range from immersive FaceTime calls
where participants appear life-size in your physical space to 3D movies
that seem to extend your room into virtual environments.
This convergence of virtual and physical realities in mainstream devices
signals a significant evolution in how we think about mixed reality - no
longer as a separate technology, but as a fundamental feature of modern
XR experiences.
### Varjo XR-4: Enterprise Mixed Reality
Varjo has been at the cutting edge of mixed reality technology for a
number of years, starting out with the XR-1 onto the latest XR-4. The
Varjo XR headsets combine high-resolution virtual reality capabilities
with advanced camera systems for seamless integration of real and
virtual environments. Below is a video from a XR-1 demonstration. It has
only improved since then.
\begin{tcolorbox}[colback=red!5!white,colframe=red!50!black,title=YouTube Video]
\textbf{Varjo XR-1 Mixed Reality Demonstration}
This demonstration showcases Varjo's high-end XR-1 headset capabilities, featuring seamless blending of real and virtual environments through advanced camera systems and ultra-high resolution displays. Viewers will see practical applications including automotive design scenarios where virtual car interiors can be overlaid onto real vehicles, demonstrating the precision and quality possible with professional-grade mixed reality systems. The video illustrates how enterprise XR applications can achieve remarkable realism and practical utility in specialized industries.
\textit{Watch at: \url{https://www.youtube.com/watch?v=uxlqMEAQd8Q&t=s}}
\end{tcolorbox}
Key features of the Varjo XR-4 include:
1. High-resolution VR display
2. Low-latency, high-quality cameras
3. Seamless blending of real and virtual environments
One notable application of the Varjo XR headsets is in automotive design
and testing.
The Varjo system demonstrates remarkable mixed reality
capabilities---the cameras are fast and high-quality enough that users
can safely drive while wearing the VR headset, seeing reality entirely
through the display. The system can then overlay virtual elements, such
as completely changing a car's interior design in real-time. This level
of seamless reality substitution is quite impressive.
### Substitutional Reality
Substitutional reality is an innovative approach that blends live camera
feeds with pre-recorded 360-degree video content, allowing for seamless
transitions between real-time and pre-recorded experiences.
\begin{tcolorbox}[colback=red!5!white,colframe=red!50!black,title=YouTube Video]
\textbf{Substitutional Reality - Blending Live and Recorded 360° Video}
This fascinating demonstration shows substitutional reality technology that seamlessly blends live camera feeds with pre-recorded 360-degree video content. Viewers will see how users can be imperceptibly switched between real-time and recorded experiences, enabling complex scenarios where people appear to leave and re-enter rooms from impossible directions. The technology showcases innovative approaches to manipulating temporal and spatial reality in mixed reality environments, opening possibilities for storytelling and experience design that blur the boundaries between live and recorded content.
\textit{Watch at: \url{https://www.youtube.com/watch?v=R3EPOZkXgy4&t=s}}
\end{tcolorbox}
The system works as follows: 1. Users wear a VR headset equipped with a
pass-through camera, initially showing them the real world. 2. The
system can switch to a pre-recorded 360-degree video without the user
noticing. 3. This enables complex scenarios, such as a person seemingly
leaving the room and re-entering from a different direction.
### The Void: Physical Props in Virtual Worlds
The Void represents a culmination of mixed reality concepts, creating
large-scale experiences that combine physical environments with virtual
reality.
\begin{tcolorbox}[colback=red!5!white,colframe=red!50!black,title=YouTube Video]
\textbf{The Void - Large-Scale Mixed Reality Entertainment}
This video provides an overview of The Void's groundbreaking approach to mixed reality entertainment, which combines virtual reality headsets with elaborate physical environments. Viewers will see how The Void creates immersive experiences by building real physical spaces that correspond to virtual worlds, incorporating touchable props, surfaces, and environmental effects that align with virtual objects. The demonstration showcases techniques borrowed from magic and illusion to create convincing mixed reality experiences where users can physically interact with virtual environments on a room-scale level.
\textit{Watch at: \url{https://www.youtube.com/watch?v=cML814JD09g&t=48s}}
\end{tcolorbox}
Key aspects of The Void's approach include: 1. Building physical
environments that correspond to virtual landscapes 2. Incorporating
touchable props and surfaces that align with virtual objects 3.
Leveraging techniques from magic and illusion to direct attention and
create convincing experiences
### Non-photorealistic AR: Blurring the Lines
An intriguing approach to augmented reality involves processing the
video feed of the real world to make it appear more like virtual
content.
This approach involves processing the real-world video feed to make
reality appear more like virtual content, creating a stylized aesthetic
that makes it difficult to distinguish between real and virtual
elements. This technique challenges traditional assumptions about how we
present mixed reality experiences.
\begin{tcolorbox}[colback=red!5!white,colframe=red!50!black,title=YouTube Video]
\textbf{Non-Photorealistic AR - Stylized Reality Processing}
This intriguing demonstration shows an innovative approach to augmented reality where the real-world video feed is processed to appear more like virtual content, creating a stylized visual aesthetic. Viewers will see how reality itself can be transformed to match virtual elements, making it difficult to distinguish between real and virtual objects in the mixed reality experience. This technique challenges traditional assumptions about AR presentation and opens new possibilities for creative expression and artistic applications in mixed reality environments where visual coherence takes precedence over photorealism.
\textit{Watch at: \url{https://www.youtube.com/watch?v=gb79GliV370&t=45s}}
\end{tcolorbox}
This approach challenges our assumptions about the nature of reality in
mixed reality experiences and opens up new possibilities for creative
expression and immersive storytelling.
### Spatial Understanding
Modern MR systems have evolved to include sophisticated spatial
understanding capabilities. These systems can: - Automatically detect
and map physical spaces - Identify common objects like furniture and
surfaces - Create persistent digital overlays that maintain their
position in physical space - Enable shared experiences where multiple
users can interact with the same virtual content anchored in physical
space
This environmental understanding enables applications like: - Virtual
workspace setups where digital screens persist between sessions -
Intelligent object placement that respects physical surfaces and
obstacles - Shared MR experiences where multiple users can collaborate
in the same augmented space - Adaptive interfaces that adjust based on
the available physical space
### Digital Twins: Replicating Real Environments in VR
One way that spatial understanding can be used is to create complete
digital replicas of real-world spaces, known as digital twins. While
basic spatial understanding allows MR systems to detect and map spaces
in real-time, digital twins take this concept further by creating
precise virtual replicas that can be used for planning, simulation, and
prototyping. This concept was demonstrated in a project where a VR
application was matched to a physical apartment.
This project created a VR application matched to a precise digital twin
of a real apartment. Users could walk around the virtual space, sit on
the sofa, and interact with various elements using the Oculus Quest's
hand tracking to control virtual cockpit interfaces that corresponded to
real-world furniture and spatial layouts.
\begin{tcolorbox}[colback=red!5!white,colframe=red!50!black,title=YouTube Video]
\textbf{Digital Twin VR Environment - Physical Space Replication}
This demonstration showcases a VR application that precisely replicates a real apartment as a digital twin, allowing users to interact with virtual controls and interfaces while navigating a space that matches their physical environment. Viewers will see how the Oculus Quest's hand tracking capabilities enable interaction with virtual cockpit-style controls that correspond to real-world furniture and space layouts. This approach demonstrates how digital twins can be used for prototyping AR designs within VR environments, creating unique hybrid experiences that blend VR immersion with real-world spatial awareness.
\textit{Watch at: \url{https://www.youtube.com/watch?v=sv6T-tg6RL4&t=s}}
\end{tcolorbox}
Among other things, this approach allows for prototyping AR designs
within a VR environment, offering a unique blend of VR and AR
concepts.Digital twins demonstrate how sophisticated spatial
understanding can enable not just real-time interaction with virtual
content, but long-term planning and modification of spaces through
persistent digital replicas.
### Conclusion
Mixed Reality and hybrid systems represent the cutting edge of immersive
technologies, blending the physical and digital worlds in increasingly
sophisticated ways. From high-end systems like the Varjo XR-4 and the
Apple Vision Pro to creative approaches like substitutional reality and
non-photorealistic AR, these technologies are pushing the boundaries of
what's possible in immersive experiences. The mainstreaming of MR
features in consumer devices has accelerated development across the
field, from sophisticated spatial understanding to digital twins, while
specialized applications continue to explore new possibilities in
specific domains.
As MR technologies continue to evolve, we can expect to see even more
innovative applications that challenge our perceptions of reality and
open up new possibilities for interaction, entertainment, education, and
professional applications. The future of mixed reality promises to
create increasingly seamless and intuitive ways of blending our physical
and digital worlds, driven by both broad consumer adoption and
specialized enterprise innovation.
## Emerging XR Technologies {#sec-emerging-xr-technologies}
As the field of extended reality (XR) continues to evolve, new
technologies are constantly emerging that push the boundaries of what's
possible in immersive experiences. This section explores some of the
cutting-edge developments in XR, focusing on haptics, advanced tracking
systems, and other innovative approaches to enhancing immersion and
interaction.
### Advanced Haptic Technologies
Haptic feedback represents one of the most promising emerging areas in
XR technology, with researchers developing innovative ways to provide
tactile sensations in virtual environments. These advancements include
haptic gloves, advanced force feedback systems, and novel approaches
like ultrasonic haptics that create tactile sensations in mid-air.
For a comprehensive exploration of haptic technologies, implementation
techniques, and design best practices, see
[Section 5.7](#sec-haptics-and-tactile-feedback){.quarto-xref}.
Additionally, emerging techniques like Galvanic Vestibular Stimulation,
which address motion sickness through vestibular system manipulation,
are covered in
[Section 5.4.7](#sec-advanced-locomotion-techniques){.quarto-xref}.
### Advanced Tracking and Interaction Systems
#### Project Northstar: Pushing the Boundaries of AR
Project Northstar, developed by Ultraleap (formerly LEAP Motion),
represents an exploratory venture into the future of augmented reality.
While not a commercially available product, it offers open-source
instructions for enthusiasts to build their own prototypes.
\begin{tcolorbox}[colback=red!5!white,colframe=red!50!black,title=YouTube Video]
\textbf{Project Northstar - Advanced Hand Tracking AR}
This demonstration showcases Project Northstar, an open-source AR headset prototype developed by Ultraleap that pushes the boundaries of hand tracking and interaction in augmented reality. Viewers will see advanced hand tracking technology that enables natural interaction with virtual objects, including hand augmentations and novel gesture-based controls. The project explores innovative ways to interact with completely virtual objects using physical hand movements in real space, demonstrating how advanced tracking can create compelling AR experiences where virtual content responds naturally to hand gestures and movements.
\textit{Watch at: \url{https://www.youtube.com/watch?v=7m6J8W6Ib4w&t=s}}
\end{tcolorbox}
Key features of Project Northstar include:
1. Advanced hand tracking
2. Augmentations to hands for enhanced interaction
3. Exploration of novel ways to interact with virtual objects in
physical space
Ultraleap's particular strength lies in hand tracking technology and
hand augmentations, exploring innovative interaction methods. This
enables users to interact with completely virtual objects using natural
body movements within their physical reality, creating compelling hybrid
experiences.
For comprehensive coverage of hand tracking and gesture recognition
technologies, implementation techniques, and best practices, see
[Section 5.8](#sec-gesture-and-voice-recognition){.quarto-xref}.
#### Redirected Walking and the Unlimited Corridor
Redirected walking is a technique that allows users to explore seemingly
infinite virtual spaces within a limited physical area. This is achieved
by subtly manipulating the user's perception of movement.
\begin{tcolorbox}[colback=red!5!white,colframe=red!50!black,title=YouTube Video]
\textbf{Redirected Walking - The Unlimited Corridor}
This impressive demonstration shows redirected walking technology that allows users to explore seemingly infinite virtual spaces within a limited physical area by subtly manipulating their perception of movement. Viewers will see how a cleverly designed physical wall structure can fool users into believing they are walking along an infinitely long, straight corridor when they are actually walking in a curved path. This technique demonstrates advanced spatial manipulation in VR, enabling large-scale virtual exploration in small physical spaces by exploiting human perceptual limitations and spatial orientation.
\textit{Watch at: \url{https://www.youtube.com/watch?v=THk92rev1VA&t=s}}
\end{tcolorbox}
This represents one of the more impressive recent developments in
redirected walking. The cleverly designed wall structure can trick users
into believing they're walking along an infinitely long, straight
corridor when they're actually following a curved path.
### Emerging Display Technologies {#sec-emerging-display-technologies}
#### Light Field Displays
Light field displays represent an emerging display technology that
promises unprecedented levels of realism and interactivity in immersive
experiences.
\begin{tcolorbox}[colback=red!5!white,colframe=red!50!black,title=YouTube Video]
\textbf{Light Field Display Technology - Spherical 3D Playback}
This demonstration showcases cutting-edge light field display technology that enables viewers to see properly rendered 3D views of scenes from multiple perspectives without special glasses. Viewers will observe how light field displays can create natural depth perception and motion parallax, allowing users to look around virtual scenes by moving their head position. The technology demonstrates how spherical light fields can be viewed from inside a volume, providing convincing 3D visualization that shifts perspective naturally as users move left, right, forward, back, up, or down, representing a significant advancement toward truly immersive glasses-free 3D displays.
\textit{Watch at: \url{https://www.youtube.com/watch?v=OUU2yGHgPQY&t=s}}
\end{tcolorbox}
When viewing a spherical light field from inside the volume, you can see
properly rendered 3D views of the scene in every direction. The
perspectives shift naturally as you move left and right, forward and
back, or up and down, creating convincing depth perception without
special glasses.
While still in development, I believe light field displays offer the
potential for glasses-free 3D viewing with natural depth perception and
motion parallax.
**For comprehensive coverage** of light field capture technology, neural
rendering techniques, video capture systems, and detailed technical
implementations, see
[Section 7.4](#sec-light-fields-and-neural-rendering){.quarto-xref}.
#### Immersive Light Field Video
Recent developments have introduced end-to-end systems for capturing and
displaying high-quality, immersive light field video content, extending
static light field displays to include temporal elements.
\begin{tcolorbox}[colback=red!5!white,colframe=red!50!black,title=YouTube Video]
\textbf{Light Field Video Capture System - Immersive Content Creation}
This video demonstrates an end-to-end system for capturing high-quality, immersive light field video content, extending static light field displays to include temporal elements. Viewers will see the complex camera array setup and processing pipeline required to capture light field video, which enables truly immersive video experiences where users can move and look around within captured scenes. The technology represents a significant advancement in immersive content creation, allowing for the development of video content that provides natural depth perception and viewing freedom, adding a new dimension to traditional video experiences through spatial exploration capabilities.
\textit{Watch at: \url{https://www.youtube.com/watch?v=SvRgkXQZIQg&t=s}}
\end{tcolorbox}
This technology allows for immersive video experiences where users can
move and look around within the captured scene, adding a new dimension
to video content.
### AI-Enhanced Interaction in XR
Recent advances in artificial intelligence are transforming how users
interact with XR environments, enabling more natural and intuitive
interactions through natural language processing and contextual
understanding. However, the computational demands of running
sophisticated AI models in real-time XR applications currently limit
widespread deployment.
For a comprehensive exploration of AI's role in XR technologies,
including AI-enhanced interactions, content generation, character
interaction, and development tools, see
[Section 8](#sec-artificial-intelligence-in-xr){.quarto-xref}.
### Conclusion
These emerging XR technologies represent the cutting edge of immersive
experiences. From advanced haptics and tracking systems to innovative
display technologies, these developments are pushing the boundaries of
what's possible in virtual and augmented reality. As these technologies
continue to evolve and become more accessible, we can expect to see even
more compelling and immersive XR experiences in the future.
For those interested in staying up-to-date with the latest developments
in XR technologies, conferences like SIGGRAPH and IEEE VR often showcase
cutting-edge research and prototypes in this rapidly evolving field.
## Further Reading
Chapter 2 delved into the various technologies that make up the extended
reality (XR) spectrum, from virtual reality (VR) to augmented reality
(AR) and mixed reality (MR). We examined the hardware and software
components of these systems and explored the concept of the
reality-virtuality continuum. To further your understanding of XR
technologies and their place on this continuum, explore these resources:
### Research Papers
- Milgram, P., & Kishino, F. (1994). A taxonomy of mixed reality
visual displays. IEICE TRANSACTIONS on Information and Systems,
77(12), 1321-1329.
- Introduces the reality-virtuality continuum, a fundamental
concept in understanding XR technologies.
# Creating Virtual Worlds
## Introduction to Game Engines
Game engines are powerful software frameworks that serve as the
foundation for creating interactive 3D environments. As noted by Matthew
Ball, "Think of the game engine as establishing the virtual universe's
laws---the ruleset that defines all interaction and all possibility."
While originally designed for game development, these engines have
evolved to become central tools for creating all kinds of virtual
experiences, from architectural visualization to urban planning.
### Understanding Game Engines
Game engines provide a comprehensive set of tools and technologies for
handling various aspects of virtual environment development:
- Graphics rendering and real-time visualization
- Physics simulation and interaction handling
- Sound processing and spatial audio
- Input management (keyboard, mouse, VR/AR devices)
- Asset management and scene organization
- Programming and logic systems
This technology has increasingly moved beyond gaming into "serious"
applications. As @ball2022metaverse notes, "As the global economy
continues to shift toward virtual worlds, these cross-platform and
cross-developer technologies will become a central part of global
society. Particularly the next wave of virtual world builders---not game
developers, but retailers, schools, sports teams, construction
companies, and cities---will likely use these solutions."
### The Two Primary Platforms: Twinmotion and Unreal Engine
In our context, we focus on two related but distinct platforms:
Twinmotion and Unreal Engine. Both are developed by Epic Games, with
Twinmotion being built on Unreal Engine technology but optimized for
different use cases.
#### Twinmotion
Twinmotion is a powerful, real-time 3D visualization tool designed for
architecture, construction, urban planning, and landscaping
professionals. Developed by Epic Games, Twinmotion leverages the Unreal
Engine to provide high-quality, interactive visualizations with ease of
use.
When you open Twinmotion, you'll find an intuitive interface with direct
access to: - A comprehensive asset library of furniture, vegetation, and
materials - Simple drag-and-drop functionality for placing objects and
applying materials - Real-time lighting and weather controls - Basic
navigation tools using WASD keys and mouse control - A straightforward
object manipulation system with an easy-to-use gizmo for moving,
rotating, and scaling
Twinmotion comes with built-in support for VR, enabling immersive
walkthroughs of your projects. It is, however, not possible to implement
specific VR interaction designs - for that you need Unreal Engine.
#### Unreal Engine
Unreal Engine is a powerful and versatile game engine that has become a
cornerstone in the world of interactive 3D content creation. To truly
appreciate the potential of Unreal Engine, it's essential to see it in
action.
\begin{tcolorbox}[colback=red!5!white,colframe=red!50!black,title=YouTube Video]
\textbf{Unreal Engine Enterprise Sizzle Reel}
This 2019 showcase demonstrates the impressive real-time rendering capabilities of Unreal Engine across enterprise applications beyond gaming. The video highlights photorealistic environments, dynamic lighting systems, and advanced character rendering used in architecture, automotive design, film production, and industrial visualization. Viewers will see how Unreal Engine enables creators to build highly detailed virtual worlds with cinematic quality graphics, real-time global illumination, and sophisticated material systems - all fundamental tools for creating compelling immersive experiences.
\textit{Watch at: \url{https://www.youtube.com/watch?v=iDqGtPHAecc&t=s}}
\end{tcolorbox}
These videos show what's possible with this kind of technology. This is
the enterprise sizzle reel from 2019, and all of these applications you
see here are actual products that are being made by companies.
The sizzle reel showcases real-time computer graphics rendering,
emphasizing Unreal Engine's ability to create highly realistic
environments and characters for various applications beyond just gaming.
Since this video was created the capabilites of Unreal Engine have bee
greatly developed, and the tightening integration with Twinmotion (as
well as UEFN, Unreal Engine for Fortnite) provides easier entry points
while giving access to full power in the Unreal Engine editor.
##### Why Unreal Engine?
Unreal Engine stands out for several reasons:
1. **Competitive Alternative**: While Unity is the primary alternative,
Unreal Engine offers unique advantages in terms of visual quality
and built-in features.
2. **Licensing and Pricing**: As of March 2024, Unreal Engine uses a
tiered licensing model:
- Games: Free to use until reaching \$1 million in revenue, then
5% royalty
- Non-games: Requires a commercial license with annual fees
- Education: Free for educational institutions and students for
learning purposes
3. **Focus on High-End Applications**.
Unreal Engine is more focused on high-end usage, I would say. Unity has
a bigger community, but if you're looking at how many *experts* you have
using Unity or Unreal Engine, it's a lot more even.
4. **Comprehensive Offerings**:
- Extensive marketplace of assets and tools
- Access to source code
- Quixel Megascans integration (high-quality photogrammetry
assets)
- Twin Motion (architecture and city planning software)
5. **Industry Standard**: Widely used in film, television, and
enterprise visualization, making it valuable for career development
in these fields.
By mastering these fundamental concepts of 3D graphics and game engine
technology, developers can create rich, interactive environments for a
wide range of applications beyond just video games.
For more detailed information on using Unreal Engine, refer to the
[Unreal Engine Documentation](https://docs.unrealengine.com/).
### Fundamental Components of 3D Objects
Whether working in Twinmotion or Unreal Engine, all 3D objects consist
of two primary elements:
1. **Mesh**: The structural framework that defines the shape of the
object.
2. **Surface Materials**: The visual properties applied to the mesh.
#### Mesh
The mesh serves as the structural framework or "wireframe" of a 3D
object. Think of it as the skeleton or scaffolding that defines the
object's shape. For curved or complex objects, a higher number of
polygons is required to achieve a smooth appearance.
`
`{=html} *A wireframe representation of the classic teapot model
used in computer graphics*
#### Surface Materials
Surface materials give objects their visual characteristics, analogous
to paint or wallpaper in the physical world. At its most basic, a
material might simply be a solid color. However, materials can become
highly complex, incorporating various properties to achieve realistic or
stylized appearances.
Textures can be used to map or drape images onto a surface, much like
applying wallpaper to a wall. This process allows for intricate details
and patterns to be added to the material, making the 3D object look more
realistic and visually appealing. These textures can represent various
surface properties such as color, roughness, metallicity, and normal
maps to simulate surface details. By applying textures, you can create
materials that mimic real-world surfaces like wood, metal, fabric, or
stone, enhancing the visual fidelity of your 3D objects.
#### Lighting
Lighting plays a crucial role in creating realistic virtual
environments. Both Twinmotion and Unreal Engine offer sophisticated
lighting systems. More about that later.
### Working with 3D Space
To position and manipulate 3D objects within a virtual environment, we
use a coordinate system and transformations. There are several common
coordinate systems used in 3D graphics:
**Left-Handed Coordinate System**: In this system, the thumb, index, and
middle fingers of the left hand represent the X, Y, and Z axes,
respectively. This system is commonly used in DirectX.
**Right-Handed Coordinate System**: Here, the thumb, index, and middle
fingers of the right hand represent the X, Y, and Z axes, respectively.
This system is often used in OpenGL.
**Unreal Engine and Twinmotion Coordinate System**: Both Unreal Engine
and Twinmotion use a right-handed coordinate system where the Z-axis is
up. This means: - X-axis: Left to right - Y-axis: Forward and backward -
Z-axis: Up and down
Understanding these coordinate systems is crucial for accurately
positioning and transforming objects in 3D space. In many 3D
applications, including Twinmotion and Unreal Engine, these axes are
color-coded for easy identification.
#### Transformations
Transformations allow for the positioning and manipulation of objects in
3D space. They consist of three main operations:
1. **Translation**: Moving the object along the X, Y, or Z axes.
2. **Rotation**: Rotating the object around each axis.
3. **Scaling**: Changing the size of the object along each axis.

The combination of these transformations determines an object's final
position, orientation, and size within the 3D environment.
### Getting Started
For those new to these tools, start with Twinmotion for its more
approachable interface and workflow, then progress to Unreal Engine as
your needs grow more complex. Remember that while these platforms share
underlying technology, they serve different purposes and offer different
levels of control and customization.
## Building in Twinmotion and Unreal Engine
The modern workflow for creating virtual environments often involves
using both Twinmotion and Unreal Engine, leveraging each tool's
strengths. While both are based on the same underlying technology, they
serve different purposes and offer different workflows.
### Getting Started with Twinmotion
Twinmotion excels at rapid visualization and intuitive environment
creation, making it an ideal starting point for many projects.
#### Navigation and Basic Controls
Learning to navigate in Twinmotion is straightforward: - WASD keys for
"flying" around the environment - Q and E keys for moving up and down -
Mouse for looking around - F key to focus on selected objects - Hold
mouse over the "gizmo" and drag to move or rotate objects - Drag along
specific axes (X, Y, Z) for precise control - Use the yellow center
point to anchor objects to the ground
#### Setting Up the Environment
To build up the larger structure of the environment, like terrain and
buildings, there are a few options in Twinmotion.
1. **Import Your Model**: If you have existing 3D models from design
software like SketchUp, Revit, or ArchiCAD, you can easily import
them into Twinmotion. You might also find models you can use on
digital marketplaces such as [Fab](https://www.fab.com/) (operated
by Epic Games, creators of Twinmotion and Unreal Engine).
2. **Use Primitive Shapes**: If you don't have detailed models, you can
use Twinmotion's primitive shapes (such as boxes, spheres, and
cylinders) to block out buildings and other structures. This is
useful for prototyping and planning your environment.
3. **Create Terrains**: Twinmotion provides tools for creating and
modifying terrains to fit your project needs. You can:
- Use the terrain tool to sculpt the landscape, adjusting
elevation and creating hills, valleys, and other features.
- Apply different textures and materials to the terrain to
simulate grass, dirt, sand, or other surfaces.
- Add vegetation, such as trees and plants, to enhance the realism
of your environment.
- Utilize the water tool to create bodies of water like lakes,
rivers, and ponds, adding another layer of detail to your scene.
#### Furnishing the Environment
1. **Materials and Textures**: Apply materials and textures to your
primitive shapes to give them a more realistic appearance.
Twinmotion offers a wide range of materials that can be customized
to fit your needs.
2. **Objects and Vegetation**: Populate your environment with
furniture, vehicles, trees, characters, and other objects from
Twinmotion's asset library. This helps create a more immersive and
detailed scene.
Twinmotion provides an extensive library of ready-to-use assets:
1. Access the library through the sidebar
2. Browse categories including:
- Furniture and decorations
- Vegetation and landscapes
- Characters and vehicles
- Materials and textures
3. Drag and drop items directly into your scene
4. Use the Properties panel to adjust object settings
#### Scene Organization
Effective scene management is crucial for larger projects. Build
hierarchies to be able to move, rearrange and show/hide groups of
objects as a unit.
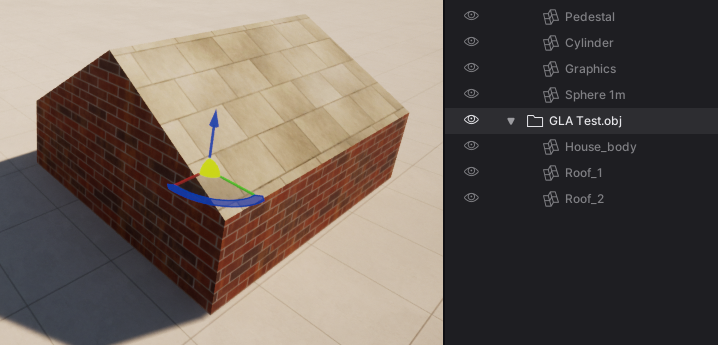
- Use the scene list to organize objects and groups
- Click the eye icon to show/hide elements
- Create hierarchies to manage complex scenes
- Select groups to move multiple objects together
#### Environment Controls
Twinmotion offers robust environment customization:
- Adjust weather conditions and time of day
- Control atmospheric effects
- Modify seasonal vegetation changes
- Set up specific lighting scenarios
#### Working with User Libraries
The User Library system in Twinmotion allows for easy resource
sharing: 1. Add objects and materials using "Add to User Library" 2.
Access saved resources through the User Library panel 3. Share the
library directory with team members - You may also locate and share
individual .tmi files within your UserLibrary folder. The recipient can
place these in their own UserLibrary folder to access them in
Twinmotion. 4. You can point the User Library to another folder, e.g., a
shared folder, under Preferences -\> Custom Paths.
#### Exporting to Unreal Engine
Once you have set up and furnished your environment in Twinmotion, you
can export it to Unreal Engine for further development. This allows you
to take advantage of Unreal Engine's advanced features and capabilities.
1. **Export the Environment**: Use Twinmotion's export functionality to
save your environment as a file that can be imported into Unreal
Engine.
2. **Import into Unreal Engine**: Open Unreal Engine and import the
exported file. You can then continue to refine and develop your
environment using Unreal Engine's powerful tools.
Note that the Twinmotion to Unreal Engine Export+Import does not work
with animated characters or objects, and requires additional work for
terrains. With these lomitations, Twinmotion's ease of use and extensive
asset library can be leveraged to quickly set up and furnish 3D
environments. By exporting to Unreal Engine your flexibility and
potentials to push your project further is greatly enhanced.
For more detailed information and tutorials, visit the [Twinmotion
Documentation](https://dev.epicgames.com/documentation/en-us/twinmotion/twinmotion-documentation)
for general information. You can also find more information on the
[Twinmotion to Unreal Engine
Workflow](https://dev.epicgames.com/documentation/en-us/twinmotion/twinmotion-to-unreal-engine-workflow).
This documentation includes the extra steps you need to do if you want
to import Twinmotion landscapes (terrains) into Unreal Engine. In the
[TwinmotionOverview of the Twinmotion to Unreal Engine
Workflow](https://dev.epicgames.com/documentation/en-us/twinmotion/overview-of-the-twinmotion-to-unreal-engine-workflow)
you can read more about the workflow, including details on what is
supported.
### Building in Unreal Engine
When projects require more complex interactions or custom functionality,
Unreal Engine provides the necessary tools and flexibility.
#### Importing Models
One of the primary ways to populate your levels is by importing models.
In addition to the path via Twinmotion described above, there are
several other methods.
##### Migrating from Other Projects
The "Migrate" function in Unreal Engine allows you to copy assets with
all their dependencies from one project to another. This is particularly
useful when you want to reuse assets across different projects, or when
you want to use a few objects from a large Asset pack (see below). Or,
perhaps, when you want to integrate work from several students into one
project.
To migrate assets:
1. Open the source project containing the desired assets.
2. Locate the asset in the Content Browser.
3. Right-click on the asset and select "Asset Actions" \> "Migrate".
4. Choose the Content folder of your target project as the destination.
##### Using Asset Packs
For larger collections of assets, such as those available on Fab:
1. Create an empty project or use a minimal template.
2. Add the asset pack to this project.
3. Select specific assets you need.
4. Migrate these selected assets to your main project.
This approach helps keep your main project lean and manageable.
I recommend not adding asset packs directly to your exercises project
because then you add everything in that pack to your project. Instead,
create an empty project or use a copy of a minimal project and add the
asset pack to that one. Then go into that project and pick the
particular models or assets that you want to use and migrate them from
there over to your exercise project.
##### Using Simple Included Shapes
As with Twinmotion, Unreal Engine comes with a set of basic geometric
shapes that can be quickly added to your level:
- Boxes
- Spheres
- Cylinders
- And more
These simple shapes are useful for blocking out levels, creating
placeholder objects, or even as building blocks for more complex
structures.
#### Building Levels
Once you have assets in your project, you can start building your level
using various tools and interfaces within Twinmotion or Unreal Engine.
##### The Transform Gizmo
The transform gizmo is a crucial tool for manipulating objects in your
scene. Simlilar gizmos exist in both Twinmotion and Unreal Engine. They
allow you to:
- Translate (move) objects
- Rotate objects
- Scale objects
##### World Outliner
The World Outliner provides a hierarchical list of all actors (objects)
in your level. It allows you to:
- View all objects in the level in a hierarchy
- Quickly search and filter objects
- Select and/or rename objects
- Organize your level structure
One useful function is to go directly to an object by either
double-click it in the Outliner or selecting it and pressing "F" (as in
Twinmotion).
##### Actor Details Panel
The Actor Details panel displays properties and settings for the
currently selected actor. Here you can adjust:
- Transform values (position, rotation, scale)
- Material properties
- Lighting settings
- And many other object-specific properties
#### Composite Objects in Unreal
In Unreal Engine, Blueprints are a powerful tool for creating composite
objects by combining multiple components into a single actor. This
approach allows for flexible and reusable design, making it easier to
manage complex objects within your virtual environment. While materials
can be set for component meshes within these Blueprints, the primary
focus here is on the construction and configuration of these composite
objects.
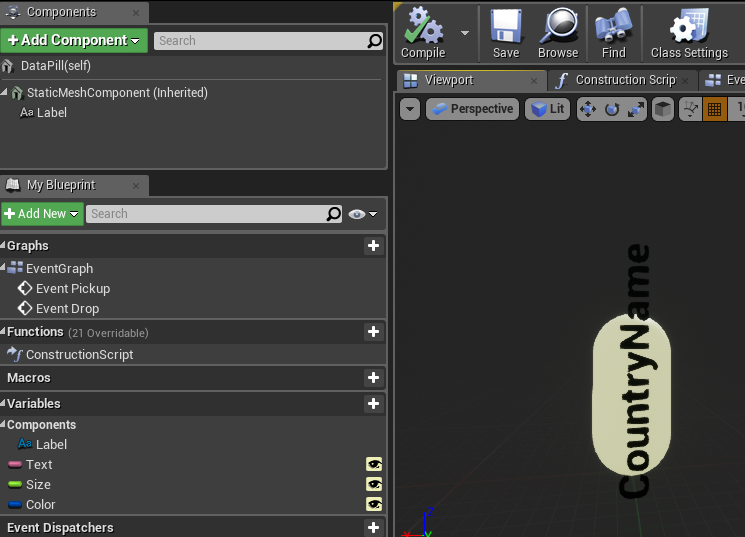
In this example, we see a Blueprint that constructs a labeled object. It
combines a mesh (the "pill" shape) with a text component, allowing for
easy customization through variables. This is a simple initial use of
Blueprints in Unreal Engine, with more advanced applications to be
covered in the next chapter.
#### Reality-Capture
It is also possible to populate your virtual 3D environment by creating
digital copies of real objects. Reality capture involves digitizing
real-world objects or environments to create 3D models for virtual use.
This enhances the authenticity of virtual environments by incorporating
realistic assets. Common methods include photogrammetry, 3D scanning,
and depth sensors. These techniques will be discussed in more detail in
a later chapter.
#### Unreal Engine Best Practices
1. **Keep projects lean**: Only migrate the assets you need to keep
your project manageable and performance-friendly.
2. **Organize before migrating**: Rename folders and assets before
migration if you want a specific structure in your target project.
3. **Use placeholders**: Start with simple shapes to block out your
level before adding detailed assets.
By mastering these techniques and tools, you'll be well-equipped to
create rich, detailed environments in Unreal Engine, whether you're
working on a small prototype or a full-scale project.
For more information on 3D modeling and asset creation in Unreal Engine,
check out the [official Unreal Engine documentation on Content
Creation](https://docs.unrealengine.com/en-US/Engine/Content/index.html).
### Best Practices for Tool Selection
Choose the appropriate tool based on your project needs:
1. **Use Twinmotion When:**
- Rapid visualization is priority
- Working with architectural or urban planning projects
- Creating quick iterations of design concepts
- Collaborating with non-technical stakeholders
- Basic VR walkthroughs are needed
2. **Switch to Unreal Engine When:**
- Custom interactions are required
- Complex behaviors need to be implemented
- Advanced VR experiences are being developed
- Specific performance optimizations are needed
- Custom shaders or effects are required
### Tips for Efficient Workflow
1. **Start in Twinmotion**
- Block out basic environments
- Test different design options
- Get stakeholder feedback early
2. **Prepare for Unreal Engine**
- Keep scene organization clean
- Document material and object settings
- Plan for feature requirements
3. **Optimize Your Process**
- Use shared User Libraries for common assets
- Maintain consistent naming conventions
- Create templates for repeated elements
- Use characters as scale reference
4. **Consider Performance**
- Start with simple shapes for blocking
- Add detail progressively
- Test performance regularly
- Use the measurement tool (F1 for help)
By understanding when and how to use each tool, you can create efficient
workflows that leverage the strengths of both Twinmotion and Unreal
Engine. This combined approach allows for rapid iteration and
visualization while maintaining the ability to develop more complex
features when needed.
## Working with Materials and Lighting
Creating realistic and visually appealing virtual environments relies
heavily on understanding and effectively implementing materials and
lighting. Both Twinmotion and Unreal Engine provide powerful tools for
controlling these aspects, though with different levels of complexity
and control.
### Basic Material Concepts
Materials consist of several key components:
1. **Base Color**
- RGB (Red, Green, Blue) color values
- Can be solid colors or image-based textures
- Additional alpha channel (RGBA) for transparency
2. **Textures**
- Images applied to surfaces
- Control various surface properties
- UV coordinates determine how textures map onto surfaces
3. **Surface Properties**
- Roughness (how smooth or rough a surface appears)
- Metallic (how metal-like the surface behaves)
- Opacity (transparency level)
- Emissive (self-illumination)

### Working with Materials in Twinmotion
Twinmotion provides an intuitive interface for material management and
application.
#### Basic Material Application
1. **Using the Material Library**
- Browse pre-made materials categorized by type (wood, metal,
glass, etc.)
- Drag and drop materials directly onto objects
- Switch between "Apply to Surface" and "Apply to Object" modes
2. **Creating Materials from Images**
- Navigate to Materials -\> + (Standard)
- Access Properties -\> Color -\> Details -\> Texture -\> Open
- Select your image file
- Adjust scale and tiling through UV properties
#### Adjusting Material Properties
To fine-tune materials in Twinmotion: 1. Select the material 2. Access
Properties panel 3. Adjust UV scaling for texture size 4. Use the
Material Picker to sample existing materials 5. Modify basic properties
like color tint and glossiness
#### Working with Decals
Decals are images that can be "stamped" onto surfaces, adding detail
without modifying the base material:
1. Access decals through Library/Objects/Decals
2. Place and position on any surface
3. Create custom decals:
- Modify existing decals through Properties -\> Color -\> Details
-\> Texture
- Save to User Library with new name
- Use for signage, weathering, or surface details
### Materials in Unreal Engine
Unreal Engine offers more advanced material creation and editing
capabilities through its Material Editor.
#### Material Editor Interface
The Material Editor uses a node-based system for creating complex
materials:
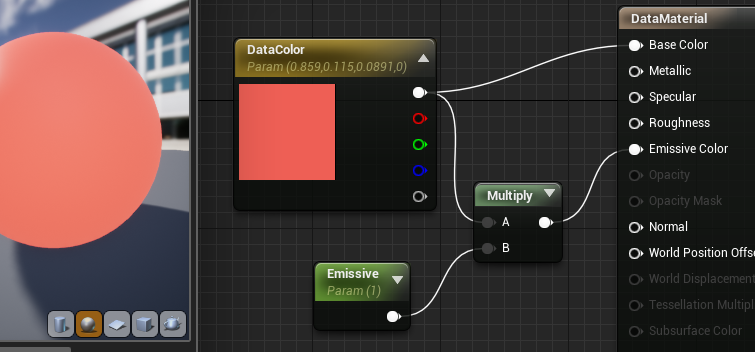
1. **Creating New Materials**
Right-click in Content Browser
Select Create Basic Asset > Material
Double-click to open Material Editor
2. **Material Instances**
- Create variations of base materials
- Adjust parameters without rebuilding shaders
- Enable runtime material modifications
#### Creating Materials from Images
Creating materials from images in Unreal Engine is straightforward and
efficient. Here's how you can do it:
1. **Import the Image as a Texture**
- Drag and drop your image file (e.g., JPG, PNG) directly into the
**Content Browser** within Unreal Engine.
- The image will be imported and appear as a **Texture** asset.
2. **Apply the Texture to an Object**
- Locate the imported texture in the **Content Browser**.
- Simply drag the texture onto the object in your scene viewport.
- Unreal Engine will automatically create a new **Material** using
the texture and assign it to the object.
3. **Reuse and Modify the Material**
- The newly created material is saved alongside your assets in the
**Content Browser**.
- You can apply this material to other objects by dragging it onto
them.
- To further customize the material, double-click it to open the
**Material Editor**, where you can adjust properties like color,
roughness, metallicness, and more.
This quick process allows you to turn any image into a usable material,
enhancing your objects with custom textures efficiently.
### Lighting Systems
Lighting is crucial for creating atmosphere and depth in virtual
environments. Both platforms offer different approaches to lighting.
#### Basic Lighting Concepts
Light interacts with surfaces in several ways: - Direct illumination
from light sources - Indirect bounced light - Surface reflections and
scatter - Color interactions between lights and materials
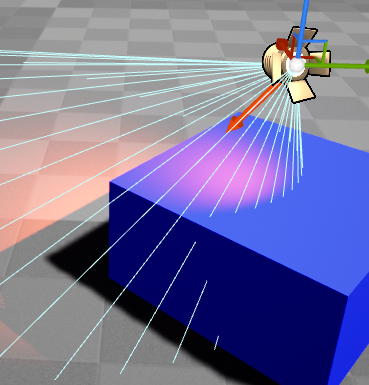
##### Simple Lighting Example: Blue Surface + Red Light = Purple
The final color displayed on the screen is a result of the interaction
between the surface material properties and the lighting conditions in
the scene.
##### Advanced Lighting: Light Bouncing and Global Illumination
- **Indirect Lighting**: Light doesn't just illuminate surfaces
directly; it also bounces off surfaces, carrying color information
with it.
- **Color Bleeding**: A red wall illuminated by light can cast a
reddish hue onto adjacent surfaces due to reflected light.
- **Multiple Bounces**: Each bounce can further mix colors, adding to
the scene's realism.
##### Surface Material Properties
- **Diffuse Reflection**: Determines how much light is scattered
uniformly in all directions.
- **Specular Reflection**: Controls the intensity and color of sharp
reflections.
- **Ambient Occlusion**: Simulates soft shadows in creases and
cavities, affecting the perceived color.
- **Subsurface Scattering**: Allows light to penetrate a surface and
scatter internally, influencing the color output.
By accurately simulating these interactions, rendering engines create
realistic visuals where materials and lights combine to produce the
final colors perceived by the viewer.
#### Lighting in Twinmotion
Twinmotion emphasizes ease of use with its lighting system:
1. **Time of Day**
- Real-time sun position adjustment
- Dynamic shadows and lighting changes
- Atmospheric effects
2. **Artificial Lighting**
- Simple light placement
- Basic intensity and color controls
- Automatic indoor/outdoor adjustment
3. **Tips for Twinmotion Lighting**
- Artificial lights are subtle during daylight
- Switch to night view to adjust artificial lighting
- Use Post Process settings for overall exposure
#### Advanced Lighting in Unreal Engine
Unreal Engine provides more comprehensive lighting control, allowing
developers to tailor lighting techniques to their specific needs. The
engine supports both baked lighting and real-time global illumination
through Lumen.
**Baked Lighting vs. Lumen**
- **Baked Lighting**: This technique precomputes lighting information
and stores it in lightmaps. It offers high-quality visuals with
minimal runtime performance impact, making it ideal for VR
applications where maintaining high frame rates is critical.
However, baked lighting is static and doesn't support dynamic
lighting changes during gameplay.
- **Lumen**: Lumen is Unreal Engine's real-time global illumination
system. It provides dynamic lighting effects without precomputed
lightmaps, allowing for more interactive and responsive
environments. While Lumen offers greater flexibility, it comes with
increased performance costs and is currently not recommended for VR
projects due to these demands.
For VR applications, baked lighting remains the preferred method to
ensure optimal performance. More detailed discussions on baking and
Lumen will be covered later.
**Light Types**
Unreal Engine offers a variety of light types to simulate different
real-world lighting scenarios. The actual light sources that you can
place in your environment are:
- **Directional Light**: Mimics sunlight or moonlight, casting
parallel rays in a specified direction. It illuminates all objects
equally, ideal for outdoor scenes.
- **Point Light**: Emits light uniformly in all directions from a
single point, like a bare light bulb. Useful for simulating
localized light sources with spherical influence.
- **Spot Light**: Projects a cone-shaped beam of light, similar to a
flashlight or stage spotlight. Allows control over beam angle and
falloff for focused lighting effects.
- **Sky Light**: Provides ambient lighting by capturing the sky's
illumination, simulating indirect light from the environment.
Enhances realism with soft shadows and subtle lighting variations.
- **Rect Light**: Emanates light from a rectangular area, producing
soft, diffused illumination. Ideal for simulating light from
windows, screens, or luminous panels.
In addition to the standard light sources, Unreal Engine offers
functionalities to enhance the realism and flexibility of your lighting:
- **IES Profiles**: Use Illuminating Engineering Society profiles to
replicate the precise light patterns of real-world fixtures, adding
authenticity with realistic light distribution.
- **Emissive Materials**: Apply materials that emit light to create
self-illuminating surfaces, ideal for neon signs, screens, or
glowing elements.
- **Light Functions**: Apply dynamic materials to lights to create
effects like flickering, pulsating, or patterned illumination,
adding interest with animated light behaviors.
- **Volumetric Effects**: Enable lights to interact with particles or
fog, creating atmospheric effects like light shafts or beams, and
enhancing depth and mood in scenes.
- **Sky Atmosphere and Fog**: Simulate atmospheric scattering for
realistic skies, sunsets, and sunrises when used with Directional
Lights, adding environmental depth to outdoor scenes.
These features allow you to design rich and immersive lighting
environments, tailoring illumination to your project's specific needs.
**Light Mobility**
The light mobility setting only affects baked lighting. For Lumen, all
lights should be treated as movable. Static lights may be automatically
ignored when using Lumen, but are key for getting nice lighting when
Baking.
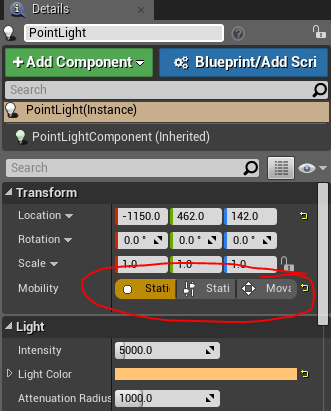
- **Stationary**: Partially baked, can change color/intensity
- **Static**: Fully baked, highest quality but fixed
- **Moveable**: Fully dynamic, most flexible but costly
**Bake Lighting**
In 5.4 you need to do the following to bake lighting, or check that it
has already been done, depending on which template you are starting out
with.
1. **Disable Lumen**:
- Go to **Edit \> Project Settings**
- Under the **Rendering** category, set **Dynamic Global Illumination
Method** to **None**
- Set **Reflections Method** to **None**
2. **Ensure Lights are Static**:
- Select your lights in the level and set their **Mobility** to
**Static**
- You can have a few dynamic lights for interactivity, but most lights
should be static.
3. **Build Lighting**:
- Go to **Build \> Build Lighting Only** to bake the lighting
To use GPU Lightmass for baking, you need to enable additional settings
and ensure your computer meets certain requirements:
1. **Enable GPU Lightmass Plugin**:
- Go to **Edit \> Plugins**
- Search for **GPU Lightmass** and enable it
- Restart the engine to apply changes
2. **Turn on Virtual Texture Support**:
- Go to **Edit \> Project Settings**
- Under the **Rendering** category, enable **Virtual Texture Support**
**Computer Requirements for GPU Lightmass**: \* A compatible GPU with
sufficient VRAM (typically 8GB or more) \* Updated graphics drivers \*
Adequate cooling and power supply to handle the increased load during
the baking process
These steps and requirements ensure that GPU Lightmass can function
correctly and efficiently, providing high-quality baked lighting for
your project.
#### Post-Processing
Both platforms offer post-processing effects to enhance the final image:
1. **Exposure Control**
- Auto-exposure adaptation
- Manual exposure adjustment
- High Dynamic Range (HDR) effects
2. **Color Grading**
- Overall color temperature
- Contrast and saturation
- Color balance adjustments
3. **Additional Effects**
- Bloom and lens flares
- Depth of field
- Ambient occlusion
### Best Practices
1. **Material Organization**
- Use clear naming conventions
- Create material libraries for reuse
- Document complex material setups
2. **Lighting Setup**
- Start with basic lighting
- Build lighting frequently to check results
- Consider performance implications
- Use reference images for comparison
3. **Performance Considerations**
- Limit dynamic lights
- Optimize texture sizes
- Use material instances for variations
- Balance quality and performance
By understanding and effectively implementing these material and
lighting concepts, you can create more convincing and visually appealing
virtual environments. Remember to start simple and gradually add
complexity as needed for your specific project requirements.
## Optimization for XR Experiences
Creating compelling XR experiences requires careful attention to
performance optimization. Unlike traditional desktop applications, XR
applications must maintain consistently high frame rates and low latency
to provide a comfortable user experience. Modern VR headsets typically
require a minimum of 90 frames per second, with some demanding up to 120
fps, while keeping motion-to-photon latency under 20 milliseconds. These
requirements exist because any inconsistency in performance can lead to
user discomfort or motion sickness.
### Performance Considerations Across Platforms
When beginning development, it's important to understand how performance
considerations differ between Twinmotion and Unreal Engine. Twinmotion,
while excellent for rapid prototyping, handles many optimization
decisions automatically but can struggle with complex scenes. Large
numbers of unique assets, extensive vegetation, or complex landscapes
can impact performance, particularly in VR. When working in Twinmotion,
focus on efficient scene organization and be selective with real-time
effects like weather systems, which can significantly impact
performance.
Moving from Twinmotion to Unreal Engine allows for more precise control
over optimization, but requires a deeper understanding of performance
factors. The transition process should begin with identifying
performance-critical elements in your Twinmotion prototype, then
planning how to optimize them in Unreal Engine. This might involve
restructuring complex areas, optimizing materials, or implementing more
efficient lighting solutions.
### Understanding Rendering Optimization
Rendering optimization forms the cornerstone of XR performance. In
Unreal Engine, the rendering pipeline must handle creating two views of
the scene (one for each eye) at high resolution while maintaining target
frame rates. This process can be optimized through several key
techniques.
Level of Detail (LOD) systems play a crucial role in managing rendering
complexity. Rather than maintaining high detail across all distances,
objects can use simpler models when viewed from afar. In VR, LOD
transitions need particular attention as users may notice sudden changes
in detail more easily than in traditional applications. The key is to
balance visual quality with performance, adjusting LOD distances and
transition zones to maintain immersion without overwhelming the
renderer.
Occlusion culling represents another vital optimization technique. By
only rendering objects that are actually visible to the user,
significant performance gains can be achieved. Unreal Engine provides
tools for setting up occlusion volumes and hierarchical LOD systems,
which are particularly effective in complex architectural or urban
environments. When implementing occlusion culling, it's important to
test in VR specifically, as the wider field of view and head movement
can affect what needs to be rendered at any given moment.
#### Note on Nanite
Nanite is Unreal Engine's virtualized geometry system that allows for
the real-time rendering of highly detailed assets with massive polygon
counts. It eliminates the need for traditional Level of Detail (LOD)
models by automatically adjusting the level of detail based on the
camera's view, providing unprecedented visual fidelity.
In general, Nanite isnot performant enough for virtual reality (VR)
applications. The demanding computational requirements of Nanite can
make it challenging to maintain the high frame rates necessary for
comfortable VR experiences, typically 90 frames per second or higher.
However, in special cases where a powerful computer is available and
lower framerates may be acceptable, it is possible to use Nanite in VR.
### Asset and Material Management
Efficient asset management dramatically impacts XR performance. While
both Twinmotion and Unreal Engine handle asset loading differently, the
principles remain similar. Complex meshes should balance detail with
performance requirements, using appropriate polygon counts for their
purpose and visibility. Texture resolution and compression settings need
careful consideration, especially for standalone VR devices with limited
memory.
Materials in XR applications require special attention. Complex material
functions that work well on desktop may cause performance issues in VR
due to the need to render them twice (once for each eye) at high frame
rates. When working with materials, consider using material instances
instead of unique materials where possible, and be particularly mindful
of expensive operations like dynamic parameters or complex transparency
effects.
The material workflow often begins in Twinmotion with simple, effective
materials that establish the visual direction. When moving to Unreal
Engine, these materials can be refined and optimized, taking advantage
of more advanced features while maintaining performance. This might
involve combining textures into atlas maps, simplifying complex material
functions, or creating more efficient shader variants for VR rendering.
### Memory and Resource Management
Memory management becomes particularly crucial in XR applications,
especially for standalone VR devices. Unlike desktop applications, VR
experiences must maintain high performance while managing resources for
two views, often at high resolutions. This requires careful attention to
asset loading and unloading, texture streaming, and resource allocation.
Unreal Engine provides powerful tools for monitoring and optimizing
resource usage. The built-in profiler allows developers to analyze CPU
and GPU usage patterns, identify performance bottlenecks, and monitor
memory allocation in real-time. Using these tools effectively requires
understanding how to interpret the data they provide and how to address
the issues they reveal.
For example, when the profiler reveals that draw calls are impacting
performance, you might need to combine static meshes, implement
instancing for repeated elements, or adjust the level streaming volume
setup. These decisions should be guided by data from the profiling tools
rather than assumptions about where performance issues might lie.
### Development Best Practices
Optimization should be considered from the beginning of development, not
treated as a final polish step. When starting a new XR project,
establish performance benchmarks early and test frequently on target
devices. This approach helps identify potential issues before they
become deeply embedded in the project structure.
Understanding your target platform's capabilities and limitations is
crucial. Different VR systems have varying performance characteristics
and requirements. For example, standalone VR headsets might require more
aggressive optimization of assets and effects compared to PC-tethered
systems. Testing on the lowest-spec target device helps ensure a
consistent experience across all platforms.
Regular testing in VR throughout development is essential. What works
well on a traditional display might present unexpected issues in VR,
from performance problems to usability concerns. By maintaining a
regular testing schedule in the target VR environment, these issues can
be identified and addressed early in development.
Remember that optimization is an ongoing process that requires regular
attention and adjustment as your project evolves. By understanding these
fundamental concepts and applying them thoughtfully throughout
development, you can create XR experiences that maintain both visual
quality and performance, providing users with comfortable and immersive
experiences.
### XR Optimization Checklist
When optimizing your XR experience, verify these key aspects:
✓ Performance Targets - \[ \] Maintains 90+ fps consistently - \[ \]
Motion-to-photon latency under 20ms - \[ \] No stuttering or frame drops
in VR view
✓ Rendering Efficiency - \[ \] LOD system properly configured for VR -
\[ \] Occlusion culling implemented - \[ \] Draw calls optimized and
monitored - \[ \] Static meshes combined where appropriate
✓ Asset Optimization - \[ \] Textures properly sized and compressed - \[
\] Material complexity appropriate for VR - \[ \] Mesh polygon counts
optimized - \[ \] Asset loading/streaming configured
✓ Testing Protocol - \[ \] Regular testing in target VR device - \[ \]
Performance profiling data reviewed - \[ \] Testing across different VR
movement patterns - \[ \] Testing in most complex scene areas
Use this checklist during development to ensure you're maintaining
optimal performance for your XR experience.
## Further Reading
### Official Documentation
- [Twinmotion
Documentation](https://dev.epicgames.com/documentation/en-us/twinmotion/twinmotion-documentation)
- [Unreal Engine Documentation](https://docs.unrealengine.com/)
- [Epic Games Learning Portal](https://dev.epicgames.com/learn)
# Dynamic Virtual Environments {#sec-dynamic-environments}
## Physics Simulations in XR
Physics simulations play a crucial role in creating immersive and
realistic virtual reality (VR) experiences. By implementing accurate
physics, developers can create environments that feel natural and
intuitive to users, enhancing the overall sense of presence in the
virtual world.
### The Importance of Physics in VR
Physics in VR is not just about creating realistic environments; it's
about providing users with a familiar and intuitive way to interact with
virtual objects. As demonstrated in early VR applications and games, the
ability to pick up, move, and manipulate objects in a physically
realistic manner greatly enhances the user experience.
\begin{tcolorbox}[colback=red!5!white,colframe=red!50!black,title=YouTube Video]
\textbf{VR Physics Interaction Demo}
Watch as users naturally pick up, manipulate, and throw virtual objects using realistic physics simulation in an early VR application. This video demonstrates how physics-based interactions create intuitive and engaging user experiences in virtual environments, allowing users to interact with objects in a way that feels natural and immersive.
\textit{Watch at: \url{https://www.youtube.com/watch?v=Uhh4dA-V2os&t=s}}
\end{tcolorbox}
These physics-based interactions allow users to:
1. Explore and experiment freely
2. Apply real-world knowledge to virtual scenarios
3. Engage in rich, multi-faceted interactions
### Testing the World Model
One of the most compelling aspects of physics in VR is the ability for
users to test their understanding of the virtual world. This concept is
beautifully illustrated in the following example:
\begin{tcolorbox}[colback=red!5!white,colframe=red!50!black,title=YouTube Video]
\textbf{Testing VR World Physics}
Observe users experimenting with creative physics interactions that weren't explicitly programmed, such as stacking objects in unexpected ways or using physics to solve problems. This video showcases how realistic physics simulation allows users to test their understanding of the virtual world model, enhancing immersion and engagement.
\textit{Watch at: \url{https://www.youtube.com/watch?v=zkcRbrnsNp4&t=s}}
\end{tcolorbox}
In this scenario, users can attempt actions that aren't explicitly
programmed but should theoretically work based on real-world physics.
When these interactions succeed, it significantly enhances the sense of
realism and immersion.
### Fundamental Concepts of Physics in VR
To create these realistic interactions, VR developers must implement
several key physics concepts:
#### Force and Velocity
The foundation of physics simulation in VR revolves around forces and
velocity:
- **Force** leads to acceleration, which in turn affects velocity
- **Velocity** is defined by both speed and direction
Forces can be applied through:
1. Collisions between objects
2. Scripted events (e.g., programmatically applying force to an object)
#### Types of Forces
Two primary types of forces are commonly used in VR physics:
1. **Impulse**: A momentary push or impact (e.g., hitting an object)
2. **Constant Force**: A continuous application of force (e.g.,
gravity)
`
`{=html} *Illustration of impulse force applied to an object*
Here I'm applying an impulse force---hitting it once (well, twice, but
one at a time). You can also have constant forces like gravity, which
continuously pushes objects downward.
#### Gravity and Collisions
Gravity plays a crucial role in making virtual environments feel
natural. It's typically implemented as a constant downward force on all
objects. Collisions, on the other hand, allow objects to interact
realistically with each other and the environment.
### Vectors in 3D Environments
In 3D environments and game engines, vectors play a crucial role in
defining direction and magnitude. They are essentially coordinates (X,
Y, Z) that specify both the direction and length of an "arrow" in 3D
space. This concept is particularly important when dealing with velocity
and force in physics simulations.
As illustrated in the image above, a vector is represented as an arrow
pointing in a specific direction relative to the X, Y, and Z axes. This
visual representation helps designers and developers understand and
manipulate directional forces within the 3D environment.
In practical applications, such as applying an impulse to an object,
vectors are used to determine both the direction and magnitude of the
force. For example, in Unreal Engine, you might see something like this:
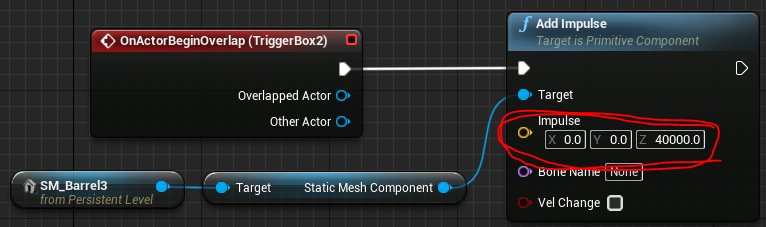
Here, we can see a large number associated with the vector.
The reason this is such a large number is because I'm not applying this
force over a longer time period. I'm essentially giving the object one
big hit.
This demonstrates how vectors are used to apply instantaneous forces in
physics simulations, allowing for realistic interactions between objects
in the virtual environment.
### Implementing Physics in Unreal Engine
Unreal Engine provides a robust physics simulation system that can be
easily integrated into VR projects. Here are some key points to consider
when implementing physics in Unreal Engine:
1. **Physics Asset Editor**: Use this tool to set up complex physics
bodies for skeletal meshes.
2. **Physical Materials**: Define how surfaces react to collisions and
friction.
3. **Constraints**: Use physics constraints to create joints and
connections between objects.
4. **Force and Torque**: Apply forces and torques to objects using
Blueprints or C++.
For more detailed information on implementing physics in Unreal Engine,
refer to the [Unreal Engine Physics
Documentation](https://docs.unrealengine.com/en-US/InteractiveExperiences/Physics/index.html).
### Collision Meshes in Unreal Engine
Before you can create interactive physics-based experiences, you need to
understand collision meshes---the invisible geometry that determines how
objects interact physically in your virtual world.
#### What Are Collision Meshes?
When you place a 3D object in Unreal Engine, you're actually working
with two distinct pieces of geometry:
1. **Visual Mesh**: The detailed, textured model you see rendered on
screen
2. **Collision Mesh**: An invisible, simplified shape that the physics
engine uses for calculations
These are separate because physics calculations on complex visual meshes
would be computationally expensive. Using simpler collision shapes
allows the physics engine to run efficiently while still providing
believable interactions.
#### Simple vs. Complex Collision
Unreal Engine provides two main approaches to collision geometry:
**Simple Collision** uses basic geometric primitives:
- Box
- Sphere
- Capsule
- Auto-generated convex hulls
Simple collision is fast and works well for most objects. A crate
doesn't need a perfectly accurate collision mesh---a box-shaped
collision volume will feel right to users and perform well.
**Complex Collision** uses the actual mesh geometry:
- More accurate representation of intricate shapes
- Significantly more expensive to calculate
- Useful for detailed architectural elements or mechanical parts where
precision matters
For most physics interactions in XR---picking up objects, knocking
things over, creating chain reactions---simple collision is the right
choice. Reserve complex collision for situations where the extra
accuracy justifies the performance cost.
#### Verifying Collision Meshes
A common frustration when setting up physics: you enable simulation,
press Play, and nothing happens. The usual culprit? The object lacks a
collision mesh entirely.
To check whether an object has collision:
1. In the viewport, go to **Show \> Collision**
2. Objects with collision will display their collision geometry as
colored wireframes
3. Objects without collision won't show anything
This simple visualization step can save considerable debugging time. Get
in the habit of checking collision meshes early when setting up
interactive objects.
#### Adding Collision to Imported Assets
Many 3D models imported from sources like Sketchfab or Twinmotion arrive
without collision meshes. Here's how to add collision to these objects:
1. **Locate the mesh asset**: Right-click the object in your level
outliner and select **Browse to Asset**
2. **Open the mesh editor**: Double-click the asset to open it in the
Static Mesh Editor
3. **Generate collision**: In the top menu, go to **Collision \> Auto
Convex Collision**
4. **Apply settings**: The default settings work well for most
objects---click **Apply**
5. **Save**: Don't forget to save the asset (Ctrl+S or File \> Save)
You can verify the collision was created by toggling collision
visibility in the mesh editor viewport. You should now see a simplified
hull wrapping your object.
The auto-generated collision may not be perfect for every object, but it
provides a functional starting point. You can refine collision shapes
manually if needed, but for physics experiments and prototyping,
auto-generated collision is typically sufficient.
### Practical Implementation: Setting Up Physics Chain Reactions
One of the most compelling uses of physics in XR is creating chain
reactions---where one collision triggers a cascade of events. Think of
dominoes falling, explosive sequences, or Rube Goldberg machines.
Building on the physics concepts above, let's explore how to implement
these patterns. The remarkable thing about implementing these in Unreal
Engine is how little setup they require. The physics engine handles all
the complexity; you just need to configure the objects correctly.
#### The Setup Checklist
Before chain reactions will work, each object needs specific settings
configured. Work through this checklist for every object that should
participate in physics simulation:
**Essential Settings:**
1. **Mobility**: Set to **Movable** (in the Details panel under
Transform)
- Static and Stationary objects cannot be moved by physics
2. **Collision mesh exists**: Verify using **Show \> Collision** in the
viewport
- If you don't see collision geometry, add it using the workflow
described above
3. **Simulate Physics**: Enable this checkbox (in the Details panel
under Physics section)
- This tells Unreal to apply physics forces and gravity to the
object
4. **Collision Preset**: Set to **PhysicsActor** (in the Details panel
under Collision section)
- This preset ensures the object blocks other physics objects and
generates hit events
- You can customize these settings, but PhysicsActor works well
for most cases
- More on collision presets and settings in the next section
5. **Mass**: The auto-calculated mass based on volume usually works
well
- You can override mass manually if needed (in the Physics
section)
- Unrealistic mass ratios (a tiny object that's extremely heavy)
can cause unexpected behavior
#### Setting Up a Simple Chain
Let's create a basic domino chain to see these principles in action:
1. **Place objects**: Add several cube static meshes to your level,
positioning them in a line with small gaps between them
2. **Apply the checklist**: For each cube, verify all five settings
above are configured correctly
3. **Spacing matters**: Leave a small gap between objects---they
shouldn't be touching at rest, but should be close enough that when
one falls, it contacts the next
4. **Test positioning**: You can temporarily enable Simulate Physics
and press Play to test if objects fall correctly---they should all
fall straight down without tipping yet
5. **Create the initial impulse**: For the first object in the chain,
you need to give it a push to start the reaction:
- In the first object's blueprint, create a simple Event BeginPlay
node
- Connect it to an Add Impulse node
- Set the impulse vector (try something like X:500, Y:0, Z:0 to
push it sideways)
- Or manually rotate/position the first object to be tipping
toward the next
6. **Press Play**: Watch as the first object falls, strikes the second,
which falls and strikes the third, and so on
The physics engine handles everything---force transfer, rotations,
realistic timing. Your role is just setting up the initial conditions
correctly.
#### Troubleshooting Common Issues
**"Nothing happens when I press Play"**
- Verify **Simulate Physics** is checked on the objects
- Confirm objects have collision meshes (use Show \> Collision)
- Check that you've applied an initial force to the first object
**"Objects fall through the floor"**
- The floor needs collision too---verify it has a collision mesh
- Check the floor's collision settings---it should block PhysicsBody
objects
- If using a Landscape, collision is automatically generated
**"The chain stops partway through"**
- Objects might be too far apart---reduce spacing
- Mass might be mismatched---very heavy objects won't be moved by
light ones
- Initial impulse might be too weak---increase the force value
- Check each object has Simulate Physics enabled (easy to miss one)
**"Can't see collision meshes in viewport"**
- Verify **Show \> Collision** is enabled (check the Show menu
carefully)
- Some objects genuinely lack collision---follow the steps above to
add it
#### Looking Ahead
This basic setup demonstrates pure physics simulation---objects
interacting through physical contact alone. Later in this chapter
(Section 4.4), after we explore collision types and overlap events in
Section 4.2, we'll look at more complex triggered behaviors. For
example, you could have an overlap trigger that spawns a new object
mid-chain, or unlocks a constrained object to drop into the sequence.
These programmed triggers extend simple physics into rich interactive
mechanisms, but they build on the foundation of proper collision and
physics setup covered here.
### Conclusion
Physics simulations are essential for creating immersive and interactive
VR experiences. By implementing accurate physics, developers can create
virtual environments that feel natural and intuitive to users, enhancing
the overall sense of presence. As VR technology continues to evolve, we
can expect even more sophisticated physics simulations that blur the
line between virtual and physical realities.
## Collision Detection and Response
Collision detection and response are fundamental aspects of creating
interactive and realistic virtual reality (VR) experiences. These
systems determine how objects interact with each other in the virtual
world, providing the basis for physics simulations and user
interactions.
### Understanding Collisions in Unreal Engine
In Unreal Engine, collisions are a core component of physics simulations
and object interactions. They determine whether objects block each
other, overlap, or ignore each other entirely.
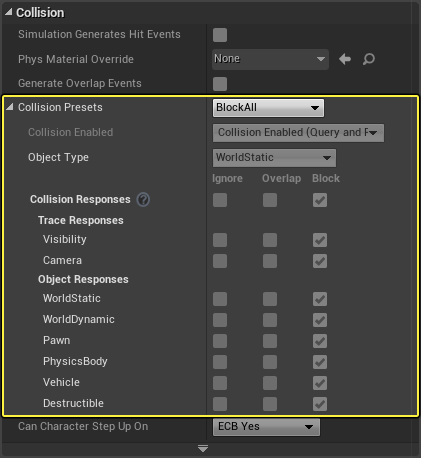
While Unreal Engine provides presets for collision settings, it's
crucial to understand what these presets actually do to effectively
implement and customize collision behavior.
#### Collision Types: To Block or Not to Block
The core of collision behavior in Unreal Engine revolves around whether
objects should block each other, overlap, or ignore each other entirely.
This is determined by the collision settings for each object type.
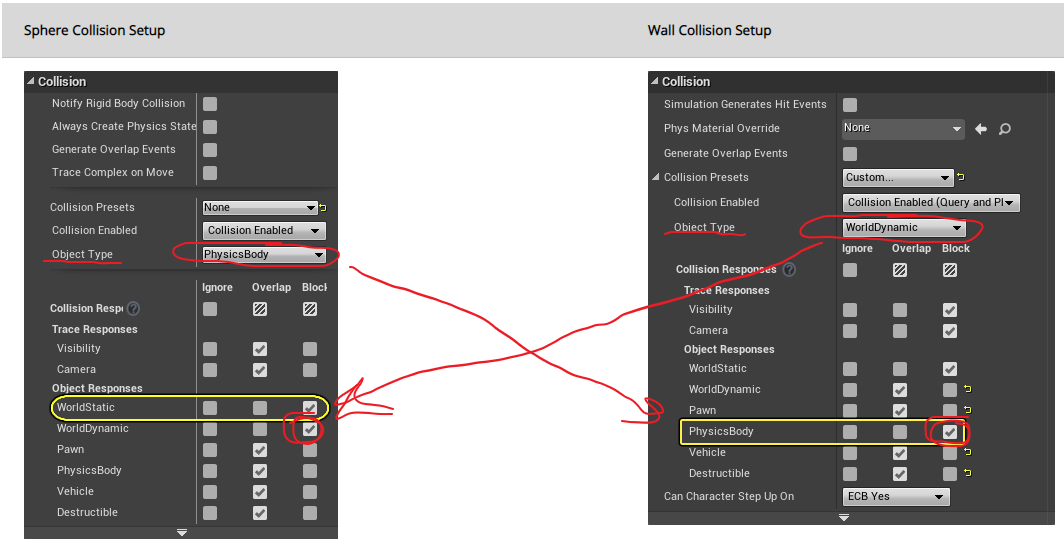
For a true collision to occur, where objects physically impact and stop
each other, both objects need to be set to block each other. For
example:
- A wall might be set as "WorldDynamic" (an object in the world that
could move but isn't physically simulated)
- A sphere might be set as "PhysicsBody" (an object that moves with
gravity and can be pushed around)
If the wall is set to block PhysicsBody objects, and the sphere is set
to block WorldDynamic objects, they will collide and block each other
when they meet.
#### Object Types
Unreal Engine defines several object types for collision purposes:
- WorldStatic: Objects that never move (e.g., immovable walls)
- WorldDynamic: Objects with scripted movement
- PhysicsBody: Objects with physics-based movement
- Pawn: Objects under user control (typically player characters)

Additional object types can be found in the [Unreal Engine
documentation](https://docs.unrealengine.com/en-US/Engine/Physics/Collision/Reference/index.html).
### Implementing Collision Detection
#### Hit Events
Hit events are crucial for detecting and responding to collisions in
your game logic. To enable hit events:
1. Check the "Simulation Generates Hit Events" option in the object's
collision settings.
2. Ensure the objects are set to block each other.
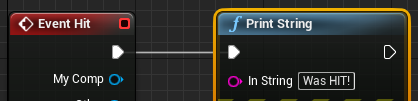
When both conditions are met, you can use Blueprint scripting to perform
actions when a collision occurs. For example:
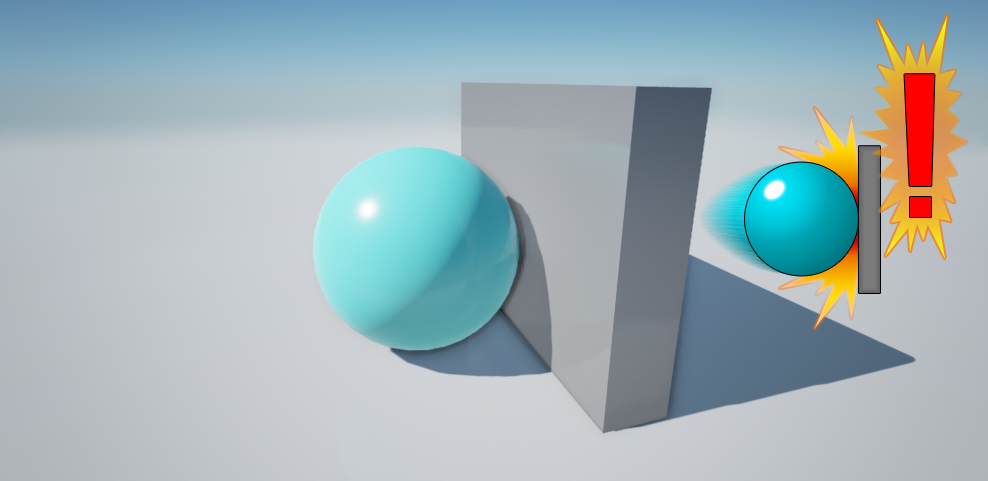
In this example, when a collision occurs, the text "it was hit" is
displayed.
It's important to note that if objects are set to overlap instead of
block, hit events won't be generated as the objects pass through each
other without collision.
#### Overlap Events
Overlap events allow objects to intersect without physically blocking
each other. To implement overlap events:
1. Enable "Generate Overlap Events" for all objects involved in the
interaction.
2. Set collision responses appropriately (Overlap or Block).
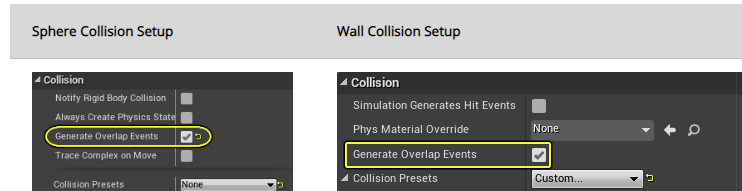
In this case, both the wall and the square need to have 'generate
overlap events' enabled.
### Event Handling Contexts
Unreal Engine provides multiple contexts for handling collision and
overlap events:
1. **Level Context**:
- Connect events to any Actor in the level.
- Triggered when something hits a specified Actor (whole object).
2. **Actor Context**:
- Triggered when something hits this Actor (whole object).
- Applies to all components of the Actor.
3. **Component Context**:
- Triggered when something hits a specific Component (part of an
Actor).
- Useful for complex Actors with multiple interactive parts.
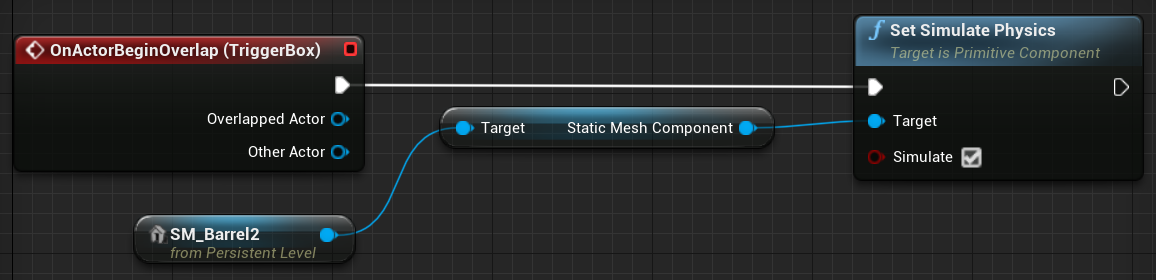
To add events to specific components:
1. Right-click the component in the Unreal Editor.
2. Select "Add Event".
3. Choose the appropriate event type (e.g., overlap, hit).
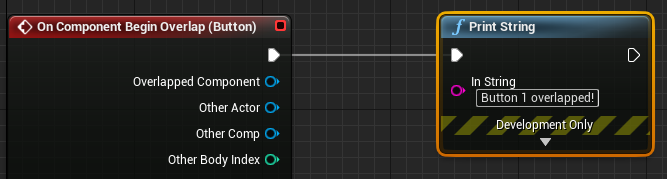
### Collision Response
Once a collision or overlap is detected, you can implement various
responses:
1. **Physical Response**: Objects react based on their physical
properties (mass, velocity, etc.).
2. **Gameplay Events**: Trigger specific game events (e.g., damage,
pickup items).
3. **Visual/Audio Feedback**: Play particle effects, sounds, or
animations on collision.
Implement these responses using Blueprints or C++ in Unreal Engine.
### Best Practices for Collision Implementation
1. **Optimize Collision Shapes**: Use simple collision shapes for
performance, detailed shapes only when necessary.
2. **Layer Collision Channels**: Organize objects into collision
channels to manage interactions efficiently.
3. **Use Trace Functions**: For complex scenarios, use trace functions
to detect collisions along specific paths.
4. **Balance Accuracy and Performance**: More accurate collisions can
be computationally expensive. Find the right balance for your
project.
### Conclusion
Effective collision detection and response are crucial for creating
interactive and believable VR environments. By understanding and
properly implementing these systems in Unreal Engine, developers can
create rich, physically accurate interactions in their VR projects.
For more detailed information, refer to the [Unreal Engine Collision
Documentation](https://docs.unrealengine.com/en-US/Engine/Physics/Collision/Overview/index.html).
For a comprehensive video tutorial on collisions in Unreal Engine, watch
this:
\begin{tcolorbox}[colback=red!5!white,colframe=red!50!black,title=YouTube Video]
\textbf{Unreal Engine Collision System Tutorial}
Comprehensive technical overview by Mathew Wadstein covering collision detection, collision shapes, collision channels, and collision responses in Unreal Engine. This tutorial is essential for understanding and implementing realistic physics interactions in dynamic virtual environments.
\textit{Watch at: \url{https://www.youtube.com/watch?v=zZPyMjEWpF8&t=s}}
\end{tcolorbox}
## Blueprints and Visual Scripting
Blueprints are a crucial feature in Unreal Engine, providing a visual
scripting system for game developers to create interactive functionality
without diving into traditional code. This section explores the key
aspects of Blueprints, their applications, and how they compare to other
programming methods.
### What are Blueprints?
Blueprints in Unreal Engine are:
- A visual scripting/programming system
- Used for Actor and Level behavior
- Employed for dynamic construction and configuration
They offer a more accessible alternative to C++ programming within the
Unreal Engine environment, making it easier for developers of all skill
levels to create complex interactions and behaviors.
### Applications of Blueprints
#### 1. Actor and Level Scripting
Blueprints can be attached to individual actors or entire levels,
allowing for:
- Specific behaviors for objects within the game world
- Global scripts that affect an entire level or world
#### 2. Dynamic Construction and Configuration
One of the powerful features of Blueprints is their ability to
dynamically construct and configure objects. This is particularly useful
for:
- Data-driven design
- Creating flexible, reusable components
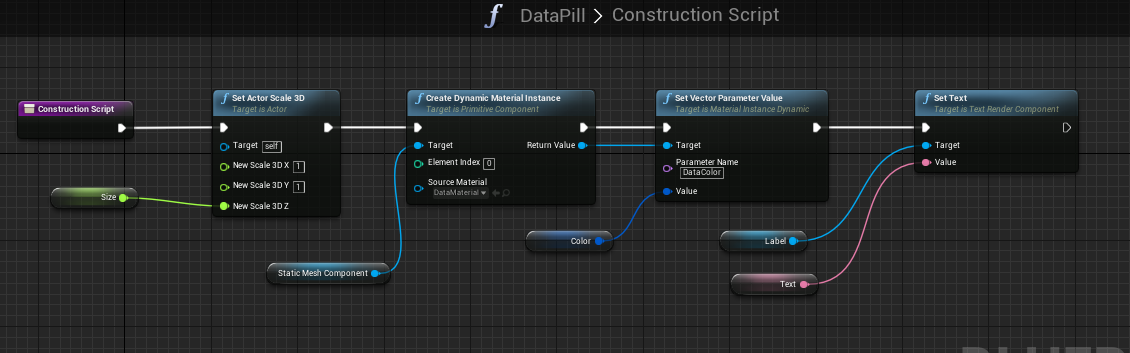
The image above demonstrates a typical Blueprint workflow. The white
lines represent the execution flow, similar to lines of code in
traditional programming languages. Each node represents a function or
action, with arguments flowing between them.
#### 3. Complex and Composite Actors
Blueprints excel at creating more intricate actors:
- Combining multiple components into a single actor
- Similar to "Prefabs" in Unity

In this example, we can see a Blueprint that creates a labeled object.
It combines a mesh (the "pill" shape) with a text component, allowing
for easy customization through variables.
### Blueprint Interface
When working with Blueprints, developers interact with several key
elements:
1. **Event Graph**: Where most of the scripting occurs, typically
triggered by events.
2. **Construction Script**: Defines how the actor is built or modified
at runtime.
3. **Components List**: Shows the various parts that make up the actor.
4. **Viewport**: Provides a 3D view of the actor for visual reference.
### Blueprints vs. Traditional Programming
To understand how Blueprints compare to more traditional programming
methods, it's helpful to see them in context. The following video
provides a comparison between Blueprints in Unreal Engine and C# in
Unity:
\begin{tcolorbox}[colback=red!5!white,colframe=red!50!black,title=YouTube Video]
\textbf{Blueprints vs Traditional Programming Comparison}
Side-by-side demonstration showing how the same interactive functionality is implemented using Unreal Engine's visual Blueprint system versus traditional C++ and C\# coding in Unity. This video illustrates the accessibility and power of visual scripting for dynamic environment creation.
\textit{Watch at: \url{https://www.youtube.com/watch?v=_TuLsC83yeM&t=s}}
\end{tcolorbox}
This video demonstrates how a simple event handling task is implemented
using: - Blueprints in Unreal Engine - C++ in Unreal Engine - C# in
Unity
It provides valuable insight into how the visual scripting of Blueprints
relates to traditional coding paradigms. The video is for Unreal Engine
4 but it works very similarly in Unreal Engine 5.
### Types of Blueprints
Unreal Engine primarily uses two types of blueprints:
1. **Actor Blueprints**: These are reusable objects that can be placed
in levels. They're ideal for creating interactive elements like
doors, switches, or any object that needs specific behavior.
2. **Level Blueprints**: These are specific to a single level and are
used for level-wide events and interactions. They're great for quick
prototyping and setting up level-specific logic.
### Actor Blueprints
- Easily reusable across different levels
- Can be instantiated multiple times
- Ideal for objects with consistent behavior across the game
### Level Blueprints
- Quick and easy setup for one specific level
- Cannot be reused in other levels
- Useful for level-specific events and interactions
### Working with Events in Blueprints
Events are a crucial part of blueprint programming. They allow you to
trigger specific actions in response to in-game occurrences. Here's how
you can work with events:
1. **Adding Events**: Right-click on an actor in the level and select
"Add Event" or "Jump to Event" if an event already exists.
2. **Level Events**: These are quick to set up and ideal for
prototyping. However, consider refactoring into Actor Blueprints
later for better reusability.
3. **Event Types**: Common events include "Begin Overlap", "End
Overlap", and "Hit Event".
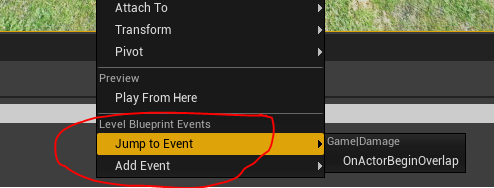
Once you've added an event, you can implement its functionality in the
Blueprint editor. For example, you might add an impulse to an object
when it overlaps with a trigger volume:

### Blueprint Optimization
While Blueprints are powerful, they can be less efficient than C++ in
performance-critical scenarios:
- Convert frequently used Blueprints to C++ for better performance
- Minimize the use of tick events in Blueprints
- Use Blueprint nativization for improved performance
### Conclusion
Blueprints in Unreal Engine offer a powerful and flexible way to create
game logic and interactivity. They bridge the gap between design and
programming, allowing for rapid prototyping and complex behavior
creation without the need for extensive coding knowledge. While they can
be used for almost any game development task, they are particularly
suited for:
- Quick iterations and prototyping
- Designer-friendly logic implementation
- Creating reusable actor templates
- Implementing level-specific behaviors
As you delve deeper into Unreal Engine development, mastering Blueprints
will become an essential skill, enabling you to bring your game ideas to
life efficiently and effectively.
For more detailed information on Blueprints, refer to the [Unreal Engine
Blueprint
Documentation](https://docs.unrealengine.com/en-US/Engine/Blueprints/index.html).
## Event-Driven Programming in XR
Event-driven programming is a crucial paradigm in XR development,
particularly in virtual reality (VR) applications. This approach allows
developers to create responsive, interactive environments that react to
user actions and changes in the virtual world.
### Understanding Events in XR
In XR applications, events can be triggered by various sources:
1. User interactions (e.g., button presses, gestures)
2. Collisions between objects
3. Changes in the environment (e.g., time-based events, proximity
triggers)
4. System-level occurrences (e.g., application state changes)
Events serve as the bridge between user actions or environmental changes
and the application's response, enabling dynamic and interactive
experiences.
### Implementing Events in Unreal Engine
Unreal Engine provides a robust system for handling events, particularly
through its Blueprint visual scripting system.
#### Types of Events
1. **Input Events**: Triggered by user input (e.g., button presses,
motion controller movements)
2. **Collision Events**: Occur when objects collide or overlap
3. **Timer Events**: Triggered after a specified time interval
4. **Custom Events**: Developer-defined events for specific gameplay
mechanics
#### Event Handling in Blueprints
In Unreal Engine's Blueprint system, events are represented as nodes
with execution pins. Here's an example of how events are structured:
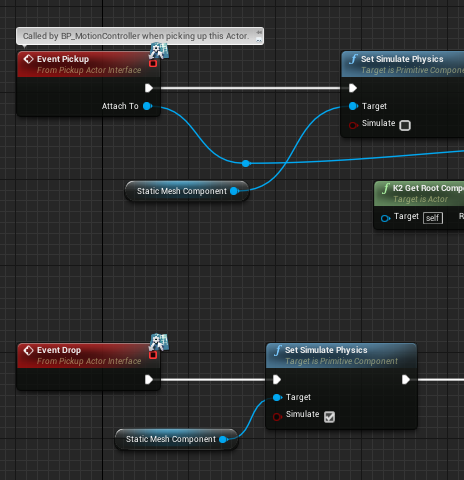
You can also create custom events with specific functions. We'll explore
this further when we look at implementing functionality for actors that
can be picked up and dropped, for instance.
#### Adding Events to Actors
To add events to actors in your level:
1. Right-click on an actor in the level
2. Select "Add Event" or "Jump to Event" if an event already exists
3. Choose the type of event you want to add (e.g., Begin Overlap, Hit
Event)

### XR-Specific Event Handling
In XR applications, certain types of events are particularly important:
#### 1. Motion Controller Events
These events are triggered by actions performed with VR controllers. For
example:
``` blueprint
Event Motion Controller Thumb Left X
Event Motion Controller Thumb Left Y
Event Motion Controller Trigger
```
These events allow you to respond to user input through VR controllers,
enabling interactions like grabbing objects or activating UI elements.
#### 2. Head Movement Events
Tracking the user's head movement is crucial in VR. You can use events
to respond to changes in the user's viewpoint:
``` blueprint
Event Tick
-> Break HMDRotation
-> Compare Rotation
```
This setup allows you to detect when the user looks in a certain
direction, which can be used to trigger interactions or change the
environment.
#### 3. Collision and Overlap Events in VR
In VR, collision and overlap events are essential for creating
interactive environments. For example:

In this case, both the wall and the square need to have 'generate
overlap events' enabled.
These events can be used to trigger actions when the user's hand
(represented by a motion controller) interacts with virtual objects.
### Custom Events and Blueprint Functions
Custom events and Blueprint functions are essential tools for creating
complex interactions and reusable logic in Unreal Engine. They allow
developers to encapsulate functionality and trigger specific actions
within their Blueprints.
#### Custom Events
Custom events are user-defined events that can be called to execute a
series of actions. They are useful for organizing and reusing logic
within a Blueprint.
**Creating a Custom Event:** 1. Open your Blueprint and navigate to the
Event Graph. 2. Right-click and select "Add Custom Event." 3. Name your
event (e.g., "Check Object Placement"). 4. Implement the logic you want
to execute when the event is called.
Example:
``` blueprint
Custom Event "CheckPuzzleSolution"
-> Get All Actors of Class (PuzzlePiece)
-> For Each Loop
-> Check Piece Position
-> Branch (If Correct)
-> Increment Correct Pieces Counter
-> Branch (If All Pieces Correct)
-> Update Text component "Puzzle Solved"
-> Trigger Puzzle Solved Event
```
#### Blueprint Functions
Blueprint functions are similar to custom events but are designed to
return a value or perform a specific calculation. They help in creating
modular and reusable code.
**Creating a Blueprint Function:** 1. Open your Blueprint and navigate
to the Functions section. 2. Click the "+" button to create a new
function. 3. Name your function and define its inputs and outputs. 4.
Implement the logic within the function.
Example:
``` blueprint
Function "Calculate Distance"
Inputs: Vector A, Vector B
Outputs: Float Distance
-> Subtract Vectors (A - B)
-> Vector Length
-> Return Distance
```
By using custom events and Blueprint functions, you can create more
organized, modular, and reusable Blueprints, enhancing the overall
efficiency and maintainability of your projects.
### Simple Animation in Unreal
Unreal Engine provides extensive animation systems---skeletal animation
for characters, animation blueprints for complex state machines, control
rigs for procedural animation, and more. This section focuses on a much
simpler subset: animating objects like doors, platforms, and interactive
mechanisms. For these cases, two tools are particularly useful:
**Timeline** and **Level Sequencer**.
#### Timeline Component
Timeline is the primary tool for script-driven animations within
Blueprint actors. It provides a visual keyframe editor that handles
smooth interpolation automatically, eliminating the need for manual lerp
calculations or tick-based updates.
**Key Features:**
- **Visual keyframe editor** embedded directly in Blueprint
- **Multiple track types**: Float, Vector, Event, Color, Linear Color
- **Built-in playback controls**: Play, Stop, Reverse, Play From
Start, Reverse From End
- **Easing curves**: Linear, ease in/out, or custom curves for natural
motion
- **Update output**: Fires every frame during playback, providing
interpolated values
**When to Use Timeline:**
- Simple object movement (doors, platforms, drawers)
- Gameplay-triggered animations (respond to player interaction)
- Quick prototyping of animated behaviors
- Single-object animations where logic lives in the Blueprint
Timeline is fast to set up and keeps animation logic close to the
Blueprint that uses it. For a sliding door triggered by player
proximity, Timeline provides everything you need.
#### Level Sequencer
Level Sequencer is Unreal's cinematic animation tool, but it can also be
used for simple object animations similar to Timeline. Sequencer
provides a more powerful editing environment with better support for
complex timing and multi-object coordination.
**Key Features:**
- **Multi-object animation**: Coordinate multiple actors in a single
sequence
- **Rich track types**: Transform, materials, visibility, events, and
more
- **Visual timeline editor**: Easier to adjust timing and preview
animation
- **Reusability**: One sequence can be triggered from multiple
Blueprints
- **Blueprint integration**: Use Level Sequence Player component to
trigger sequences
**When to Use Sequencer:**
- Animations that might grow more complex later
- Multi-object coordinated movement
- When you want powerful visual editing tools
- Reusable animations across multiple actors
Sequencer has more overhead for simple cases, but offers flexibility for
future expansion. If you think your door animation might later include
lighting changes, camera movements, or coordinated sounds, starting with
Sequencer saves refactoring later.
#### Choosing Between Timeline and Sequencer
For most simple cases---a door opening, a platform moving---either tool
works. **Timeline** is quicker to set up and keeps everything in one
Blueprint. **Sequencer** provides more editing power and flexibility.
Both can be triggered from the same Blueprint events and controlled with
similar logic.
The practical example below uses Timeline, as it represents the most
common workflow for simple interactive animations. The same result can
be achieved with Sequencer using a Level Sequence asset and Level
Sequence Player component instead.
### Practical Implementation: Animated Sliding Door
Let's create a sliding door that opens when the player approaches and
closes when they leave---a common pattern for interactive environments.
This example uses Timeline to handle the smooth animation between open
and closed positions.
\begin{tcolorbox}[colback=red!5!white,colframe=red!50!black,title=YouTube Video]
\textbf{Building a Sliding Door with Blueprints and Timeline}
Step-by-step tutorial demonstrating Blueprint fundamentals through building a functional sliding door using Timeline animation, trigger volumes, and overlap events in Unreal Engine. This video covers core concepts including components, events, and visual scripting that form the foundation for interactive XR environments.
\textit{Watch at: \url{https://www.youtube.com/watch?v=3NpM8v-ukEY&t=s}}
\end{tcolorbox}
This example follows the workflow demonstrated in the video above,
adapted for XR applications.
#### Setting Up the Blueprint Structure
1. **Create Blueprint Actor**: In the Content Browser, create a new
Blueprint Class derived from Actor. Name it "SlidingDoor."
2. **Add Static Mesh components**:
- Add a Static Mesh component for the door piece that will move
(name it "DoorPiece")
- Add additional Static Mesh components for the door frame
(stationary parts)
- Set the root component to something stationary (like the frame)
or a Scene component
3. **Add trigger volume**: Add a Box Collision component (name it
"TriggerVolume"). This invisible box will detect when the player
enters and exits.
4. **Position and scale**: In the viewport, position the door frame and
door piece to form a complete door. Scale the Box Collision to cover
the area in front of the door where you want it to trigger.
#### Creating the Timeline Animation
1. **Add Timeline node**: In the Event Graph, right-click and add a
Timeline node. Name it "DoorSlide."
2. **Open Timeline editor**: Double-click the Timeline node to open the
Timeline editor panel.
3. **Create Float track**: Click the "+ Track" button and select "Add
Float Track." Name it "SlideAmount."
4. **Add keyframes**:
- **At time 0.0 seconds**: Right-click the timeline and "Add Key."
Set value to **0.0** (door closed)
- **At time 1.0 seconds**: Add another key at 1.0s with value
**1.0** (door open)
- These values represent the animation progress: 0 = closed, 1 =
fully open
5. **Set animation length**: Adjust the timeline length (default 1.0
seconds works well for a quick slide; use 2.0 for slower movement)
6. **Optional - adjust curve**: Select the keyframes and change the
curve type (Auto, Linear, Curve) for different easing feels
#### Connecting the Movement Logic
Now connect the Timeline's output to actually move the door:
1. **Get Timeline Update output**: From the Timeline node, drag out the
**Update** execution pin. This fires every frame while the Timeline
plays.
2. **Add Set Relative Location node**: Add a "Set Relative Location"
node and set the target to your "DoorPiece" component.
3. **Split the Vector**: Right-click the "New Location" pin on Set
Relative Location and select "Split Struct Pin." This exposes X, Y,
and Z separately.
4. **Add Multiply node**: From the Timeline's "SlideAmount" data output
(the float track), drag out and add a "Multiply (float)" node. Set
the multiplier value to your desired movement distance (e.g.,
**200** for 200cm slide upward).
5. **Connect to movement axis**: Connect the Multiply result to the
**Z** pin of the split vector (for vertical slide). Use **X** or
**Y** for horizontal sliding.
6. **Preserve other axes**: Leave the other vector components (X and Y
if sliding on Z) unconnected---they'll maintain the door's starting
position on those axes.
The logic flow: Timeline outputs 0-1 → Multiply by 200 → Results in
0-200 range → Applied to Z position → Door slides 200cm up.
#### Adding Trigger Events
Connect the trigger volume to control the Timeline:
1. **Select trigger volume component**: In the Components panel, select
"TriggerVolume."
2. **Add overlap event**: Right-click and select "Add Event → Add On
Component Begin Overlap."
3. **Add Cast to Character**: From the "Other Actor" pin of the overlap
event, add a "Cast to Character" node. This ensures only the player
triggers the door, not other objects.
4. **Connect to Timeline**: From the successful cast output (the
execution pin below the Character pin), connect to the Timeline's
**Play From Start** input.
5. **Add end overlap event**: Right-click TriggerVolume again and add
"Add On Component End Overlap."
6. **Add second Cast**: Add another "Cast to Character" from this
event's "Other Actor" pin.
7. **Connect to Reverse**: From the successful cast, connect to the
Timeline's **Reverse From End** input.
This creates the behavior: player enters trigger → door slides open;
player exits trigger → door slides closed.
#### Testing Your Door
1. **Place door instance in level**: Drag your SlidingDoor Blueprint
into the level.
2. **Adjust trigger volume**: Select the instance, and in the viewport,
scale the Box Collision component to cover the desired trigger area
in front of the door.
3. **Press Play**: Walk toward the door. It should slide open as you
approach and close as you move away.
#### Common Variations
**Rotating door** (hinged door): Instead of Set Relative Location, use
**Set Relative Rotation**. Connect the multiply result to the **Z**
component of the split rotation vector. This rotates the door around its
pivot point.
**Horizontal slide**: Connect the multiply result to the **X** or **Y**
component of the split location vector instead of Z.
**Multiple moving pieces**: Add multiple Set Relative Location nodes
(one per moving component) connected to the same Timeline Update output.
**One-way door**: Remove the End Overlap event entirely. The door opens
but stays open.
**Delay before closing**: After the Timeline finishes playing forward,
add a Delay node before calling Reverse.
#### Using Sequencer Instead
To achieve the same result with Sequencer:
1. Create a Level Sequence asset in the Content Browser
2. Add your door actor to the Sequencer and keyframe its Transform
track
3. In your Blueprint, add a **Level Sequence Player** component
4. Replace the Timeline Play/Reverse calls with Level Sequence Player
**Play** and **Reverse** nodes
5. The trigger logic remains identical
Sequencer provides more flexibility for adjusting the animation visually
without reopening the Blueprint.
#### Troubleshooting
**"Door doesn't move when triggered"**
- Verify the Timeline is playing: Add a Print String after "Play From
Start" to confirm execution reaches it
- Check the Update pin is connected to Set Relative Location
- Ensure you're modifying the correct component (DoorPiece, not the
root or frame)
**"Door moves in wrong direction or axis"**
- Check which vector component (X, Y, or Z) you're driving with the
multiply output
- Try inverting the multiply value (e.g., use -200 instead of 200) to
reverse direction
**"Door doesn't trigger"**
- Verify "Generate Overlap Events" is enabled on the Box Collision
component
- Check the Box Collision's collision preset (should overlap Pawn)
- Confirm the Cast to Character succeeds (the player is a Character)
**"Door moves too far or not far enough"**
- Adjust the multiply value: higher = more movement, lower = less
movement
- The multiply value is in Unreal units (centimeters)
**"Animation feels too fast/slow or jerky"**
- Change the Timeline length (longer = slower animation)
- Adjust the curve type on keyframes (ease in/out for smoother motion)
**"Door jumps to wrong position or animates from wrong starting point"**
- This often happens when the door mesh has a non-zero initial
relative position and your Timeline animation assumes it starts from
zero
- **Solution**: Use a Scene Component wrapper pattern:
1. Add an empty Scene Component as the parent of your door mesh
2. Zero out the door mesh's relative position (set it to 0,0,0)
first
3. Now position the Scene Component where you want the door in the
level---you'll see the door mesh move with it, providing visual
feedback
4. Your Timeline animation now works from zero, and the Scene
Component provides the world-space offset
- This pattern keeps animation logic simple while allowing flexible
positioning
### Blueprint Variables and References
The door example above demonstrates Timeline animation and overlap
events, but to create truly interactive systems, you need a way to store
and manage state. Does the door stay locked until a switch is pressed?
Has the player already triggered this checkpoint? Which specific door
should this button control? These questions require **variables** and
**references**---fundamental concepts that enable Blueprints to remember
information and communicate with each other.
#### What Are Variables?
A variable is a named container that stores a piece of information
during gameplay. Think of it as a labeled box where you can put data,
check what's inside, and change the contents as needed.
**Reading** a variable means checking its current value---"Is the door
locked?" **Writing** (or setting) a variable means changing its
value---"Set the door to unlocked."
Variables in Blueprints persist while the game runs. If you set a door
to unlocked, it stays unlocked until something explicitly locks it again
or the level reloads.
#### Common Variable Types
Blueprint variables have specific **types** that determine what kind of
information they can hold:
- **Boolean**: True or false. Perfect for on/off states like
"IsDoorLocked" or "HasPlayerEnteredArea."
- **Integer**: Whole numbers (0, 1, 2, 100, -5). Used for counts like
"CurrentCheckpoint" or "EnemiesDefeated."
- **Float**: Numbers with decimal points (3.14, 0.5, 100.0). Used for
health values, timers, or any measurement needing precision.
- **String**: Text like "Welcome Player" or "KeyCardBlue." Useful for
names, messages, or identifiers.
- **Vector**: 3D position (X, Y, Z coordinates). Stores locations in
3D space.
- **Rotator**: 3D rotation (Pitch, Yaw, Roll angles). Stores
orientations.
For interactive triggers and state management, Boolean and Integer types
are most common. A pressure plate might use a Boolean "IsActivated,"
while a multi-step puzzle might use an Integer "CurrentStep."
#### Creating Variables in Blueprints
Variables are created in the **My Blueprint** panel:
1. In the Blueprint editor, find the **Variables** section in the My
Blueprint panel (typically left side)
2. Click the **+ Variable** button
3. Name your variable descriptively (e.g., "IsDoorLocked" not "Var1")
4. Select the variable type in the **Details panel** (Boolean, Integer,
etc.)
5. Set the **default value**---the initial state when the Blueprint
spawns
Once created, the variable appears in your variables list and can be
dragged into the Event Graph.
#### Using Variables in Event Graphs
To use a variable in your Blueprint logic, drag it from the Variables
list into the Event Graph. You'll be prompted to choose:
- **Get**: Read the current value without changing it. Use this to
check state in conditions.
- **Set**: Change the value. Use this to update state when events
occur.
A **Get** node outputs the variable's current value---you might connect
it to a Branch node's condition to check "if door is locked." A **Set**
node has an input where you specify the new value---you might connect
this to an overlap event to mark "checkpoint reached = true."
Variables are what make your interactive systems remember state between
events. Without variables, the door wouldn't know it was unlocked, and
the switch wouldn't know it had been pressed.
#### What Are References?
Variables let one Blueprint remember its own state, but what if a floor
switch needs to unlock a door? That requires a **reference**---a
variable whose type is another Blueprint class. This allows one
Blueprint to access and modify another Blueprint's variables or call its
functions.
In the upcoming example, you'll create a switch Blueprint that holds a
reference to a specific door Blueprint. When the player steps on the
switch, it uses that reference to tell the door "set your IsDoorLocked
variable to false."
References are set up similarly to other variables, but their type is a
Blueprint class (like "Door" or "Light") instead of Boolean or Integer.
Once you place both Blueprints in your level, you manually assign which
specific door instance this switch controls via the Details panel.
#### Public vs. Private Variables
By default, variables are **private**---only the Blueprint that owns
them can access them. To allow other Blueprints to read or change a
variable through a reference, make it **public** by clicking the eye
icon next to the variable in the My Blueprint panel. The eye icon
turning solid indicates the variable is now **Instance Editable**,
meaning:
1. Other Blueprints with a reference can access it
2. You can set its value per-instance in the Details panel when placing
the Blueprint in a level
The upcoming practical example demonstrates all these concepts in
action---creating variables, using Get/Set nodes, establishing
references between Blueprints, and building interactive trigger systems
that maintain state.
### Practical Implementation: Switch Controlling Door
Building on the animated door from the previous section, let's add
interactivity through variables and references. You'll create a floor
switch that unlocks the door when stepped on---a fundamental pattern for
triggers, pressure plates, buttons, and any mechanism where one object
controls another's state.
\begin{tcolorbox}[colback=red!5!white,colframe=red!50!black,title=YouTube Video]
\textbf{Building a Switch with Variables and References}
Step-by-step tutorial demonstrating Blueprint variables and references by building a floor switch that controls a door's locked state. This video covers Boolean variables, Branch nodes for conditional logic, making variables public, and establishing references between Blueprints for inter-object communication.
\textit{Watch at: \url{https://www.youtube.com/watch?v=01dEzec8bmo&t=s}}
\end{tcolorbox}
This example extends the door Blueprint from the previous section and
introduces a new switch Blueprint that controls it.
#### Modifying the Door Blueprint
First, add state management to your existing door:
1. **Add IsDoorLocked variable**:
- Open your Door Blueprint from the previous example
- In the My Blueprint panel, click **+ Variable**
- Name it **IsDoorLocked**
- In the Details panel, set variable type to **Boolean**
- Set the default value to **True** (door starts locked)
- Click the **eye icon** to make it **public** (Instance Editable)
2. **Add locking logic with Branch nodes**:
- In the Event Graph, find where your overlap events trigger the
Timeline (Play From Start)
- Before the Timeline node, add a **Branch** node
- Drag the **IsDoorLocked** variable into the graph and choose
**Get**
- Connect the Get node's output to the Branch's **Condition**
input
- Connect the **False** branch output to the Timeline's Play From
Start (door opens only if unlocked)
- The **True** branch does nothing (door stays closed if locked)
- Repeat for the close logic on End Overlap
This conditional check ensures the Timeline only plays when the door is
unlocked. Without it, overlap events would always trigger the door
regardless of lock state.
3. **Optional - Add status display**:
- Add a **Text Render** component to your door for visual feedback
- In Event Graph, use **Event Tick** with a Branch to check
IsDoorLocked
- If True: Set Text to "Locked"
- If False: Set Text to "Unlocked"
- This constantly updates the display based on current state
Note: Event Tick runs every frame and can impact performance. For a
production project, update the text only when the lock state changes
rather than every frame. For learning purposes, this approach clearly
demonstrates continuous state checking.
#### Creating the Switch Blueprint
Now create the floor switch that controls the door:
1. **Create new Blueprint Actor**:
- In Content Browser, create Blueprint Class → Actor
- Name it **FloorSwitch**
2. **Build visual components**:
- Add Static Mesh components for the switch platform (e.g.,
cylinders for base and button)
- Add a **Box Collision** component named **SwitchCollider**
- Position and scale the collision to cover the switch area
3. **Add door reference variable**:
- Click **+ Variable**, name it **MyDoor**
- In Details panel, set variable type to **object reference →
Door** (your door Blueprint class)
- Make it **public** (click eye icon) so you can assign specific
door instances
4. **Add switch trigger logic**:
- Select **SwitchCollider** component
- Right-click → Add Event → On Component Begin Overlap
- From the overlap event, add a **Cast to Character** node to
verify it's the player
- From successful cast, drag out **MyDoor** reference and choose
**Get**
- From the MyDoor output pin, search for "Set Is Door Locked"
- Connect the execution flow and set the Boolean value to
**False** (unlock)
- Optional: Add **Play Sound at Location** for audio feedback
The key here is the **Set** node---it modifies a variable on a different
Blueprint through the reference. The switch reaches into the door's
variables and changes its locked state.
#### Connecting Switch to Door in the Level
The reference variable creates the connection, but you must assign which
door instance:
1. Place your **Door** Blueprint in the level
2. Place your **FloorSwitch** Blueprint in front of the door
3. Select the **FloorSwitch** instance
4. In the **Details panel**, find the **MyDoor** variable
5. Click the dropdown and select the specific Door instance from your
level
This manual assignment lets you create multiple switch-door pairs with
different connections. One switch unlocks Door A, another unlocks Door
B---the Blueprint logic is reusable, the specific relationships are
configured per-instance.
#### Testing Your Switch
1. Press Play
2. Walk toward the door---it should remain closed (locked)
3. Step on the switch---you should hear the click sound
4. Return to the door---it should now open when you approach (unlocked)
#### Common Variations
**Temporary unlock**: Add a **Timer** after setting IsDoorLocked to
False. After 5 seconds, set it back to True.
**Toggle switch**: Instead of setting to False, add a Get → NOT Boolean
→ Set pattern to invert the current state each time.
**Multiple switches required**: Add an Integer "SwitchesActivated" to
the door. Each switch increments it. Door only unlocks when
SwitchesActivated \>= RequiredCount.
**One-time trigger**: Add a Boolean "HasBeenActivated" to the switch.
Check it in the overlap event---if True, do nothing. If False, unlock
door and set HasBeenActivated to True.
#### Troubleshooting
**"Switch doesn't unlock door"**
- Verify MyDoor reference is assigned in the Details panel (not None)
- Check that IsDoorLocked is public (eye icon solid) on the door
Blueprint
- Confirm the Cast to Character succeeds---print a debug string to
verify
**"Door unlocks but won't open"**
- Check the Branch logic in the door---False branch should lead to
Timeline Play
- Verify IsDoorLocked is actually set to False by the switch (add a
Print String showing the value)
**"Switch triggers for objects other than player"**
- Ensure you're using Cast to Character and only continuing execution
on successful cast
- Check collision settings on SwitchCollider (should overlap
Pawn/Character)
**"Multiple switches all control the same door"**
- This is correct if you assigned the same door reference to all
switches
- To have switches control different doors, assign different door
instances to each switch's MyDoor variable
This pattern---trigger volume, Boolean variable, Branch node, Blueprint
reference---forms the foundation for most interactive mechanisms in
Unreal. Pressure plates, buttons, levers, and puzzle elements all build
on these concepts.
## From Physics to Interaction: Looking Ahead
The foundational concepts of physics simulations, collision detection,
and event-driven programming we've explored in this chapter form the
basis for creating rich, interactive experiences in XR. In this final
section, we'll look ahead to how these concepts enable more complex
interactions and mechanisms, which we'll explore in depth in later
chapters.
### Bridging Physics and Interaction
The physical properties and behaviors we've discussed don't exist in
isolation; they serve as the building blocks for user interactions in XR
environments. For example:
1. Physics simulations allow objects to behave realistically when
manipulated
2. Collision detection enables precise interaction between the user and
virtual objects
3. Event-driven programming ties user actions to object responses
These elements combine to create a sense of presence and immersion that
is crucial to effective XR experiences.
### The Power of Grabbing in VR
One of the most fundamental interactions in VR is the ability to grab
and manipulate objects. While we'll delve into implementation details in
a later chapter, it's worth noting how this interaction ties together
the concepts we've covered:
- Physics determines how objects move when grabbed and released
- Collision detection recognizes when a user's hand is near a
grabbable object
- Events trigger the grabbing action and subsequent object behavior
Grabbing mechanics demonstrate the power of combining these elements to
create intuitive, immersive interactions that mirror real-world
experiences.
### Complex Mechanisms and Environmental Interactions
Looking ahead, we'll explore how to create more complex interactive
systems:
1. **Levers and Buttons**: Using physics and events to create
interactive control mechanisms
2. **Dynamic Environments**: Creating responsive environments that
change based on user actions
3. **Multi-step Interactions**: Designing puzzles or tasks that require
a series of physics-based interactions
These advanced interactions build directly on the foundations laid in
this chapter.
### The Role of AI in Interactive Environments
Artificial intelligence can significantly enhance the interactivity of
XR environments through AI-controlled characters, intelligent objects,
and dynamic environments that evolve based on physics simulations and AI
decision-making.
For comprehensive coverage of AI applications in XR environments,
including intelligent characters, adaptive behaviors, and dynamic
content generation, see
[Section 8](#sec-artificial-intelligence-in-xr){.quarto-xref}.
### Looking Forward
In the coming chapters, we'll delve deeper into:
1. Specific interaction techniques like grabbing, pointing, and
locomotion
2. User interface design for XR environments
3. Advanced interaction paradigms that build on physics and events
4. The integration of AI to create more dynamic and responsive
experiences
Each of these topics will build upon the fundamental concepts of
physics, collisions, and events that we've covered in this chapter.
### Conclusion
The physics simulations, collision systems, and event-driven programming
we've explored form the foundation of interactive XR environments. As we
move forward, we'll see how these elements combine with more advanced
concepts to create truly immersive and engaging XR experiences. The
journey from basic physics to complex, intelligent interactions is what
makes XR development so exciting and full of potential.
## Further Reading
Chapter 4 explored the creation of dynamic and interactive virtual
environments, focusing on physics simulations, collision detection, and
event-driven programming in XR. We delved into how these elements
contribute to creating more realistic and engaging virtual worlds. To
further your understanding of these topics and their practical
applications, consider the following resources:
### Additional Resources
- Unreal Engine Physics Documentation:
- Detailed guides on implementing physics in Unreal Engine.
# Spatial Interaction Design {#sec-spatial-interaction}
## Input Methods and Controllers in XR
Virtual Reality (VR) and other XR technologies offer unique ways to
interact with digital environments. This section explores the various
input methods and controllers used in XR, with a focus on VR interaction
techniques.
### VR Controllers and Hand Tracking
Modern VR systems typically use handheld controllers or hand tracking
systems to allow users to interact with virtual objects. These input
methods provide a more natural and intuitive way to manipulate the
virtual environment compared to traditional input devices like keyboards
and mice.
#### VR Controllers
VR controllers are handheld devices that allow users to interact with
virtual objects. They typically include:
- Buttons for various actions
- Analog sticks or touchpads for movement and menu navigation
- Triggers for grabbing or selecting objects
- Haptic feedback for enhanced immersion
Many VR systems, such as the Oculus Quest, come with two controllers -
one for each hand. This allows for more natural, two-handed interactions
in the virtual space.
#### Hand Tracking
Some VR systems, like the Oculus Quest, also offer hand tracking
capabilities. This allows users to interact with the virtual environment
using their bare hands, without the need for controllers. While this can
provide a more intuitive interaction in some cases, it may lack the
precision and haptic feedback of physical controllers.
### Basic VR Interactions
VR systems typically support several basic types of interactions:
1. **Pointing and Selection**: Users can point at objects in the
virtual environment and select them, often using a laser
pointer-like interface.
2. **Grabbing and Manipulation**: Users can reach out and grab virtual
objects, manipulating them as they would in the real world.
3. **UI Interaction**: Users can interact with 2D or 3D user
interfaces, pressing buttons or manipulating sliders and other UI
elements.
4. **Locomotion**: Various methods for moving around in the virtual
space, which we'll explore in more detail in section 4.2.
### Implementing Basic Interactions in Unreal Engine
Unreal Engine provides robust VR templates that offer a foundation for
developing immersive VR experiences. These templates are included in the
MyExercises template and provide essential functionalities for VR
interaction.
#### Key Features of VR Templates
1. **Realistic Hand and Head Positioning**: The VR templates ensure
that hands and head are positioned sensibly relative to the tracking
system. This creates a more natural and intuitive VR experience.
When you're actually using this in VR, these hands will be your hands,
so you can use them as you would expect to in VR. The tracking system
ensures your head and hands are positioned at the correct height
relative to the floor and surroundings.
2. **Hand Interaction Capabilities**: Users can interact with the
virtual environment using their hands in several ways:
- Poking or pushing objects
- Picking up items
- Dropping or throwing objects
These interactions are made possible through the implementation of
specific interfaces on actors within the virtual environment.
#### Using VR Templates Without VR Hardware
One of the significant advantages of these templates is their usability
even without VR hardware. This feature allows developers to design and
test VR interactions using standard input devices.
##### Hand Interactions Without VR
1. **Poking and Grabbing**: Users can still use virtual hands to
interact with objects.
2. **Throwing**: While more challenging without VR controllers, it's
still possible to throw objects.
##### Keyboard Controls
The templates include keyboard controls to simulate VR hand movements: -
Press 'R' to reach forward - Press 'T' to turn the hand
You can press 'R' on the keyboard to reach forward with one of the
hands, and press 'T' to perform a turn. I encourage you to check the
implementation of these controls and feel free to imitate that approach
when coding different kinds of motions you want to explore and use in
your experiments.
These controls are implemented in the VRCapablePawn blueprint,
specifically in the MotionControllerEvents graph.
##### Mouse Controls
- Use the Left mouse button to grab with the right hand
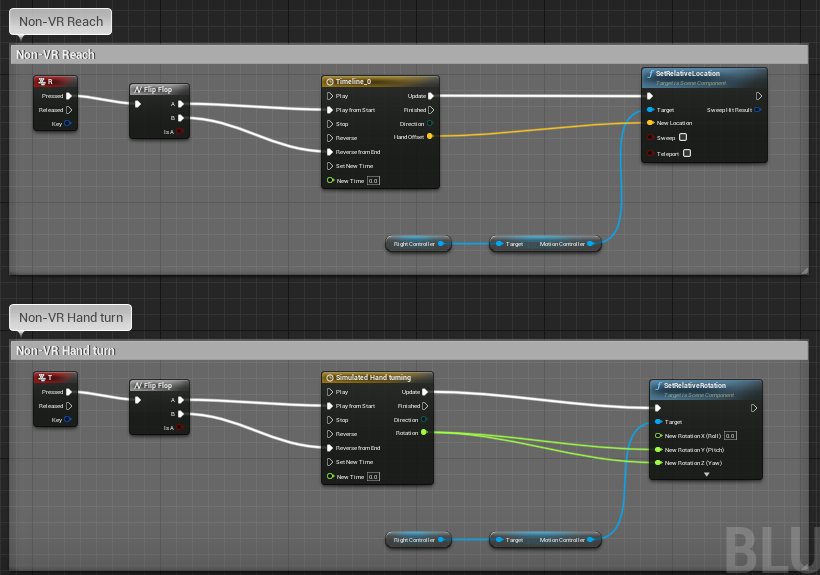
### Implementing Grab Functionality with **GrabComponent**
To simplify object interaction in your VR projects, you can utilize the
**GrabComponent** provided in the exercise template. This component is
much simpler to use than methods from previous years and allows for
straightforward implementation of grabbing mechanics.
**Key Features of GrabComponent:**
- **Easy Attachment/Detachment**: Attach or detach actors from the
grabbing component, effectively simulating the action of picking up
or dropping objects with a "hand."
- **Physics Simulation Toggle**: Control physics simulation to pick up
or drop physics-enabled objects.
- **Movement Without Physics**: Move objects through space without
relying on physics, providing more control over their behavior.
To use the GrabComponent, simply add it to component list of the actor
you want to be able to grab, keeping the checklist below in mind.
### Checklist for Implementing Grabbing Mechanics
To ensure smooth functionality when using the **GrabComponent**, follow
this checklist:
1. **Set the Object to Movable**
- Ensure that the object you want to grab is marked as **Movable**
in its settings. Static objects cannot be moved during gameplay.
- Confirm that the object has appropriate **Collision** settings
to interact with the grabbing component.
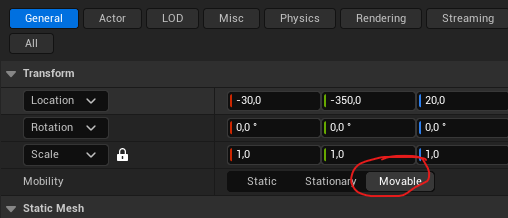
2. **Enable Overlap Events**
- Activate **Generates Overlap Events** on the object. This allows
the system to detect when the grabbing "hand" overlaps with the
object, which is essential for initiating the grab action.
3. **Enable Physics Simulation (If Required)**
- If you want the object to behave according to physics when
dropped (e.g., fall due to gravity), enable **Simulate Physics**
on the object.
- This setting allows the object to interact naturally with the
environment when not held.
4. **Verify Component Hierarchy in Complex Blueprints**
- For objects with complex blueprints or multiple components,
check the component hierarchy.
- Ensure that the **GrabComponent** acts on the parent component
so that all child components follow correctly during movement.
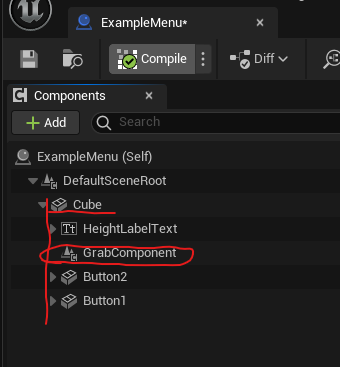
By carefully following these steps, you can effectively implement
grabbing mechanics in your VR application, providing users with an
intuitive and responsive experience.
## Constrained Manipulation: Levers, Switches, and Sliders
While grabbing freely movable objects with GrabComponent works well for
items you pick up and carry, many VR interactions require **constrained
manipulation**---objects that rotate around a pivot, slide along a
track, or toggle between positions. Think of valve wheels, light
switches, drawer handles, or cockpit controls. These require a different
approach: continuously tracking hand movement while manually
constraining the object's transform.
### The Manual Tracking Approach
Unlike free object grabbing, constrained manipulation doesn't use
attachment or physics simulation. Instead, you:
1. **Detect grab**: Use overlap events and grip button input (similar
to GrabComponent)
2. **Track continuously**: Every frame while grip is held, read the
hand's position/rotation
3. **Calculate constrained transform**: Project hand movement onto the
allowed axis or rotation, clamp to min/max limits
4. **Update manually**: Set the object's transform directly using
`Set Relative Location` or `Set Relative Rotation`
5. **Release**: When grip is released, stop tracking
This manual approach gives you precise control over exactly how the
object moves and avoids the complexity of physics constraints, which can
be finicky and unpredictable in VR.
### Common Constrained Interaction Types
**Rotational Levers** (valves, dials, door handles): - Object rotates
around a pivot point (single axis rotation) - Hand rotation drives
object rotation within min/max angle limits - Maps to normalized 0-1
value (e.g., 0° to 270° → 0.0 to 1.0)
**Linear Sliders** (throttles, faders, drawers): - Object moves along a
single axis (X, Y, or Z) - Hand position drives object position within
min/max distance limits - Maps to normalized 0-1 value based on position
along track
**Multi-Position Switches** (toggle switches, gear shifts): - Object
snaps to discrete positions - Hand position determines which snap point
is closest - On release, object jumps to nearest position with
haptic/audio feedback
### Blueprint Examples
For complete Blueprint implementations of these patterns, see:
- **Lever/Rotational Control**:
- **Slider/Linear Control**:
These examples demonstrate the full event flow from grip detection
through continuous tracking to release, showing how to handle the
constraint math in Blueprint nodes.
### Practical Implementation: Rotational Lever
Let's build a simple valve wheel that rotates when grabbed. This pattern
applies to door handles, steering wheels, dials, and any rotating
control.
#### Setting Up the Lever Blueprint
1. **Create Blueprint Actor**:
- Content Browser → Blueprint Class → Actor
- Name it "RotationalLever"
2. **Add components**:
- **Static Mesh** for the lever handle (the part user grabs)
- **Scene Component** as root (optional, for easier positioning)
- **Sphere Collision** component overlapping the grabbable area
3. **Configure collision**:
- Sphere Collision: Enable "Generate Overlap Events"
- Set to overlap with Pawn (so hand controller triggers it)
#### Adding Variables
In the My Blueprint panel, add these variables:
- **bIsGrabbed** (Boolean): Tracks whether lever is currently held
- **MinAngle** (Float): Minimum rotation angle (e.g., 0)
- **MaxAngle** (Float): Maximum rotation angle (e.g., 270)
- **CurrentValue** (Float): Normalized value 0.0 to 1.0
- **GrabbingHand** (Object Reference → MotionControllerComponent):
Reference to which hand is holding
Make MinAngle and MaxAngle public (Instance Editable) so you can
configure per-instance.
#### Implementing Grab Detection
1. **Add overlap event**:
- Select Sphere Collision component
- Right-click → Add Event → On Component Begin Overlap
2. **Add grip input event**:
- In Event Graph, add input event for grip button
- For Oculus/Quest: "MotionController (Right) Grip1 Axis"
- Use Branch to check if axis value \> 0.5 (grip pressed)
3. **Connect grab logic**:
- When overlap occurs AND grip pressed:
- Set **bIsGrabbed** to True
- Store reference to overlapping actor (the hand) in
**GrabbingHand**
#### Implementing Continuous Tracking
This is the key part---while held, update every frame:
1. **Add Event Tick**:
- This runs every frame
- First node: Branch checking **bIsGrabbed**
2. **Get hand rotation**:
- From **GrabbingHand** reference → Get World Rotation
- Break Rotator to get individual components (Roll, Pitch, Yaw)
3. **Calculate constrained rotation**:
- Decide which rotator component drives your lever (usually Yaw or
Roll depending on axis)
- Use **Clamp (Float)** node: clamp hand rotation between MinAngle
and MaxAngle
- This gives you the constrained angle
4. **Set lever rotation**:
- Make Rotator from your constrained angle (put it in the right
component: X for Roll, Y for Pitch, Z for Yaw)
- **Set Relative Rotation** on lever mesh with this rotator
5. **Calculate normalized value**:
- Subtract MinAngle from constrained angle
- Divide by (MaxAngle - MinAngle)
- Store in **CurrentValue** variable (now 0.0 to 1.0)
**Important**: Only do this tracking on Event Tick when **bIsGrabbed**
is True. This keeps it efficient---no calculations when lever isn't
held.
#### Implementing Release
1. **Add grip release event**:
- Same grip axis input, but Branch for value \< 0.5 (released)
2. **Connect release logic**:
- Set **bIsGrabbed** to False
- Clear **GrabbingHand** reference (set to None)
- Optional: Broadcast the final **CurrentValue** via Event
Dispatcher for other systems
#### Using the Lever Value
The **CurrentValue** variable (0.0 to 1.0) can drive other systems:
**Method 1: Direct access** - Other Blueprints can get a reference to
your lever - Read CurrentValue directly (make it public)
**Method 2: Event Dispatcher** - Add Event Dispatcher "OnValueChanged" -
Call it whenever CurrentValue updates (or on release) - Other Blueprints
bind to this event
**Example uses**: - Lerp a light's intensity:
`Light Intensity = Lerp(0, 5000, CurrentValue)` - Control particle spawn
rate: `Spawn Rate = Lerp(0, 100, CurrentValue)` - Drive animation:
`Set Playback Position = CurrentValue` on a Timeline
#### Common Variations
**Linear Slider** (throttle, drawer): - Same structure, different math -
Track hand **position** instead of rotation - Project hand position onto
slider axis using **Vector Projection** - Clamp to min/max distance -
Use **Set Relative Location** instead of rotation
**Multi-Position Switch**: - Define array of snap positions (e.g.,
\[-0.1, 0.0, 0.1\] for 3-position switch) - Track hand position while
held (same as slider) - On **release**: find closest snap position, set
object to that exact position - Play click sound and haptic pulse when
snapping
**Two-Handed Wheel** (steering wheel): - Track both hands if both
gripping - Calculate rotation from vector between hands - Use midpoint
of hands as reference for rotation calculation
#### Troubleshooting
**"Lever jumps to wrong angle when grabbed"** - Calculate initial grab
offset: store difference between hand angle and lever angle at grab
moment - Apply this offset during tracking to maintain natural feel
**"Lever rotation feels jittery"** - Add smoothing: Lerp from current
rotation toward target rotation -
`New Rotation = Lerp(Current, Target, 0.3)` for smooth following
**"Lever doesn't track hand rotation"** - Verify you're reading the
correct rotator component (Roll/Pitch/Yaw) - Check lever's pivot
point---rotation should be around correct axis
**"Other objects can grab the lever"** - Add Cast to
MotionControllerComponent in overlap event - Only set bIsGrabbed if
overlapping actor is actually a hand controller
#### Blueprint References
For complete working examples showing all the node connections:
- **Rotational lever**:
- **Linear slider**:
These show the full Event Tick tracking loop, constraint math, and
proper release handling.
### Integration with Haptics
Consider adding haptic feedback for better physicality (see Section 5.5
for details):
- **Threshold crossings**: Pulse when CurrentValue passes 0.25, 0.5,
0.75
- **Min/max limits**: Stronger pulse when reaching ends of range
- **Snap positions**: Strong pulse when switch snaps to position
- **Continuous feedback**: Light pulse proportional to movement speed
while dragging
Haptic feedback makes constrained manipulation feel more physical and
helps users understand the control's range without looking at it.
### Conclusion
Understanding and implementing these basic interaction methods is
crucial for creating immersive and intuitive XR experiences. As you
develop your projects, consider how these interactions can be used to
create engaging and natural user experiences in your virtual
environments.
For more detailed information on VR interaction in Unreal Engine, refer
to the [Unreal Engine VR Development
Documentation](https://docs.unrealengine.com/en-US/SharingAndReleasing/XRDevelopment/VR/index.html).
## Spatial Platform Capabilities (2025)
Contemporary headsets and glasses ship with increasingly rich spatial
understanding out of the box. Designers can now assume that most
platforms offer at least anchors, surface reconstruction, and semantic
understanding---with notable nuances by vendor.
### Core Capability Checklist
- **Anchors & Persistence**: Anchor systems let virtual objects stay
attached to real-world positions. Niantic's 2025 Spatial SDK update
extends centimeter-accurate Visual Positioning System (VPS) anchors
from phones to Quest 3 headsets, so a task board you pin in a lobby
remains in place across sessions and
devices.[@niantic_spatial_sdk_2024]
- **Meshing & Scene Understanding**: Live meshing now runs locally on
consumer headsets. Niantic demonstrates near-field meshes for living
rooms and lobby-scale reconstructions, while Meta's Depth API powers
instant placement without full
scans.[@niantic_spatial_sdk_2024; @uploadvr_meta_sdk_v71_2024]
- **Semantics & Object Labels**: Semantic segmentation (walls, floors,
furniture) feeds more context into your UX logic---trigger hand-off
guides only when a "table" is detected or scale UI to fit actual
wall dimensions.
- **Occlusion & Depth**: Depth sensors or reconstructed meshes allow
virtual content to hide behind real objects. This is essential for
believable MR portals, spatial UI, and colocation-heavy multiplayer.
> **Friction reducers to design around**
>
> - **Instant placement** (Meta Quest SDK v71): Drop objects directly
> on detected surfaces using the Depth API, reducing the onboarding
> flow from a 60-second scan to a single tap.
> - **Keyboard cutouts**: Quest now supports passthrough around any
> Bluetooth keyboard, so productivity apps can expose physical
> peripherals without custom calibration.
> - **Automatic colocation discovery**: Nearby Quest headsets can find
> each other over Bluetooth, allowing same-room multiplayer to start
> without room codes---pair this with shared anchors for rapid
> collaborative setup.
### Planning for Cross-Device Deployments
Android XR's cross-device strategy and Niantic's shared SDK suggest a
practical baseline.[@google_android_xr_2024; @niantic_spatial_sdk_2024]
1. **Design with feature tiers**: Assume anchors + basic depth
everywhere, with semantics and meshing as optional enhancements.
2. **Build shared scene graphs**: Use platform services (Niantic VPS,
Meta Shared Spatial Anchors) to sync object placement across phones,
standalone headsets, and future smart glasses.
3. **Prototype friction flows**: Test how quickly someone can place an
object, join a colocated session, or reveal a keyboard. Small
latency improvements drastically affect perceived polish.
Grounding design decisions in these capabilities keeps experiences
portable across the full form-factor spectrum introduced in Chapter 2.
## Locomotion Techniques in Virtual Reality
Locomotion in virtual reality (VR) presents unique challenges and
opportunities. The ability to move within virtual spaces larger than the
physical reality is crucial for creating immersive experiences. However,
implementing movement in VR requires careful consideration to maintain
user comfort and prevent motion sickness.
### The Challenge: Motion Sickness
While locomotion is essential for immersive VR experiences, it presents
a significant challenge: motion sickness. This issue arises from what is
known as visual-vestibular conflict.
#### Visual-Vestibular Conflict
This conflict occurs when there's a mismatch between what the user sees
in the VR headset and what their inner ear (vestibular system) senses.
As
You see this environment that feels real and you see yourself moving
there, but you don't feel it in your inner ears---the vestibular system
that senses acceleration and helps with balance.
This discrepancy can lead to the body reacting as if something is wrong,
potentially triggering nausea as a defense mechanism. One theory
suggests that this reaction might be evolutionary, similar to the body's
response to ingesting poison.
### Individual Variation
Susceptibility to VR-induced motion sickness varies greatly among
individuals. Some people may experience discomfort from merely watching
a car ride on a large screen, while others can handle complex movements
in VR without significant issues.
### The Phenomenon of "VR Legs"
A common sentiment in the VR community is the concept of developing "VR
legs" - the idea that users can acclimate to VR environments and reduce
motion sickness over time. Porter and Robb [-@porterrobb2019] explored
this phenomenon, finding that while some users do indeed adapt, this is
not universal.
You can, to a certain degree, develop what we call "VR legs" as you get
used to using virtual reality. You can tolerate more of these kinds of
motions over time, but this adaptation isn't true for everyone.
![About possible VR Legs adaptation, or not. Quote from Porter and Robb
[-@porterrobb2019].](images/expgame2019/cybersick-some.png){width="70%"}
### Solutions to VR Locomotion Challenges
Developers have devised various solutions to address motion sickness in
VR, each with its own advantages and limitations:
#### 1. No Visual Motion (or Acceleration)
- **Teleportation/Dashing**: Users instantly move to a new location
without showing the transition.
- Reduces visual-vestibular conflict by eliminating perceived
motion.
- Most effective when avoiding acceleration visuals.
#### 2. Reduced Visible Motion
- **Tunneling**: Narrows the field of view during movement.
- Exploits the fact that we're most sensitive to motion in our
peripheral vision.
- **Morphing**: Alters the world in ways that the brain doesn't
interpret as typical movement.
#### 3. Setting Expectations
- **Running in Place**: Encourages physical movement that aligns with
virtual motion. If you're running in place while moving in VR, that
physical action really helps the brain accept that the movement
you're seeing is reasonable and makes sense.
- **Pulling the World**: Allows users to grab and move the virtual
environment directly. This sets expectations to moving the world,
not to you moving through the world.
#### 4. Combining Approaches
Developers often combine these techniques, creating narratives or tools
within the virtual world to explain and facilitate movement. This
approach can help direct user attention and make locomotion feel more
natural within the context of the experience.
### Locomotion Options in Unreal Engine VR Templates
Unreal Engine provides several built-in locomotion options for VR
experiences, designed to enhance user comfort and reduce motion
sickness.
#### Teleportation with Parabolic Pointing
Teleportation is a popular VR movement technique that allows users to
instantly transport to a new location. The Unreal Engine template
implements this with parabolic pointing.
Key Features: - Uses a parabolic trajectory to determine teleport
destination - Allows reaching higher positions - Limits teleportation
range for better control
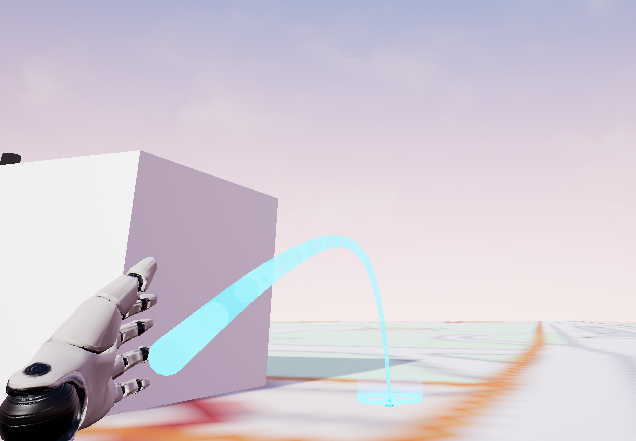
#### Snap Turning
Snap turning is a technique to reduce motion sickness when rotating in
VR.
Key Features: - Turns the view by 45 degrees in one quick motion - Can
be pressed multiple times for larger rotations - Helps prevent
disorientation caused by smooth rotation
#### Snap/Blink Movement
This technique allows for short, controlled movements in VR space.
Key Features: - Moves the user 1 meter forward or backward in one quick
motion - Can be used multiple times for longer distances - Doesn't
require pointing to a specific location each time
#### Quick Fade Transition
All locomotion techniques in the template use a quick fade to black and
back during movement.
Purpose: - Helps the brain ignore the sudden change in position -
Reduces the likelihood of motion sickness
Each of these locomotion techniques is implemented with a quick fade to
black and back. This helps the brain ignore the movement because it
becomes less aware of---or doesn't detect---the actual switch from one
place to another when there's a brief blackout in between.
### Implementing Teleportation in Exercises
For simple teleportation exercises, students can use a streamlined
approach:
1. Check if the player enters a trigger box acting as a teleporter
2. Use the teleport blueprint node to move the player to a new location
3. Optionally, teleport to another level using the "Open Level"
blueprint node
Tip for Targeting: Use the position of an actor as the teleport target
for more dynamic teleportation.
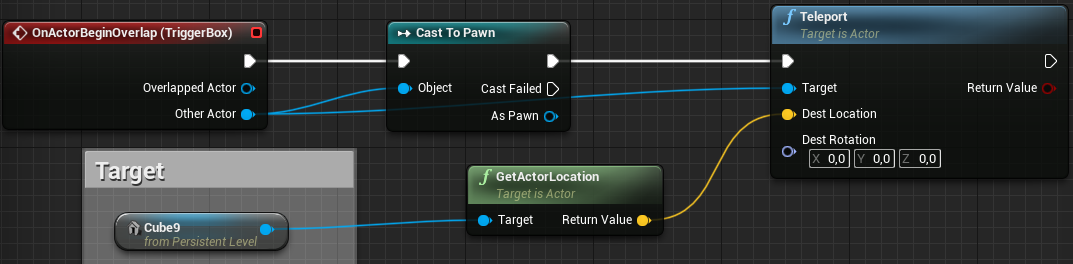
### Advanced Locomotion Techniques {#sec-advanced-locomotion-techniques}
For more advanced applications, researchers and developers have explored
innovative locomotion techniques:
#### Redirected Walking and the Unlimited Corridor
Redirected walking is a technique that allows users to explore seemingly
infinite virtual spaces within a limited physical area. This is achieved
by subtly manipulating the user's perception of movement.
\begin{tcolorbox}[colback=red!5!white,colframe=red!50!black,title=YouTube Video]
\textbf{Redirected Walking Unlimited Corridor Demo}
Experience how users can walk infinitely in VR within a limited physical space using clever spatial manipulation techniques. The physical path curves while users perceive walking straight along an endless corridor, solving space constraints in room-scale VR.
\textit{Watch at: \url{https://www.youtube.com/watch?v=THk92rev1VA&t=s}}
\end{tcolorbox}
This is one of the more impressive recent developments I've encountered.
By constructing this particular wall shape, you can fool users into
thinking they're walking along an infinitely long straight wall when
they're actually walking in a curve.
#### Galvanic Vestibular Stimulation
To address the issue of motion sickness in VR, researchers are exploring
ways to directly stimulate the vestibular system, which is responsible
for our sense of balance and spatial orientation.
\begin{tcolorbox}[colback=red!5!white,colframe=red!50!black,title=YouTube Video]
\textbf{Galvanic Vestibular Stimulation for VR Motion}
Learn about experimental technology that uses electrical stimulation of the inner ear to create sensations of movement and acceleration. This approach could potentially solve VR motion sickness by synchronizing vestibular perception with visual motion in virtual environments.
\textit{Watch at: \url{https://www.youtube.com/watch?v=5Li_1xQV_Hs&t=s}}
\end{tcolorbox}
This technique is called Galvanic Vestibular Stimulation (GVS), where
you essentially apply controlled electrical signals to stimulate the
vestibular system, making you feel as if you're accelerating and turning
in different directions. This is a potential "holy grail" for solving VR
motion issues, as the only suggestion that might completely remove it.
This technology, while still in research stages, could potentially solve
one of the major challenges in VR by aligning the user's sense of
movement with the visual input from the VR environment.
### Conclusion
Locomotion in VR remains an active area of research and development.
While various techniques have been developed to mitigate motion sickness
and enhance user comfort, the choice of locomotion method often depends
on the specific application and target audience. As VR technology
continues to evolve, we can expect to see further innovations in this
crucial aspect of virtual reality experiences.
For more information on locomotion in Unreal Engine, refer to the
[Unreal Engine VR Locomotion
Documentation](https://docs.unrealengine.com/en-US/SharingAndReleasing/XRDevelopment/VR/DevelopVR/VRCharacters/index.html).
## Designing User Interfaces for 3D Spaces
Creating effective user interfaces (UI) for 3D spaces in Extended
Reality (XR) presents unique challenges and opportunities. This section
explores the principles and techniques for designing UI elements that
seamlessly integrate with virtual environments.
### The Challenge of 2D UI in VR
Traditional 2D user interfaces do not translate well to virtual reality
(VR) environments. There are two main issues:
1. **Stereo Effect Distortion**: Simply projecting a 2D interface onto
the VR screens results in an incorrect stereo effect, making the UI
difficult to perceive properly.
2. **Lack of Natural Interaction**: Without proper placement in 3D
space, users cannot interact with the UI using natural body
movements, which is a key aspect of VR experiences.
In short, showing ordinary UI overlays does not work in VR.
### Unreal Engine's Solution: Placing UI on 3D Surfaces
To address these challenges, Unreal Engine adopts an approach of placing
2D interfaces on surfaces within the 3D environment. This solution
involves creating a virtual screen that exists as part of the VR world,
allowing for proper depth perception and intuitive interaction.

The image above demonstrates how a 2D interface can be integrated into a
3D VR environment, complete with hand controllers for interaction.
### Required Components for 2D UI in VR
To implement a 2D user interface in VR using Unreal Engine, three key
components are necessary:
1. **Menu Actor**: This is a Blueprint actor that serves as the
container for the 2D surface in 3D space. It allows you to position
and manipulate the UI within the virtual environment.
2. **UMG Widget**: UMG (Unreal Motion Graphics) is Unreal Engine's
system for creating 2D user interfaces. The UMG Widget is connected
to the Menu Actor and contains the actual UI design.
3. **Widget Interaction Component**: This component is attached to the
player's Pawn (usually the hand or controller) and acts as a
pointer, enabling interaction with the 2D interface elements like
buttons.
### Creating UIs with UMG
UMG provides a familiar environment for designing 2D interfaces within
Unreal Engine. It offers a range of common UI widgets and allows for
hierarchical construction of interfaces.
Key features of UMG include:
- A variety of widgets common to 2D UIs
- Ability to build interfaces hierarchically (e.g., adding a text
label as a child of a button)
- Visual editor for easy UI design
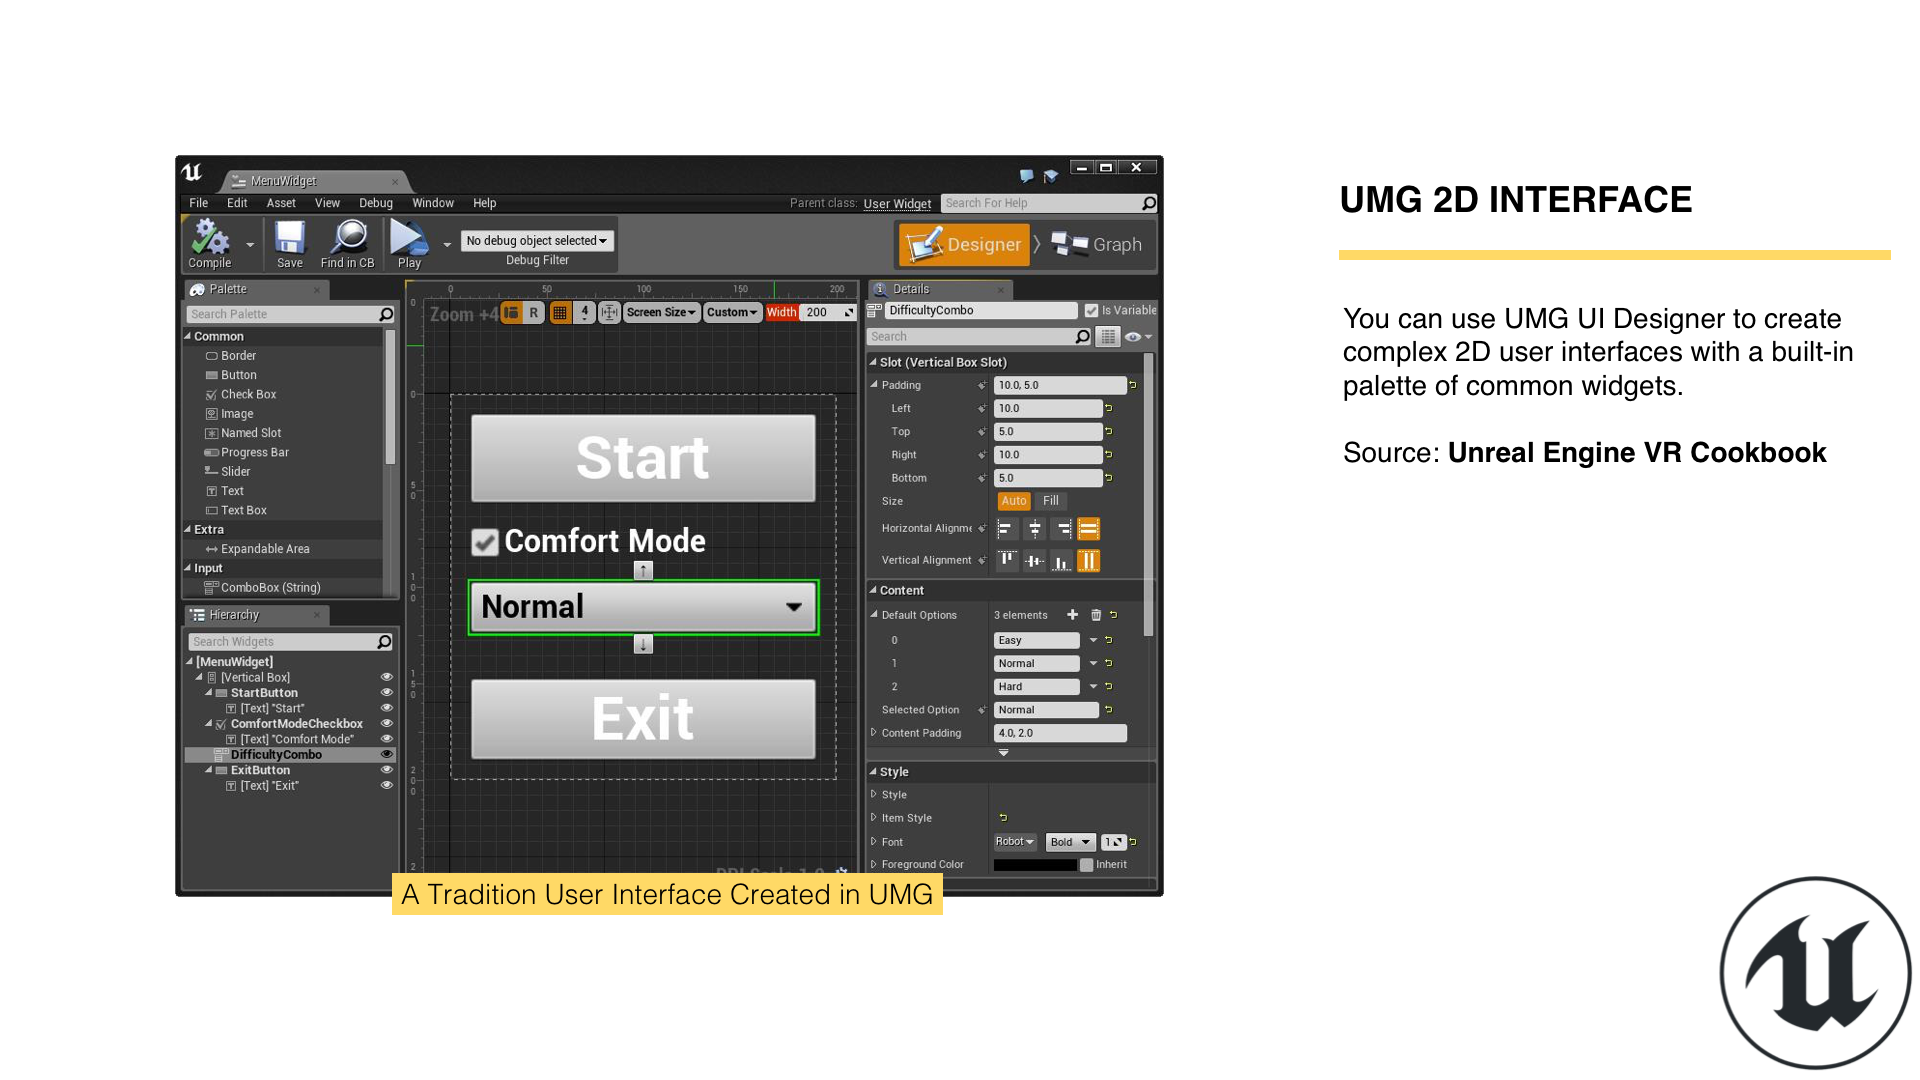
For more detailed information on using UMG, refer to the [UMG UI
Designer Quick Start
Guide](https://dev.epicgames.com/documentation/en-us/unreal-engine/umg-ui-designer-quick-start-guide-in-unreal-engine).
### Implementing the Menu Actor
The Menu Actor is crucial for placing your 2D interface in the 3D VR
environment. Here's how to set it up:
1. Create a new Blueprint actor or extend an existing one.
2. Add a Widget Component to this actor.
3. Configure the Widget Component with the following key settings:
- **Widget Class**: Specify the UMG UI to use.
- **Draw Size**: Set the "resolution" of the draw surface.
- **Rendering Options**: Adjust background color, blend mode,
two-sided rendering, and opacity.
4. Scale the entire actor to adjust its size in the world, independent
of the Draw Size.
It's important to note that scaling the actor and adjusting the Draw
Size work together to determine the final appearance of your UI in the
VR space.
### Connecting UI Events to the Game World
While UMG UI provides a powerful system for creating interfaces, it's
important to understand that these UI elements cannot directly interact
with the game world. This is because the UMG UI is not an actor in
itself within the level.
To enable interaction between your UI and the game world, there are two
primary methods:
1. Connect UMG events to events in the menu actor
2. Set variables on the UMG UI to allow it to act in the world
In both cases, you need to cast to your UI class to access the necessary
functions or variables. This involves getting the widget, calling
`GetUserWidgetObject`, and then casting to your specific UI class. Note
that this process does not work in the Construction Script; you should
perform it in the `BeginPlay` event instead to ensure the widget is
created before you attempt to access it.
#### Connecting to Events in the Menu Actor
To connect events from your UMG UI to events in your menu actor:
1. Cast to your widget class.
2. Get the button (or similar UI element) you want to interact with.
3. Bind the button's event to a custom event in your menu actor.
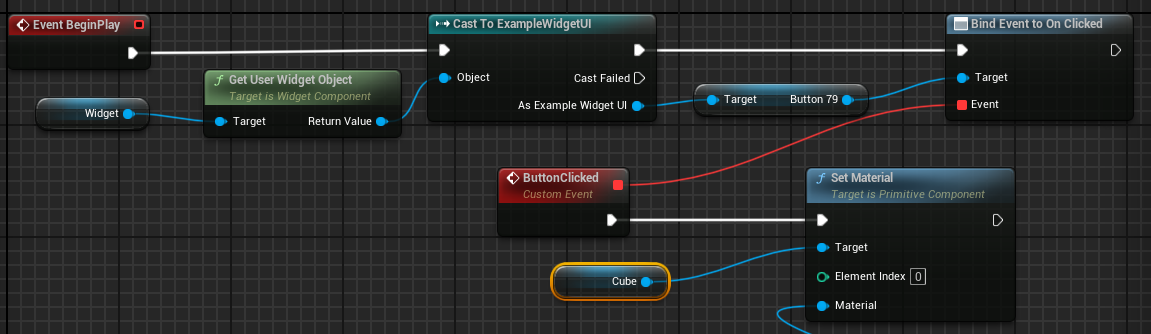
This approach allows you to handle UI events, such as button clicks,
directly within your menu actor, facilitating interaction with the game
world.
#### Setting Variables and Using Events in UMG
Alternatively, you can set variables on your UMG UI to enable it to act
in the world:
1. Make the necessary variables in your UMG UI public.
2. Cast to your widget class and set these variables from your menu
actor.
3. Handle events within your UMG UI, using the variables you've set to
affect the game world.
In the Menu Actor: 
In the UMG Widget Blueprint: 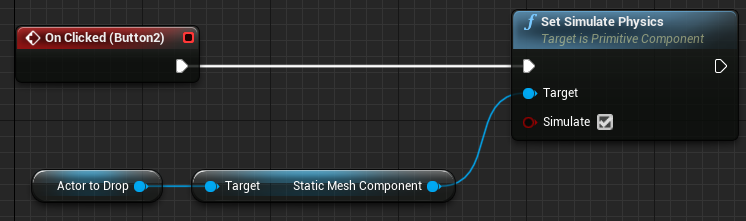
By setting variables on your UMG UI, you allow the UI to perform actions
in the game world based on user interactions, enhancing the
interactivity of your application.
## Principles of 3D UI Design
When designing UI for 3D spaces, consider the following principles:
1. **Spatial Awareness**: UI elements should be placed in logical
locations within the 3D space. For example, a menu might appear on a
virtual wall or float in front of the user at a comfortable
distance.
2. **Depth and Layering**: Utilize depth to create hierarchy and
organization in your UI. Important elements can be brought closer to
the user, while less critical information can be pushed further
back.
3. **Interaction Paradigms**: Design UI elements that can be interacted
with using natural gestures. For example, buttons that can be
pressed with virtual hands or laser pointers.
4. **Scale and Readability**: Ensure that text and UI elements are
large enough to be read comfortably in VR. Consider the resolution
limitations of current VR headsets.
5. **Field of View**: Remember that VR headsets have a limited field of
view. Avoid placing crucial UI elements at the extreme edges of the
user's vision.
6. **Context-Sensitive UI**: Consider implementing UI elements that
appear or become more prominent based on the user's context or
actions within the virtual environment.
### Importance of Collision in 3D UI
Collision detection plays a crucial role in creating interactive 3D UIs.
It allows users to interact with UI elements as if they were physical
objects in the virtual space.
Key points about collision in 3D UIs:
1. **Enable collision for UI elements**: This allows them to be
"touched" by the user's virtual hands or pointers.
2. **Use overlap events**: These can trigger actions when the user's
hand or pointer enters the UI element's collision volume.
3. **Consider different collision shapes**: Some UI elements might
benefit from more complex collision shapes than simple boxes or
spheres.
For more detailed information on implementing collision in Unreal
Engine, refer to the next chapter which covers this topic in depth.
### Triggering Actions Upon Touch
3D buttons in VR can be implemented using collision and overlap events.
Here's a basic approach:
1. Create a 3D mesh for your button (e.g., a simple cube).
2. Enable collision on the button mesh.
3. Implement an overlap event that triggers when the user's hand or
pointer enters the button's collision volume.
4. In the overlap event, trigger the desired action (e.g., change a
scene, open a menu, etc.).
This approach allows for intuitive, physical-feeling interactions with
UI elements in 3D space.
### Advanced UI Concepts
#### Diegetic UI
Diegetic UI elements are those that exist within the game world itself.
For example, a health meter on the player's in-game wrist device, or
ammunition count displayed on the weapon itself. These UI elements can
greatly enhance immersion by blending seamlessly with the virtual
environment.
#### Spatial UI
Spatial UI takes advantage of the 3D environment to present information
in a way that's impossible in 2D interfaces. For example, a 3D scatter
plot that the user can walk through and examine from different angles.
#### Adaptive UI
Consider implementing UI that adapts to the user's position and
orientation in the virtual space. This could involve UI elements that
follow the user at a comfortable distance, or rearrange themselves based
on the user's viewing angle.
### Conclusion
Designing effective user interfaces for 3D spaces in XR requires a shift
in thinking from traditional 2D UI design. By leveraging the unique
capabilities of VR and AR, designers can create intuitive, immersive
interfaces that enhance the overall user experience. As XR technologies
continue to evolve, we can expect to see even more innovative approaches
to UI design in 3D spaces.
For more information on UI design in Unreal Engine, refer to the [Unreal
Engine UMG UI Designer
Documentation](https://docs.unrealengine.com/en-US/InteractiveExperiences/UMG/UserGuide/index.html).
## Haptics and Tactile Feedback {#sec-haptics-and-tactile-feedback}
Haptic feedback plays a crucial role in creating immersive experiences
in Extended Reality (XR). By providing tactile sensations, haptics
enhance the sense of presence and interaction in virtual environments.
This section provides a comprehensive exploration of haptic technologies
in XR, from simple vibrations to advanced tactile technologies.
*Note: While [Section 2.5](#sec-emerging-xr-technologies){.quarto-xref}
introduces haptic technologies as part of emerging XR innovations, this
chapter serves as the definitive guide to understanding, implementing,
and designing haptic feedback in XR applications.*
### The Importance of Touch in XR
Haptics, the sense of touch in virtual reality (VR), plays a crucial
role in creating immersive experiences. The ability to physically
interact with virtual objects significantly enhances the realism and
engagement of VR applications. This concept builds upon the famous
"rubber hand illusion," which demonstrates how our brains can be tricked
into perceiving an artificial limb as part of our body.
### Types of Haptic Feedback
#### 1. Controller Vibration
The most common form of haptic feedback in current VR systems is
controller vibration. This provides a basic level of tactile feedback
for interactions such as:
- Touching or colliding with virtual objects
- Firing a virtual weapon
- Receiving in-game notifications
While simple, controller vibration can significantly enhance the sense
of interaction in VR when used effectively.
#### 2. Advanced Haptic Controllers
More sophisticated haptic controllers are being developed to provide
more nuanced and realistic tactile sensations. For example:
\begin{tcolorbox}[colback=red!5!white,colframe=red!50!black,title=YouTube Video]
\textbf{Advanced Haptic Gloves Demo}
See sophisticated haptic feedback technology in action, demonstrating variable resistance, texture simulation, and pressure sensations. These advanced haptic gloves provide realistic touch feedback when grasping and manipulating virtual objects in immersive environments.
\textit{Watch at: \url{https://www.youtube.com/watch?v=4ODO4AcCIQY&t=s}}
\end{tcolorbox}
These advanced controllers can provide:
- Variable resistance when grasping objects
- Texture simulation
- Pressure sensations
Some of these advanced haptic devices are probably available, but
they're not targeted at consumers. They tend to be really expensive and
focus on enterprise applications.
#### 3. Passive Haptics
Passive haptics refers to the use of physical objects that correspond to
virtual elements in a VR environment. This technique allows users to
touch and feel virtual objects, greatly enhancing the sense of presence
and immersion.
One notable example came from a company called The Void (which
unfortunately closed in 2021). They created experiences where you walk
around with VR equipment in spaces with physical constructions built to
match the virtual environment. You could reach out to touch virtual
objects and actually feel their physical counterparts.
This approach allows users to physically interact with their
surroundings while experiencing a virtual overlay, creating a powerful
blend of digital and physical realities.
### Passive Haptics in Mixed Reality (MR)
In Mixed Reality applications, passive haptics can be particularly
effective. By matching virtual objects to real-world counterparts,
developers can create convincing tactile experiences. For example:
- A virtual table that corresponds to a physical table in the user's
environment
- Virtual walls that align with the real walls of a room
This approach not only enhances the sense of immersion but also
contributes to user safety and confidence in movement within the virtual
space. As users can physically feel the boundaries of their environment,
they can move more freely and naturally within the virtual world.
### Haptic Gloves
Haptic gloves represent a significant advancement in tactile feedback
for VR interactions. These gloves incorporate motors and mechanisms that
provide resistance and sensations to the user's fingers, allowing them
to:
- Feel the sensation of grasping virtual objects
- Experience resistance when squeezing or pulling items
- Receive varied haptic feedback based on different virtual textures
and materials
While currently aimed at enterprise applications due to their cost,
haptic gloves represent a promising direction for enhancing the tactile
dimension of VR experiences.
### Implementing Haptic Feedback in Unreal Engine
While Unreal Engine doesn't directly support advanced haptic devices, it
does provide ways to implement basic haptic feedback through controller
vibration. Here's a simple approach:
1. **Detect Collision**: Use collision events to detect when a user
interacts with a virtual object.
2. **Trigger Haptic Feedback**: Use the "Play Haptic Effect" node in
Blueprints to trigger a vibration on the controller.
3. **Customize Feedback**: Adjust the intensity and duration of the
vibration based on the type of interaction.
For more advanced haptic implementations, you may need to use plugins or
custom C++ code to interface with specific haptic devices.
### Best Practices for Haptic Design
When designing haptic feedback for XR experiences, consider the
following:
1. **Subtlety**: Haptic feedback should enhance the experience, not
overwhelm it. Use varying intensities based on the importance of the
interaction.
2. **Consistency**: Establish a consistent haptic language across your
application. Similar interactions should have similar haptic
feedback.
3. **Latency**: Minimize the delay between visual events and haptic
feedback to maintain the illusion of physical interaction.
4. **Context**: Consider the context of the interaction. A soft object
should provide different feedback compared to a hard object.
5. **User Comfort**: Provide options for users to adjust or disable
haptic feedback, as some may find strong vibrations uncomfortable.
### Future of Haptics in XR
The field of haptics in XR is rapidly evolving. Some promising areas of
development include:
- **Ultrasonic Haptics**: Creating tactile sensations in mid-air using
focused ultrasound waves.
- **Thermal Feedback**: Simulating temperature changes to enhance
realism in virtual environments.
- **Force Feedback**: Advanced systems that can simulate the weight
and resistance of virtual objects.
As these technologies mature and become more accessible, we can expect
XR experiences to become increasingly tactile and immersive.
### Conclusion
Haptics and tactile feedback are crucial elements in creating truly
immersive XR experiences. From simple controller vibrations to advanced
haptic gloves and passive haptics, these technologies bridge the gap
between the virtual and physical worlds. As XR continues to evolve, we
can expect haptic feedback to play an increasingly important role in
creating convincing and engaging virtual environments.
For more information on implementing basic haptic feedback in Unreal
Engine, refer to the [Unreal Engine Force Feedback
Documentation](https://docs.unrealengine.com/en-US/InteractiveExperiences/Input/ForceFeedback/index.html).
## Gesture and Voice Recognition in XR {#sec-gesture-and-voice-recognition}
Gesture and voice recognition technologies are becoming increasingly
important in XR (Extended Reality) applications, offering more natural
and intuitive ways for users to interact with virtual environments.
These input methods can complement or even replace traditional
controller-based interactions, enhancing immersion and accessibility in
XR experiences.
*Note: This chapter provides comprehensive coverage of gesture and voice
recognition fundamentals, implementation techniques, and design best
practices for XR applications. For AI-enhanced gesture and voice
recognition technologies, see
[Section 8.6.2](#sec-machine-learning-gesture-voice-recognition){.quarto-xref}.*
### Gesture Recognition in XR
Gesture recognition allows users to interact with virtual objects and
interfaces using natural hand movements and poses. This technology has
seen significant advancements in recent years, particularly in the
context of XR applications.
#### Types of Gesture Recognition
1. **Controller-based Gestures**: These rely on the motion and
orientation of handheld controllers to interpret gestures.
2. **Camera-based Hand Tracking**: Uses external or headset-mounted
cameras to track hand and finger movements without the need for
controllers.
3. **Glove-based Systems**: Specialized gloves with sensors that
provide precise finger tracking and sometimes haptic feedback.
#### Common Gestures in XR
Some commonly implemented gestures in XR applications include:
- Pinch to grab or select
- Swipe to scroll or navigate menus
- Open hand to release objects
- Point for UI interaction
- Thumbs up/down for quick feedback
#### Implementing Gesture Recognition
In Unreal Engine, gesture recognition can be implemented through:
1. **Motion Controller Components**: For controller-based gestures
2. **Vision-based Plugins**: For camera-based hand tracking (e.g.,
Oculus Hand Tracking plugin)
3. **Custom Gesture Recognition Systems**: Using Blueprint or C++ to
define and recognize specific hand poses and movements
### Voice Recognition in XR
Voice commands offer a hands-free way to interact with XR environments,
which can be particularly useful when the user's hands are occupied or
when accessibility is a concern.
#### Applications of Voice Recognition in XR
1. **Navigation**: Using voice commands to move through virtual spaces
or menus
2. **Object Manipulation**: Selecting, moving, or modifying virtual
objects
3. **System Control**: Adjusting settings or launching applications
4. **Text Input**: Dictating text for messaging or search functions
5. **AI Assistants**: Interacting with virtual AI assistants within the
XR environment
#### Implementing Voice Recognition
While Unreal Engine doesn't have built-in voice recognition
capabilities, developers can integrate third-party solutions:
1. **Platform-specific SDKs**: Using voice recognition APIs provided by
VR/AR platforms (e.g., Oculus Voice SDK)
2. **Cloud-based Services**: Integrating services like Google Cloud
Speech-to-Text or Amazon Transcribe
3. **Middleware Solutions**: Using plugins that provide voice
recognition functionality
### Challenges in Gesture and Voice Recognition
1. **Accuracy**: Ensuring reliable recognition across different users
and environments
2. **Latency**: Minimizing delay between user input and system response
3. **User Training**: Familiarizing users with available gestures and
voice commands
4. **Privacy Concerns**: Addressing user concerns about voice data
collection and processing
5. **Multilingual Support**: Providing recognition for multiple
languages and accents
### Best Practices for XR Gesture and Voice Interactions
1. **Intuitive Design**: Design gestures and voice commands that feel
natural and are easy to remember
2. **Visual Feedback**: Provide clear visual cues to confirm recognized
gestures and voice commands
3. **Multimodal Input**: Combine gesture and voice input with
traditional controls for flexibility
4. **Customization**: Allow users to customize gesture and voice
commands to their preferences
5. **Fallback Options**: Provide alternative input methods for all
gesture and voice-controlled functions
### Future Trends
The field of gesture and voice recognition in XR is rapidly evolving.
Some emerging trends include:
1. **Improved AI and Machine Learning**: Enhancing recognition accuracy
and adapting to individual users
2. **Haptic Feedback**: Combining gesture recognition with haptic
feedback for more immersive interactions
3. **Brain-Computer Interfaces**: Exploring direct neural interfaces
for even more intuitive control
4. **Emotional Recognition**: Interpreting user emotions through voice
tone and facial expressions
5. **Context-Aware Systems**: Adapting gesture and voice interactions
based on the user's current activity or environment
### Conclusion
Gesture and voice recognition technologies offer exciting possibilities
for creating more natural, intuitive, and immersive XR experiences. As
these technologies continue to advance, we can expect to see
increasingly sophisticated and seamless interactions between users and
virtual environments. Developers should consider incorporating these
input methods to enhance the usability and accessibility of their XR
applications, while being mindful of the challenges and best practices
associated with their implementation.
For more information on implementing motion controls in Unreal Engine,
which can be a starting point for gesture recognition, refer to the
[Unreal Engine Motion Controller
Documentation](https://docs.unrealengine.com/en-US/InteractiveExperiences/Input/MotionControllers/index.html).
## Advanced Avatar Technologies and Digital Humans {#sec-advanced-avatar-technologies}
The rapid advancement of avatar technologies is revolutionizing how we
represent ourselves in virtual and augmented reality spaces. From Meta's
high-end codec avatars to freely available tools like Epic Games'
Metahuman, the push for photorealistic digital representations is
gaining momentum.
This section focuses on the technical implementation and practical tools
for creating advanced avatars. For the foundational psychological
principles underlying virtual embodiment---including the Rubber Hand
Illusion, body ownership, and the Proteus Effect---see
[Section 1.4](#sec-avatars-and-virtual-embodiment){.quarto-xref}.
### Meta Codec Avatars: Pushing the Boundaries of Realism
Meta (formerly Facebook) has demonstrated some of the most advanced
avatar technology to date with their codec avatars.These highly
realistic digital representations showcase the potential for lifelike
interactions in virtual environments.
\begin{tcolorbox}[colback=red!5!white,colframe=red!50!black,title=YouTube Video]
\textbf{Meta Codec Avatars Technology Demo}
Witness photorealistic digital human representations with real-time facial animation, showcasing the cutting-edge scanning and rendering technology that creates lifelike avatars for immersive social interactions in virtual reality environments.
\textit{Watch at: \url{https://www.youtube.com/watch?v=MVYrJJNdrEg&t=s}}
\end{tcolorbox}
Key features of Meta Codec Avatars:
1. Photorealistic rendering: The avatars achieve a level of detail that
closely mimics real human faces.
2. Real-time animation: Facial expressions and movements are captured
and rendered in real-time.
3. Custom scanning process: Currently, users need to visit a Meta lab
for precise facial scanning.
This clip shows an interview between Mark Zuckerberg and Lex Fridman
where both faces you see are actually computer-generated graphics. These
avatars are created in real-time based on recorded data and tracking
capabilities of advanced headsets that understand how the eyes, mouth,
and other facial features move.
While incredibly impressive, it's important to note that this technology
is not yet generally available to the public. The requirement for
specialized scanning equipment limits its current accessibility.
### Epic Games' Metahuman: Democratizing Realistic Avatar Creation
Epic Games, known for their Unreal Engine technology, has released
Metahuman Creator, a tool that aims to make highly realistic avatar
creation more accessible to developers and content creators.

Metahuman Creator offers:
1. Browser-based creation: Users can craft detailed human avatars
directly in their web browser.
2. Extensive customization: A wide range of facial features,
hairstyles, and other attributes can be adjusted.
3. Integration with game engines: The created avatars can be easily
imported into Unreal Engine for use in games or other interactive
experiences.
Metahuman Creator is one of the tools that's freely available for
creating realistic digital humans, and it represents how Epic Games is
pushing this technology forward. You can explore it yourself at the link
provided.
For those interested in exploring Metahuman Creator, you can access it
at .
### Live Link Face: Bringing Avatars to Life
Building upon the Metahuman technology, Epic Games has also introduced
Live Link Face, an iPhone app that enables real-time facial animation
capture.
\begin{tcolorbox}[colback=red!5!white,colframe=red!50!black,title=YouTube Video]
\textbf{Metahuman Live Link Face Animation}
Discover how iPhone facial capture technology drives high-quality Metahuman avatars in real-time, demonstrating accessible tools for creating professional facial animations without expensive motion capture equipment for immersive character development.
\textit{Watch at: \url{https://www.youtube.com/watch?v=V--tYfl8m38&t=s}}
\end{tcolorbox}
This technology allows developers to:
1. Capture facial expressions in real-time using an iPhone's
front-facing camera.
2. Apply the captured animations to Metahuman avatars instantly.
3. Create high-quality facial animations without the need for expensive
motion capture equipment.
You can achieve this level of quality now with freely available tools
and software, using just an iPhone or similar device.
This combination of Metahuman and Live Link Face represents a
significant step towards making high-quality avatar creation and
animation accessible to a broader range of creators and developers.
### GaussianAvatars: The Future of Photorealistic Avatars
Recent research has explored the application of Gaussian Splatting
techniques to avatar creation, resulting in the development of
GaussianAvatars.
\begin{tcolorbox}[colback=red!5!white,colframe=red!50!black,title=YouTube Video]
\textbf{GaussianAvatars Research Demo}
Explore cutting-edge avatar technology using Gaussian Splatting techniques to create unprecedented photorealistic digital humans with efficient rendering performance and realistic deformation capabilities for next-generation immersive experiences.
\textit{Watch at: \url{https://www.youtube.com/watch?v=lVEY78RwU_I&t=s}}
\end{tcolorbox}
Key aspects of GaussianAvatars:
1. Photorealistic rendering: Achieves an unprecedented level of realism
in digital human representation.
2. Efficient performance: Leverages Gaussian Splatting for improved
rendering speed and quality.
3. Rigged 3D Gaussians: Allows for realistic deformation and animation
of the avatar.
This is a very interesting development for creating photorealistic
avatars that could become more readily available to developers and
content creators.
While still in the research phase, GaussianAvatars represent a promising
direction for the future of avatar technology, potentially offering even
more realistic and efficient avatar representations for immersive
environments.
### Implementation Considerations and Cross-Platform Compatibility
As avatar technologies become more sophisticated, several practical
considerations emerge for developers and content creators:
**Technical Integration:** - Cross-platform compatibility between
different VR systems - Performance optimization for real-time
rendering - Integration with existing game engines and development
pipelines
**Accessibility and Inclusivity:** - Ensuring avatar creation tools are
accessible to users with different technical skills - Providing diverse
representation options in avatar creation systems - Accommodating users
with disabilities in avatar design
**Ethical Design Principles:** The psychological effects of avatar
embodiment (covered in detail in
[Section 1.4](#sec-avatars-and-virtual-embodiment){.quarto-xref}) raise
important ethical considerations for developers:
1. **Informed Consent**: Users should understand how avatar
characteristics might influence their behavior and self-perception
2. **Representation**: Avatar systems should offer inclusive options
for diverse user populations
3. **Privacy**: Biometric data used for avatar creation and animation
should be handled responsibly
For a comprehensive understanding of the psychological foundations
underlying these design considerations, see the discussion of virtual
embodiment principles in
[Section 1.4](#sec-avatars-and-virtual-embodiment){.quarto-xref}.
**Future Technical Directions:** - Integration with haptic feedback
systems for enhanced embodiment - Real-time emotion recognition and
expression mapping - AI-driven avatar behavior and personality
simulation
## Further Reading
Chapter 5 focused on designing interactions for 3D spaces in XR,
covering topics such as input methods, locomotion techniques, 3D user
interfaces, and haptic feedback. We explored how to create intuitive and
comfortable ways for users to navigate and interact with virtual
environments. To deepen your understanding of spatial interaction
design, consider these resources:
### Additional Resources
- Meta Design docs:
- Design guidelines and best practices for VR interactions from
Meta.
# Applications of XR Technologies {#sec-applications}
## 2025 Spotlight Applications: Why XR Here?
Recent deployments highlight how XR solves domain-specific problems
across regulation, industry, and social impact. Use these case tiles as
conversation starters when scoping new projects or pitching
stakeholders.
### Varjo XR-4 + Teleport: EASA-Qualified Mixed-Reality Flight Simulation
**Scenario**: European Aviation Safety Agency approval of a
mixed-reality simulator that pairs Varjo XR-4 headsets with certified
cockpit hardware.[@varjo_xr4_easa_2024]
**Why XR here?**
- Regulatory compliance: Mixed reality meets stringent pilot-training
standards, allowing airlines to log official hours with flexible
content updates.
- Cost containment: Operators swap scenery and emergency scenarios
digitally instead of rebuilding physical mockups.
- Sensory fidelity: XR-4's retinal-resolution passthrough preserves
cockpit instrumentation readability while blending synthetic visuals
for complex weather training.
### Unreal, Twinmotion, and Cesium: Industrial Digital Twins for AEC
**Scenario**: AEC teams stitch together geospatial data, architectural
models, and real-time collaboration inside Unreal Engine using
Twinmotion and Cesium integrations.[@unreal_cesium_aec_2024]
**Why XR here?**
- Geospatial context: XR visualizes proposed infrastructure alongside
real terrain, making stakeholder reviews intuitive.
- Iterative coordination: Designers, engineers, and contractors
co-locate in virtual spaces to detect clashes before construction.
- Decision transparency: Immersive walk-throughs translate technical
documentation into experiences that non-experts can evaluate.
### Therapeutic VR in Prisons: Creative Acts Rehabilitation Program
**Scenario**: California prisons deploy VR modules combined with art
therapy to support people transitioning out of solitary
confinement.[@guardian_creative_acts_2024]
**Why XR here?**
- Emotional rehearsal: VR safely simulates stressful situations
(grocery stores, family gatherings) before release.
- Documented outcomes: Facilities reported dramatic reductions in
infractions---evidence that immersive therapy can complement
systemic reforms.
- Human-centered design: Facilitators tailor content to participant
fears, showing XR's role in trauma-informed care.
## Architectural and Urban Visualization
Virtual Reality (VR) and Augmented Reality (AR) technologies have
revolutionized the field of architectural visualization and urban
planning. These immersive technologies offer new ways to experience and
interact with unbuilt environments, providing significant advantages in
design, presentation, and decision-making processes.
### Immersive Architectural Visualization
Architectural visualization has become a well-established practice in
the design industry, leveraging powerful tools like Unreal Engine to
create immersive 3D environments. These digital representations allow
architects and clients to explore and evaluate building designs before
construction begins, serving as an invaluable decision-making tool.
> An amazing film or an amazing image? You know, I still have to imagine
> myself in this space to understand the impact and we could just never
> do that until recently. I mean, it's really just a couple of years
> ago.
>
> *- Quote from industry professional*
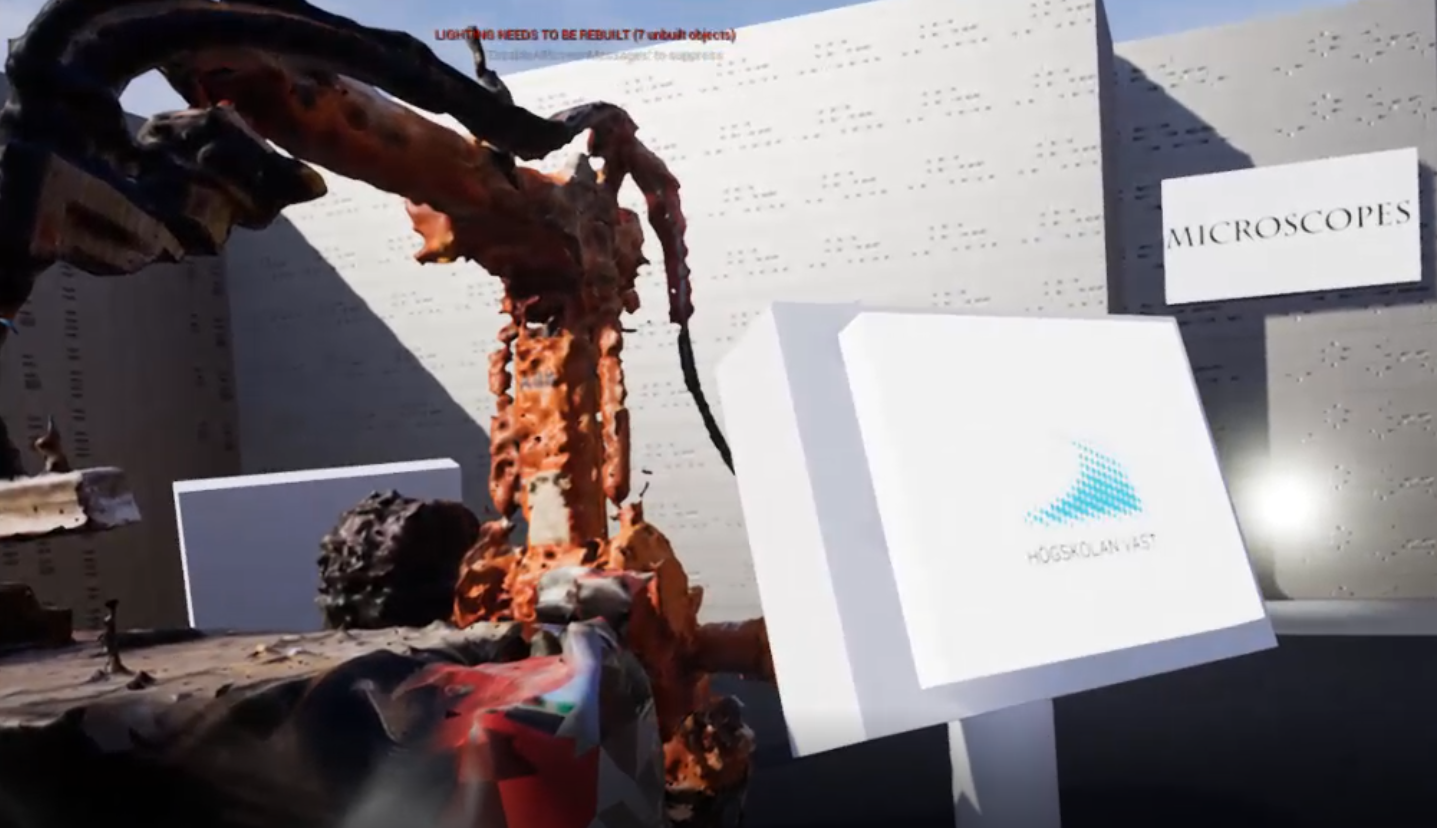
The power of VR in architectural visualization lies in its ability to
create a sense of presence within the designed space. This immersive
quality allows users to experience the spatial conditions in a way that
traditional 2D renderings or physical models cannot achieve.
> And I feel that, you know, the technology has reached a point where we
> can simulate those spaces to a degree where I can actually trick my
> body into feeling the spatial condition virtually.
>
> *- Quote from industry professional*
\begin{tcolorbox}[colback=red!5!white,colframe=red!50!black,title=YouTube Video]
\textbf{Architecture in Virtual Spaces}
This video explores how architects are using VR to create immersive experiences that allow clients to feel the spatial conditions of unbuilt environments. The discussion covers the evolution from traditional 2D renderings to fully immersive 3D spaces, demonstrating how VR technology has reached a point where it can effectively simulate spatial conditions and trick the human body into feeling present in virtual architectural spaces.
\textit{Watch at: \url{https://www.youtube.com/watch?v=XZr_xRh-vmo&t=504s}}
\end{tcolorbox}
### Urban Planning and City Visualization
VR technology has also found significant applications in urban planning
and city visualization. These tools allow planners, stakeholders, and
citizens to experience proposed urban developments in an immersive and
intuitive way.
One example of this is the virtual city visualization project at
Chalmers University:
\begin{tcolorbox}[colback=red!5!white,colframe=red!50!black,title=YouTube Video]
\textbf{Chalmers Virtual City Visualization}
Experience multi-scale urban planning visualization that allows users to interact with city models both holographically (bird's-eye table view) and immersively at street level. This video demonstrates how different perspectives provide unique insights for urban development and planning decisions, highlighting the value of immersive visualization for stakeholders and planners.
\textit{Watch at: \url{https://www.youtube.com/watch?v=f4GPnivRtPo&t=s}}
\end{tcolorbox}
This project demonstrates how different scales of visualization can
provide varied insights:
1. **Holographic interaction**: Viewing the city model as if it were on
a table, allowing for a bird's-eye perspective
2. **Immersive street-level view**: Providing context and relatability
to the real environment
The holographic interaction allows you to use your whole body to engage
with the city model from above, while the street-level view provides a
completely different perspective. When you're down at street level, you
can imagine yourself standing there, looking up and seeing the
environment in its proper context for better understanding.
### Benefits of XR in Architecture and Urban Planning
1. **Enhanced Spatial Understanding**: XR allows clients and
stakeholders to truly understand the scale and feel of a space
before it's built.
2. **Iterative Design**: Architects can make real-time changes and
immediately see the impact in an immersive environment.
3. **Collaborative Decision Making**: Multiple stakeholders can
simultaneously explore and discuss a design in a shared virtual
space.
4. **Cost and Time Savings**: By identifying design issues early in the
virtual environment, costly changes during construction can be
avoided.
5. **Public Engagement**: Urban planners can use XR to better
communicate proposed changes to the public, increasing understanding
and engagement.
### Case Study: John Wick 3 Set Design
The production of "John Wick 3" showcases how VR can be used to
prototype and visualize complex sets before they're physically built.
Using Unreal Engine, the production team was able to: - Explore set
designs in VR months before physical construction - Create and adjust
lighting in a virtual environment - Provide a spatial understanding of
abstract set concepts - Allow actors, directors, and cinematographers to
visualize scenes in advance
A production designer on the film emphasized the tool's importance.
> It became this tool that allowed us to visualize what this set look
> like and also helped us to create the lighting and the design of this
> thing months and months before any decisions had to be made on the
> physical set. It was such an abstract set that having this kind of
> spatial relationship and visualizing it from that point of view had
> tons of value. I can't imagine them doing this set without VR.
>
> *- Quote from film production designer*
\begin{tcolorbox}[colback=red!5!white,colframe=red!50!black,title=YouTube Video]
\textbf{John Wick 3 Virtual Production Pipeline}
Behind-the-scenes look at how Unreal Engine enabled virtual set design and previsualization months before physical construction. The video shows how directors, actors, and cinematographers could explore and refine scenes in VR before filming began, streamlining the creative process and improving set design outcomes.
\textit{Watch at: \url{https://www.youtube.com/watch?v=ngudPwaAfIE&t=s}}
\end{tcolorbox}
### Conclusion
XR technologies have become indispensable tools in architecture and
urban planning. By providing immersive, interactive experiences of
unbuilt environments, they enable better design decisions, more
effective communication, and ultimately, the creation of spaces that
better serve their intended purposes. As these technologies continue to
evolve, we can expect their role in shaping our built environment to
grow even further.
## Data Visualization in XR
Extended Reality (XR) technologies offer powerful new ways to visualize
and interact with complex data sets. By leveraging the immersive and
spatial nature of XR, data visualization can become more intuitive,
engaging, and insightful.
### The Power of Immersive Data Visualization
Immersive data visualization in XR goes beyond traditional 2D charts or
graphs by allowing users to physically move through and interact with
data in a three-dimensional space. This approach can make complex data
more accessible and memorable.
These examples demonstrate how VR, AR, and immersive technologies can
make data and information more impactful, memorable, and relatable to us
as embodied humans. The physical engagement transforms abstract data
into tangible, experiential knowledge.
### Examples of XR Data Visualization
#### 1. HoloCube: Augmented Reality for 3D Data Visualization
The HoloCube represents an innovative application of augmented reality
(AR) technology for data visualization. This device consists of a
physical box with AR markers that, when viewed through a smartphone or
other AR-capable device, displays a 3D object that can be manipulated by
the user.
The HoloCube presents itself as a 3D object that you can turn and twist
in your hands to understand different types of three-dimensional
information. This tactile manipulation creates an intuitive interface
for data exploration.
\begin{tcolorbox}[colback=red!5!white,colframe=red!50!black,title=YouTube Video]
\textbf{HoloCube: Immersive Data Visualization}
This video demonstrates HoloCube, a mixed reality application for immersive data visualization. It shows how users can interact with complex datasets in 3D space, providing a more intuitive and engaging way to explore and understand data through augmented reality.
\textit{Watch at: \url{https://www.youtube.com/watch?v=G26n_vY_418&t=s}}
\end{tcolorbox}
#### 2. Embodied Data Visualization: The Nasdaq Example
Moving beyond handheld devices, the concept of embodied data
visualization aims to make data more memorable and relatable by
connecting it to physical experiences. One example is a visualization of
the Nasdaq stock exchange's value over time, represented as a series of
steps. When you represent data this way, you get the physical sensation
of walking up stairs, creating a different type of memory for how these
values rise and fall. You can feel when there's a steep incline or
gradual slope, embedding the data pattern in your muscle memory.
#### 3. Data Sculptures: Physical and Virtual Representations
Data sculptures take embodied visualization a step further by creating
large-scale, physical or virtual installations that users can interact
with. These installations allow for a more immersive and physically
engaging experience with data.
One example involves representing population data. Population data from
different parts of the world is represented through physical models that
you can walk into and examine directly. You can step up to these
representations and compare them to yourself and your own body scale,
making abstract demographic statistics tangible and personally
relatable.
This approach makes abstract population statistics tangible and
comparable to human scale, potentially leading to more intuitive
understanding of disparities and distributions.
](images/world_index_sculpture.png)
### Visualizing Death Tolls in Virtual Reality
A powerful example of using VR for data visualization is a project that
represents death tolls from drone strikes.
Here the death toll is displayed as individual bodies arranged in a vast
hall. As you walk through and navigate this space, you gain a visceral
sense of the scope and what these numbers actually represent in human
terms. The physical act of moving through the representation transforms
statistics into emotional understanding.
This approach goes beyond traditional 2D charts or graphs by allowing
the viewer to physically move through a space filled with
representations of the deceased. Each body in the virtual environment
corresponds to a real person killed, creating a powerful and emotionally
resonant experience.
\begin{tcolorbox}[colback=red!5!white,colframe=red!50!black,title=YouTube Video]
\textbf{VR Death Toll Visualization}
This video presents a powerful embodied data visualization where statistical casualties are represented as individual bodies in a virtual space. By allowing users to physically navigate through the representation, it creates emotional impact and a deeper understanding of the scale of loss.
\textit{Watch at: \url{https://www.youtube.com/watch?v=Fc3lqak7tkE&t=s}}
\end{tcolorbox}
### Benefits of XR Data Visualization
1. **Spatial Understanding**: XR allows users to perceive data in three
dimensions, potentially revealing patterns or relationships not
apparent in 2D representations.
2. **Increased Engagement**: Immersive and interactive visualizations
can make data exploration more engaging and memorable.
3. **Collaborative Analysis**: Multiple users can explore and discuss
data together in a shared virtual space.
4. **Scale and Perspective**: XR enables users to view data at various
scales, from overview to detail, simply by moving within the virtual
space.
5. **Embodied Cognition**: By allowing users to physically interact
with data, XR can leverage embodied cognition principles to enhance
understanding.
### Challenges and Considerations
While XR data visualization offers many benefits, there are also
challenges to consider:
1. **Cognitive Overload**: Immersive 3D environments can potentially
overwhelm users with too much information.
2. **Design Complexity**: Creating effective 3D visualizations requires
new design skills and considerations.
3. **Accessibility**: Ensuring that XR data visualizations are
accessible to users with various physical abilities.
4. **Technological Barriers**: The need for specialized hardware (VR/AR
headsets) can limit widespread adoption.
### Conclusion
XR technologies are opening up new frontiers in data visualization,
offering ways to make complex data more intuitive, engaging, and
impactful. As these technologies continue to evolve and become more
accessible, we can expect to see increasingly sophisticated and
insightful XR data visualizations across various fields, from business
analytics to scientific research and beyond.
## Education and Training Applications
Extended Reality (XR) technologies are revolutionizing education and
training across various fields. By offering immersive, interactive
experiences, XR can enhance learning outcomes, improve retention, and
provide safe environments for practicing complex skills.
### Why Immersive Learning Works: Theoretical Foundations
Before exploring specific applications, it's worth understanding why XR
is particularly effective for learning. Several established learning
theories help explain the educational power of immersive experiences.
**Experiential Learning**: Kolb's experiential learning cycle describes
learning as a process of concrete experience, reflective observation,
abstract conceptualization, and active experimentation. XR uniquely
enables this entire cycle within a single session. A medical student can
perform a virtual surgery (concrete experience), review their
performance from different angles (reflective observation), understand
the underlying anatomical principles through 3D visualization (abstract
conceptualization), and immediately try again with modifications (active
experimentation). The immersive nature compresses and intensifies this
learning cycle in ways traditional instruction cannot match.
**Situated Cognition**: Learning occurs most effectively in authentic
contexts that match how knowledge will be used. VR excels at providing
contexts that would be expensive, dangerous, or impossible to access
otherwise. A welding student learns not just the technique but also the
physical context---the heat, the sparks, the spatial relationships.
Language learners practice not in abstract grammar exercises but in
simulated cultural contexts. This situatedness makes knowledge more
transferable to real-world application because it was acquired in
conditions that more closely approximate actual use.
**Cognitive Load Theory**: XR can both reduce and increase cognitive
load, depending on design. Well-designed immersive experiences reduce
extraneous cognitive load by making spatial relationships and
three-dimensional structures immediately apparent rather than requiring
mental rotation or visualization. A chemistry student seeing molecular
structures in 3D space doesn't need to expend cognitive effort
translating 2D diagrams. However, poor XR design can increase extraneous
load through uncomfortable interfaces, motion sickness, or unnecessarily
complex navigation. The key is designing experiences that leverage XR's
ability to clarify spatial and procedural understanding while avoiding
interface complexity that distracts from learning objectives.
**Connection to Presence and Embodiment**: These learning advantages
connect directly to the presence and embodiment concepts discussed in
**?@sec-presence** and
[Section 1.4](#sec-avatars-and-virtual-embodiment){.quarto-xref}. The
sense of presence---the feeling of "being there"---is what enables the
concrete experiences that drive experiential learning. Embodiment
creates the authentic context that situated cognition requires. When
students feel physically present in a virtual environment and embodied
within it, they engage with content through the same perceptual and
motor systems they'll use in real-world application. This alignment
between learning context and application context is what makes immersive
learning particularly effective.
These theoretical foundations explain why the following examples and
applications demonstrate such strong learning outcomes. XR isn't just a
novel delivery mechanism---it leverages fundamental principles of how
humans learn most effectively.
### Virtual Classrooms and Immersive Learning Environments
XR technologies can create virtual classrooms that go beyond traditional
limitations.
When you have all students in a virtual environment, you can begin with
something that essentially replicates a normal lecture situation. But
once you establish that familiar foundation, you can then introduce 3D
materials into the environment---essentially anything you can imagine.
The possibilities become limitless.
Key advantages of virtual classrooms include: - Ability to visualize
complex 3D concepts - Dynamic environment changes (e.g., transporting to
historical locations) - Interactive demonstrations with virtual objects
Think of it like Hogwarts, essentially. You have a school where you want
to teach using sound pedagogy, but you also have magic at your disposal.
In VR, you can do anything---conjure any object, create any environment,
and transport students anywhere. The educational possibilities are truly
magical.
\begin{tcolorbox}[colback=red!5!white,colframe=red!50!black,title=YouTube Video]
\textbf{VR Lecture Environment Concept}
This video presents a concept for a virtual lecture environment, showing how XR can replicate and enhance traditional classroom experiences. It demonstrates the potential for immersive education, where students and teachers can interact with 3D content and each other in a shared virtual space.
\textit{Watch at: \url{https://www.youtube.com/watch?v=PItLw_Mtec8&t=115s}}
\end{tcolorbox}
### Hands-on Training in Virtual Environments
XR technologies excel at providing hands-on training experiences,
especially in fields where real-world practice might be dangerous,
expensive, or impractical.
#### Example: Virtual Welding Lab
At University West, a project was undertaken to create a virtual welding
lab:
- Collaboration with PTC (Production Technology Center)
- Utilization of photogrammetry to create 3D models of equipment
- Development of a virtual "exhibition" space
- Integration of instructional videos and information
This virtual lab serves multiple purposes: 1. Provides accessibility to
expensive or potentially dangerous equipment 2. Offers a platform for
remote learning and training 3. Creates an interactive space for
showcasing technology and processes
### Medical Training and Surgical Simulation {#sec-med-training}
XR technologies have found significant applications in medical education
and surgical training.
One particularly valuable application is in surgical training and
review. Surgical operations can be recorded using volumetric video,
allowing medical professionals to review procedures from multiple angles
after the fact.
During live surgical procedures, there are often angles you can observe
and others you wish you could see but cannot. With volumetric or
free-viewpoint video recording, you can actually rotate the view and
examine the procedure from different angles, seeing more of what's
happening and better understanding how the surgery unfolds.
\begin{tcolorbox}[colback=red!5!white,colframe=red!50!black,title=YouTube Video]
\textbf{Volumetric Video in Medical Training}
This video demonstrates an advanced surgical training application using volumetric video capture to record and replay surgical procedures from any angle. Students can observe operations from perspectives impossible with traditional filming methods, enhancing medical education and surgical review.
\textit{Watch at: \url{https://www.youtube.com/watch?v=d-hn2lSeOfk&t=s}}
\end{tcolorbox}
This capability enhances the learning experience and can lead to
improved surgical techniques and outcomes. For technical details on how
volumetric video capture works, see
[Section 7.3](#sec-volumetric-video){.quarto-xref}.
### Language Learning and Cultural Immersion
XR can provide immersive environments for language learning and cultural
experiences. Students can be transported to virtual representations of
foreign countries, practicing language skills in context and
experiencing cultural nuances firsthand.
### Benefits of XR in Education and Training
1. **Engagement**: Immersive experiences can increase student
engagement and motivation.
2. **Experiential Learning**: XR allows for learning by doing, which
can improve retention and understanding.
3. **Visualization of Abstract Concepts**: Complex or abstract ideas
can be visualized in 3D, making them easier to grasp.
4. **Safe Practice Environment**: Students can practice dangerous or
high-stakes procedures without real-world risks.
5. **Accessibility**: XR can make certain educational experiences more
accessible to students regardless of physical location.
### Challenges and Considerations
While XR offers many benefits for education and training, there are also
challenges to consider:
1. **Cost**: High-quality XR equipment can be expensive, potentially
limiting widespread adoption.
2. **Technical Expertise**: Educators need training to effectively use
and create XR content.
3. **Content Development**: Creating high-quality educational XR
experiences requires significant time and resources.
4. **Potential for Distraction**: Immersive environments might
sometimes distract from learning objectives.
5. **Equity Issues**: Ensuring equal access to XR technologies for all
students can be challenging.
### Future Directions
As XR technologies continue to evolve, we can expect to see:
1. More sophisticated simulations for professional training
2. Increased use of AI to create adaptive learning experiences in XR
3. Greater integration of haptic feedback for more realistic training
scenarios
4. Development of collaborative XR spaces for group learning and
projects
### Conclusion
XR technologies are transforming education and training by offering
immersive, interactive, and engaging learning experiences. From virtual
classrooms that can transport students anywhere in the universe to
sophisticated simulations for professional training, XR is opening up
new possibilities for how we learn and practice skills. As these
technologies become more advanced and accessible, they have the
potential to revolutionize education at all levels, making learning more
effective, engaging, and accessible than ever before.
## Healthcare and Therapy Uses
Extended Reality (XR) technologies are making significant impacts in the
healthcare sector, offering innovative solutions for medical training,
patient treatment, and therapeutic interventions. This section explores
various applications of XR in healthcare and therapy.
### Augmented Reality in Medical Procedures
Augmented Reality (AR) is finding applications in various medical
procedures, providing real-time information and guidance to healthcare
professionals.
#### Example: Vein Visualization
AR technology can be used to help medical professionals locate veins for
injections or blood draws. By projecting a map of the patient's veins
onto their skin, this technology can: - Improve accuracy of needle
placement - Reduce patient discomfort - Increase efficiency of
procedures
### Mental Health and Therapy Applications
XR technologies offer new possibilities for mental health treatment and
therapy.
#### Virtual Reality Exposure Therapy (VRET)
VRET is a form of exposure therapy that uses VR to create controlled
environments for patients to confront their fears or anxieties. This can
be particularly effective for treating: - Phobias (e.g., fear of
heights, flying, or public speaking) - Post-Traumatic Stress Disorder
(PTSD) - Anxiety disorders
The immersive nature of VR allows therapists to: - Create customized,
gradual exposure scenarios - Control and adjust the intensity of the
experience - Provide a safe, controlled environment for patients
#### Pain Management
VR has shown promise in pain management, particularly for chronic pain
and during medical procedures. By immersing patients in engaging virtual
environments, VR can: - Distract from pain sensations - Reduce anxiety
associated with medical procedures - Potentially decrease the need for
pain medication
### Rehabilitation and Physical Therapy
XR technologies are being used to enhance rehabilitation and physical
therapy programs.
#### Gamified Exercises
By turning rehabilitation exercises into immersive games, XR can: -
Increase patient engagement and motivation - Provide real-time feedback
on movement and progress - Allow for remote monitoring by healthcare
professionals
#### Motor Skills Rehabilitation
For patients recovering from strokes or other neurological conditions,
XR can provide: - Customized, adaptive exercises - Immersive
environments that encourage movement - Visual feedback to help retrain
motor skills
### Challenges and Considerations
While XR offers significant benefits in healthcare, there are challenges
to consider:
1. **Data Privacy and Security**: Ensuring patient data protection in
XR applications.
2. **Integration with Existing Systems**: Seamlessly incorporating XR
into current healthcare IT infrastructures.
3. **Regulatory Approval**: Navigating the process of getting XR
medical applications approved by regulatory bodies.
4. **User Adoption**: Training healthcare professionals to effectively
use XR technologies.
5. **Potential Side Effects**: Addressing issues like motion sickness
or eye strain in some users.
### Future Directions
As XR technologies continue to advance, we can expect to see:
1. More sophisticated surgical planning and visualization tools
2. Enhanced telemedicine capabilities using AR and VR
3. Integration of haptic feedback for more realistic medical
simulations
4. Development of AI-powered virtual health assistants
5. Expanded use of XR in medical education and training
### Conclusion
XR technologies are transforming healthcare by offering new tools for
medical training, patient treatment, and therapeutic interventions. From
enhancing surgical precision to providing innovative approaches to
mental health treatment, XR is opening up new possibilities in
healthcare. As these technologies continue to evolve and become more
integrated into medical practice, they have the potential to
significantly improve patient outcomes, enhance medical education, and
revolutionize how healthcare is delivered.
## Entertainment and Gaming
Extended Reality (XR) technologies have made a significant impact on the
entertainment industry, particularly in gaming. This section explores
how XR is reshaping entertainment experiences and revolutionizing game
development.
### VR Gaming: Immersive Experiences
Virtual Reality (VR) has transformed gaming experiences, offering two
primary approaches:
#### 1. Seated VR Gaming
Seated VR games create immersive cockpit-like environments, allowing
players to control vehicles or spaceships without requiring physical
movement.
A prime example is Elite Dangerous, a space simulation game.
This is an excellent example of VR's advantages in gaming, where you can
design an entire cockpit environment with all controls positioned
naturally around you. You can look left and right to access additional
information that feels intuitively placed and easily accessible.
This setup provides several advantages: - Full 360-degree visual
immersion - Intuitive control layouts - Reduced motion sickness issues -
Simplified tracking and transportation problem-solving
\begin{tcolorbox}[colback=red!5!white,colframe=red!50!black,title=YouTube Video]
\textbf{Elite Dangerous VR Space Combat}
This video demonstrates seated VR gaming at its finest, showing how Elite Dangerous creates an immersive cockpit environment. Players can look around the detailed spacecraft interior, access controls positioned naturally around them, and experience space flight with full 360-degree visual immersion. This example illustrates how VR can enhance traditional gaming experiences without requiring room-scale movement.
\textit{Watch at: \url{https://www.youtube.com/watch?v=Mlx-ooZv5qA&t=110s}}
\end{tcolorbox}
#### 2. Room-scale VR Gaming
Room-scale VR games utilize physical movement within a defined space,
creating highly interactive experiences.
The game Unseen Diplomacy exemplifies this approach.
The game requires you to physically get down on your knees, use hand
controls to unscrew screws, crawl through ducts, and follow complex
twists and turns. This full-body engagement creates an unprecedented
level of immersion and physical presence in the game world.
Key features of room-scale VR: - Full-body engagement - Complex
environmental interactions - Clever level design to maximize limited
physical space - Enhanced sense of presence
Developers use techniques like narrow turns to create the illusion of
large environments within confined physical spaces.
\begin{tcolorbox}[colback=red!5!white,colframe=red!50!black,title=YouTube Video]
\textbf{Unseen Diplomacy Room-Scale VR Gameplay}
Experience room-scale VR gaming that requires crawling, crouching, and physical movement through air ducts and complex environments. This video showcases how clever level design maximizes limited physical space for immersive stealth gameplay, highlighting the unique possibilities of room-scale VR.
\textit{Watch at: \url{https://www.youtube.com/watch?v=KirQtdsG5yE&t=s}}
\end{tcolorbox}
### XR in Film and Entertainment
XR technologies are not just transforming gaming; they're also reshaping
how films are made and experienced.
#### Virtual Production in Filmmaking
VR and AR technologies are being used in film production, particularly
for previsualization and virtual set design. The production of "John
Wick 3" showcases this approach.
> It became this tool that allowed us to visualize what this set look
> like and also helped us to create the lighting and the design of this
> thing months and months before any decisions had to be made on the
> physical set. It was such an abstract set that having this kind of
> spatial relationship and visualizing it from that point of view had
> tons of value.
>
> *- Quote from production designer on John Wick 3*
Using Unreal Engine, the production team was able to: - Explore set
designs in VR months before physical construction - Create and adjust
lighting in a virtual environment - Allow actors, directors, and
cinematographers to visualize scenes in advance
\begin{tcolorbox}[colback=red!5!white,colframe=red!50!black,title=YouTube Video]
\textbf{John Wick 3 Virtual Production Behind-the-Scenes}
This video provides a detailed look at the virtual production workflow using Unreal Engine for film set design. It demonstrates how VR previsualization streamlines film production by allowing creative teams to explore and iterate on set designs before physical construction, improving collaboration and creativity.
\textit{Watch at: \url{https://www.youtube.com/watch?v=ngudPwaAfIE&t=s}}
\end{tcolorbox}
#### 360-degree Videos and Immersive Experiences {#sec-360-degree-videos-immersive-experiences}
360-degree videos represent a significant advancement in immersive
entertainment, offering viewers the ability to look around in any
direction and feel present within filmed content.These videos have found
particular success in entertainment applications where they can
transport audiences to otherwise inaccessible locations.
**Entertainment Applications:** - **Nature documentaries**: Underwater
scenes, wildlife encounters, and extreme environments - **Concert
experiences**: Virtual front-row seats to live performances\
- **Travel content**: Virtual tourism and location scouting - **Sports
broadcasting**: Courtside or field-level viewing experiences
When you experience 360-degree video in a VR headset, you can simply
turn your head to look around naturally. This represents one of the best
applications for mobile VR headsets, where the interaction remains
simple yet highly immersive.
**User Experience Considerations:** - **Immersive storytelling**:
Directors must consider that viewers can look anywhere, changing
traditional narrative control - **Comfort and accessibility**: Works
particularly well for users who cannot physically travel or experience
certain environments - **Social viewing**: Multiple users can share the
same 360-degree experience while each controlling their own viewpoint -
**Interactivity**: Only interactivity is to look around, if you try to
move or interact in any other way your sense of presence may break.
\begin{tcolorbox}[colback=red!5!white,colframe=red!50!black,title=YouTube Video]
\textbf{Immersive 360-Degree Underwater Experience}
Dive into an underwater world through 360-degree video that showcases the power of immersive entertainment. This video allows viewers to look around freely and feel present in otherwise inaccessible ocean environments, demonstrating the potential of VR for nature documentaries and virtual tourism.
\textit{Watch at: \url{https://www.youtube.com/watch?v=rG4jSz_2HDY&t=s}}
\end{tcolorbox}
*Note: For technical details on 360-degree video integration and
implementation considerations, see
[Section 7.5.1](#sec-360-video-integration){.quarto-xref} in Chapter 7.*
### AR in Entertainment
Augmented Reality (AR) is finding its place in entertainment through
mobile applications and location-based experiences.
#### Mobile AR Games
Games like Pokémon Go have demonstrated the potential of AR in creating
engaging, real-world interactive experiences. These games: - Blend
virtual elements with the real world - Encourage physical activity and
exploration - Create social experiences through shared AR environments
#### Location-Based AR Experiences
Theme parks and museums are incorporating AR to enhance visitor
experiences: - Interactive exhibits that come to life through AR
devices - Guided tours with AR overlays providing additional
information - AR-enhanced rides that blend physical and virtual elements
### The Future of XR in Entertainment
As XR technologies continue to evolve, we can expect to see:
1. More sophisticated and immersive VR gaming experiences
2. Increased use of XR in film production and virtual cinematography
3. Blending of physical and virtual elements in live performances and
events
4. Development of shared virtual spaces for social entertainment
experiences
5. Integration of haptic feedback and other sensory inputs for more
immersive experiences
### Challenges and Considerations
While XR offers exciting possibilities for entertainment, there are
challenges to address:
1. **Motion Sickness**: Designing VR experiences that minimize
discomfort for users
2. **Hardware Limitations**: Current XR devices may have limitations in
resolution, field of view, or comfort for extended use
3. **Content Creation**: Developing high-quality XR content requires
new skills and can be resource-intensive
4. **Accessibility**: Ensuring XR entertainment is accessible to users
with various physical abilities
5. **Social Concerns**: Addressing potential issues of isolation or
addiction in immersive virtual experiences
### Conclusion
XR technologies are reshaping the landscape of entertainment and gaming,
offering new ways to create and experience content. From fully immersive
VR games to AR-enhanced real-world experiences, XR is opening up new
frontiers in how we play, watch, and interact with entertainment. As
these technologies continue to advance, we can expect to see even more
innovative and engaging applications in the world of entertainment and
gaming.
## Immersive Cultural and Tourism Experiences
Virtual Reality (VR) technology is revolutionizing the way we experience
tourism and cultural sites, offering immersive experiences that
transport users to different parts of the world and even to imaginary
realms. This section explores several innovative VR applications in
tourism and cultural experiences.
### Google Earth VR
Google Earth VR leverages Google's extensive 3D mapping data to provide
virtual tours of cities around the world. This application allows users
to:
- Explore 3D renderings of major cities
- Navigate freely through different parts of the world
- Experience changes in time of day within the virtual environment
The application allows you to navigate effortlessly from one part of the
world to another, move around freely, and observe changes in time of day
and other environmental conditions. This creates a fluid, global
exploration experience.
While the application offers an impressive bird's-eye view of cities,
it's worth noting that the detail at street level may be limited due to
the nature of photogrammetry data used.
\begin{tcolorbox}[colback=red!5!white,colframe=red!50!black,title=YouTube Video]
\textbf{Google Earth VR Global Exploration}
Fly around the world in virtual reality using photogrammetry data to explore cities from impossible perspectives. This video demonstrates how VR transforms geographical exploration and virtual tourism through immersive bird's-eye views of real locations, making global travel accessible from home.
\textit{Watch at: \url{https://www.youtube.com/watch?v=SCrkZOx5Q1M&t=s}}
\end{tcolorbox}
### Versailles VR
The Versailles VR project showcases the potential of high-detail
photogrammetry in creating virtual tourism experiences. This ambitious
project involved:
- Capturing the Palace of Versailles in extreme detail
- Using tens of thousands of photos to recreate the site
- Allowing users to navigate and explore the palace in virtual reality
I want to emphasize the project's scale.
The team undertook extremely ambitious photogrammetry work to capture
Versailles in extraordinary detail, using tens of thousands of
photographs---possibly more---to recreate much of what you would see
during an actual visit to the palace. This level of detail creates an
remarkably authentic virtual experience.
This level of detail allows for a highly immersive experience that
closely mimics an actual visit to the palace.
\begin{tcolorbox}[colback=red!5!white,colframe=red!50!black,title=YouTube Video]
\textbf{Versailles VR Virtual Palace Tour}
Explore the Palace of Versailles through high-detail photogrammetry reconstruction. This video showcases how virtual tourism can provide access to historical sites with extraordinary detail and immersion that closely mimics physical visits, highlighting the potential of VR for cultural heritage.
\textit{Watch at: \url{https://www.youtube.com/watch?v=ln-SceumPlI&t=s}}
\end{tcolorbox}
### Museum of Other Realities
The Museum of Other Realities (MOR) represents a different approach to
virtual tourism and cultural experiences. Unlike recreations of physical
places, MOR leverages the unique possibilities of VR to create:
- A virtual museum with various art installations
- Novel and interesting cultural experiences
- Artistic expressions that may not be possible in the physical world
This represents a different type of experience that isn't widely
available yet, but I find it particularly fascinating in terms of the
novel and interesting cultural experiences it can provide. It opens up
entirely new possibilities for cultural engagement that transcend
physical limitations.
This type of virtual experience opens up new possibilities for artistic
expression and cultural exploration that go beyond the limitations of
physical spaces.
\begin{tcolorbox}[colback=red!5!white,colframe=red!50!black,title=YouTube Video]
\textbf{Museum of Other Realities Virtual Art Space}
Experience a virtual museum that transcends physical limitations, featuring impossible art installations and cultural experiences. This video leverages VR's unique capabilities for artistic expression beyond what's possible in traditional gallery spaces, opening new frontiers for digital art.
\textit{Watch at: \url{https://www.youtube.com/watch?v=zUtqvp1LIcM&t=s}}
\end{tcolorbox}
### The Void
The Void takes virtual reality experiences to another level by combining
VR technology with physical environments and effects. This approach:
- Creates immersive experiences based on popular franchises like Star
Wars and Ghostbusters
- Uses "magic theory and design" to enhance the sense of reality
- Allows users to step into and interact with fantasy worlds
> If we're going to put you inside a Star Wars, I mean, that's an
> impossible reality. That's not a reality that you're going to actually
> travel to and visit. So we use a lot of magic theory and design behind
> the scenes to help convince you, even if it's just subconsciously that
> these things are real.
>
> *- Quote from The Void*
The Void demonstrates how VR can be used to create fantastical tourism
experiences, allowing people to visit and interact with imaginary worlds
in ways that feel tangible and real.
\begin{tcolorbox}[colback=red!5!white,colframe=red!50!black,title=YouTube Video]
\textbf{The Void Immersive VR Experience}
Step into location-based VR that combines virtual worlds with physical environments and effects. This video shows how The Void creates fantastical tourism experiences in franchises like Star Wars, where users can tangibly interact with imaginary worlds through mixed physical and virtual elements.
\textit{Watch at: \url{https://www.youtube.com/watch?v=fa52D-XYbkw&t=s}}
\end{tcolorbox}
### Implications for the Tourism Industry
The development of these immersive cultural and tourism experiences has
significant implications for the tourism industry:
1. **Accessibility**: VR can make cultural sites and experiences
accessible to those who may not be able to visit in person due to
physical, financial, or geographical constraints.
2. **Preservation**: Detailed virtual recreations can aid in the
preservation of historical sites and artifacts, allowing for their
study and appreciation even if the physical locations become
inaccessible.
3. **Pre-trip Planning**: Potential tourists can use VR to explore
destinations before deciding to visit, potentially influencing their
travel choices.
4. **Education**: These immersive experiences offer new ways to learn
about history, culture, and art, supplementing traditional
educational methods.
5. **New Forms of Entertainment**: Experiences like The Void blur the
lines between tourism, entertainment, and storytelling, creating new
opportunities for the tourism and entertainment industries.
As VR technology continues to advance, we can expect even more
innovative and immersive applications in tourism and cultural
experiences, further transforming how we explore and interact with the
world around us.
## Further Reading
Chapter 6 explored various real-world applications of XR technologies
across different sectors, including education, healthcare,
entertainment, and industry. We examined how VR, AR, and MR are being
used to solve problems and create new opportunities in these fields. To
gain a broader perspective on the current and future applications of XR,
explore these resources:
### Research Papers
- Riva, G., Baños, R. M., Botella, C., Mantovani, F., & Gaggioli, A.
(2016). Transforming experience: the potential of augmented reality
and virtual reality for enhancing personal and clinical change.
Frontiers in psychiatry, 7, 164.
- Explores applications of VR and AR in mental health and personal
development.
- Somanath, S., et al. (2024). Towards Urban Digital Twins: A Workflow
for Procedural Visualization Using Geospatial Data. Remote Sensing,
16(11), Article 11.
- Demonstrates the application of XR technologies in urban
planning and visualization.
### Additional Resources
- IEEE VR Conference proceedings:
- Annual conference proceedings showcasing the latest research and
applications in virtual reality.
- Augmented World Expo (AWE) website:
- Resources and news about the latest developments in AR and VR
applications.
# Reality capture
## Photogrammetry and 3D Scanning
Photogrammetry is a powerful technique that allows the creation of
detailed 3D models from a series of 2D photographs. This method has
become increasingly accessible and powerful in recent years, thanks to
advances in computing power and the widespread availability of
high-quality cameras in smartphones.
### Basic Principles of Photogrammetry
The core concept of photogrammetry involves:
1. Taking multiple photographs of an object or environment from
different angles
2. Using software to track features across these images
3. Matching camera positions and orientations
4. Generating a 3D model based on the identified common points
As I often explain to my students, photogrammetry is essentially just
taking a bunch of normal photos and letting the computer chew on them.
I've found this process can work with "any" cameras, though the quality
of the output will depend on the input image quality. Importantly,
smartphone cameras are often sufficient for getting started with
photogrammetry projects.
### A Personal Example
In one project, I took my normal digital camera and captured about 100
photos of construction work we were doing behind our house in
Trollhättan. Using default settings, I let the computer process the
images for about an hour and a half, and it produced a detailed 3D
environment.
This example illustrates how accessible the technology has become. With
just a standard digital camera and some freely available software, it's
possible to create a 3D model of a real-world environment in just a
couple of hours.
[View the 3D
model](https://sketchfab.com/3d-models/bygge-abc07cd42ee94eee9bcc2e11c9aa5960)
The resulting 3D model can be exported and used in various applications,
such as virtual reality environments or game engines like Unreal Engine,
allowing for virtual exploration and planning.
### Aerial Photogrammetry
For larger scale projects, aerial photogrammetry using drones can be
incredibly effective. While this requires more specialized equipment, it
opens up possibilities for creating detailed 3D models of expansive
areas.
Once you've made the initial investment---learning the software,
acquiring a drone, and understanding the workflow---you can create
detailed 3D models for VR/AR applications in real-world settings.
\begin{tcolorbox}[colback=red!5!white,colframe=red!50!black,title=YouTube Video]
\textbf{Aerial Photogrammetry Process}
Comprehensive overview of capturing large-scale environments from the air using systematic photography techniques to create detailed 3D models for urban planning, archaeology, and immersive virtual experiences of real-world locations.
\textit{Watch at: \url{https://www.youtube.com/watch?v=wa_b9BRjXgk&t=s}}
\end{tcolorbox}
This method allows for the creation of highly detailed 3D models of
large environments, which can be invaluable for urban planning,
archaeology, or creating immersive virtual experiences of real-world
locations.
### Large Scale Integration in Unreal Engine
Taking photogrammetry to the next level, it's possible to create
incredibly detailed and expansive virtual environments by integrating
photogrammetry data into game engines like Unreal Engine.
This example shows a monastery in a spectacular location. The creators
captured thousands of photographs to build this virtual
environment---essentially creating a digital copy of this real-world
place.
\begin{tcolorbox}[colback=red!5!white,colframe=red!50!black,title=YouTube Video]
\textbf{Large-Scale Photogrammetry in Unreal Engine}
Stunning demonstration of a monastery location recreated through extensive photogrammetry and integrated into Unreal Engine, showcasing how massive real-world environments can become explorable virtual spaces with photorealistic detail.
\textit{Watch at: \url{https://www.youtube.com/watch?v=BVvAY2gImjc&t=s}}
\end{tcolorbox}
This example demonstrates how photogrammetry can be used to create
highly detailed, explorable virtual environments based on real-world
locations. It's worth noting that while most of the environment is
captured through photogrammetry, some elements (like water bodies) might
be added or enhanced using the game engine's capabilities.
### Limitations and Challenges of Photogrammetry
While photogrammetry is a powerful tool, it comes with its own set of
limitations and challenges:
1. **Time-Consuming Process**: It takes time for one just to gather
these images.
2. **Reflections**: Reflective surfaces pose a significant challenge
for photogrammetry software.
Reflections present a significant challenge because the software looks
for recognizable features across images to understand spatial
relationships. When you have reflections---imagine seeing a person in a
mirror---the system can become confused about where the camera actually
is in relation to these features.
3. **"Featureless" Surfaces**: Surfaces lacking distinct features or
textures can be problematic. Surfaces lacking distinct
features---like a plain white wall---pose problems because they
don't provide enough structural information for the software to work
with.
4. **Patterns**: While patterns can provide some texture, strictly
repeating patterns can cause issues.
Patterns can be helpful, but strictly repeating patterns create
difficulties. While patterns are better than featureless surfaces,
repetitive patterns make it hard for the software to distinguish one
section from another.
5. **Varying and Sharp Lighting**: Lighting conditions play a crucial
role in the quality of photogrammetry results.
Varying lighting conditions, particularly outdoors with moving clouds or
changing sun position, can significantly alter the appearance of objects
across photos, creating additional processing challenges.
6. **Motion**: Photogrammetry requires a static subject.
Since photogrammetry relies on multiple photos taken over time, the
subject must remain completely static throughout the capture process.
### Conclusion
Photogrammetry has evolved from a specialized technique to an accessible
tool for creating 3D models from photographs. Whether you're using a
smartphone for small projects or professional equipment for large-scale
environments, the principles remain the same. As technology continues to
advance, we can expect even more impressive and accessible applications
of photogrammetry in fields ranging from entertainment to scientific
research.
## 3D Gaussian Splatting and Hybrid Workflows
3D Gaussian Splatting (3DGS) has matured from a research curiosity into
a production-ready capture format that complements traditional
photogrammetry. Instead of reconstructing polygon meshes, 3DGS stores
scenes as millions of overlapping ellipsoids rendered directly by GPUs,
enabling photorealistic, view-dependent effects with surprisingly small
file sizes.
### Artifact Taxonomy
- **Urban walkthroughs**: The Ludlow "Quality Square" capture
demonstrates street-scale scans with navigable splat viewers and
scanning-path visualizations.[@ludlow_quality_square_2024]
- **Macro specimens**: Honeybee macro captures use focus stacking
across 1,700+ photos to showcase microscopic detail---perfect for
museums and scientific storytelling.[@honeybee_macro_3dgs_2024]
- **Hybrid architectural sets**: Hybrid real-estate demos combine
synthetic interiors (generated from architectural renders) with
photogrammetric backdrops for
pre-visualization.[@eastcott_hybrid_splats_2024]
- **Industrial inspection**: Factory-floor "4D video scrubbers"
compare splat captures over time to reveal maintenance
issues.[@radiancefields_4dgs_2024]
> **Compression and fidelity**
>
> Ludlow's professional workflow compresses a 1.2 GB raw scan down to a
> 50 MB web-ready splat without noticeable quality
> loss.[@ludlow_quality_square_2024] Expect to budget roughly 20--60 MB
> for room-scale captures and 150+ MB for dense outdoor scenes, making
> 3DGS viable for browser delivery and headset streaming.
### Capture Accessibility in 2025
- **Quest-native capture**: Meta's Horizon Hyperscape records outdoor
environments directly from Quest 3 headsets, uploading frames to the
cloud for automated processing. This removes the dedicated camera
requirement for student projects.[@hyperscape_capture_2024]
- **Enterprise platforms**: Varjo's Teleport service ingests photos or
prebuilt splats, stitches multiple rooms into portal-connected
tours, and streams content to browsers or high-end
headsets.[@varjo_teleport_2024]
- **Consumer experiments**: Mobile apps such as Polycam and Luma
export splats alongside meshes, letting you pick the representation
that best fits your pipeline.
### Preparing Splats for Engines
While many teams view 3DGS scenes in native viewers, you can now import
splats into Unreal Engine or Unity via plugins (gsplat, InstantNGP
integrations). When planning a project, sketch an "import checklist"
alongside your photogrammetry workflow:
1. Export splats plus metadata (camera positions, scale) from your
capture tool.
2. Convert to engine-friendly formats (PLY, Gaussian binaries) using
open-source converters.
3. Set up level-of-detail switches or fallback meshes for devices
without splat renderers.
See the content creation pipelines in Chapter 3 for practical examples
of moving captured spaces into interactive experiences.
## Volumetric Video Capture {#sec-volumetric-video}
Volumetric video is an advanced reality capture technique that offers
unprecedented flexibility in viewing and interacting with recorded
content. This technology goes beyond traditional video by capturing
three-dimensional representations of subjects or scenes, allowing for
free-viewpoint experiences.
### Understanding Volumetric Video
Volumetric video capture involves recording a three-dimensional space,
including depth information for each pixel. This results in a dynamic 3D
model that can be viewed from any angle.
This technique uses three different Kinect camera views, each containing
depth information for every pixel. This means the system knows not just
the color of each pixel, but also its distance from the camera.
This depth information is crucial for reconstructing the scene in three
dimensions, enabling viewers to move around and view the content from
any desired angle.
\begin{tcolorbox}[colback=red!5!white,colframe=red!50!black,title=YouTube Video]
\textbf{Free Viewpoint Video Demo}
Demo of free viewpoint video: move around scenes using depth info and multi-camera capture for perspectives not possible with traditional video.
\textit{Watch at: \url{https://www.youtube.com/watch?v=ptmHag3XwXY&t=s}}
\end{tcolorbox}
### Large-scale Volumetric Capture
For professional applications, large-scale volumetric capture setups are
used. These typically involve:
1. A large space surrounded by green screens
2. Numerous cameras positioned strategically around the space
3. Performers acting within the capture area
\begin{tcolorbox}[colback=red!5!white,colframe=red!50!black,title=YouTube Video]
\textbf{Large-Scale Volumetric Studio}
Behind the scenes: hundreds of cameras and green screens for full 3D capture in immersive applications.
\textit{Watch at: \url{https://www.youtube.com/watch?v=G0XUgnPl9KQ&t=s}}
\end{tcolorbox}
This demonstrates large-scale volumetric capture with extensive green
screen setups and numerous cameras---those dots visible on the walls are
actually individual cameras.
### Relightable Volumetric Video
An advanced form of volumetric capture is relightable volumetric video.
This technique not only captures the three-dimensional form of
performers but also records detailed information about the materials and
surfaces being filmed.
This system captures detailed information about the materials and
surfaces of performers. It calculates not only 3D shape but also how
different colored lights should reflect off skin, clothing, and other
materials.
\begin{tcolorbox}[colback=red!5!white,colframe=red!50!black,title=YouTube Video]
\textbf{Relightable Volumetric Capture}
Advanced tech: captures 3D geometry and material properties for relighting performances in post-production with dynamic virtual lighting.
\textit{Watch at: \url{https://www.youtube.com/watch?v=anBRroZWfzI&t=s}}
\end{tcolorbox}
The key advantage of this technique is the ability to relight the
captured performance in post-production, allowing for seamless
integration into virtual environments with dynamic lighting conditions.
### Applications of Volumetric Video
#### Entertainment Industry
In the entertainment industry, volumetric video allows for innovative
approaches to filmmaking and content creation. Actors can be recorded
volumetrically and placed in 3D environments, offering new possibilities
for editing and storytelling.
This example shows a simpler setup where the actors don't actually have
a complete 3D representation---they're only recorded from one direction.
This limits the viewing angles, but they're still positioned in 3D space
and work effectively as long as you don't move too far from the intended
viewing position.
\begin{tcolorbox}[colback=red!5!white,colframe=red!50!black,title=YouTube Video]
\textbf{Depthkit Volumetric Filmmaking}
Volumetric video with simplified setups and limited camera angles: create 3D content with modest equipment, understanding single-sided capture limits.
\textit{Watch at: \url{https://www.youtube.com/watch?v=MXRk1njT_hE&t=s}}
\end{tcolorbox}
#### Medical Applications
Volumetric video technology offers unique technical advantages for
medical applications due to its ability to capture precise spatial
relationships and multi-angle perspectives. The technology's capacity to
record depth information alongside visual data makes it particularly
valuable for medical documentation and analysis.
Key technical benefits for medical use include: - **Multi-perspective
recording**: Eliminates blind spots common in traditional video -
**Spatial accuracy**: Preserves precise anatomical relationships -
**Post-capture navigation**: Allows reviewers to examine procedures from
optimal viewing angles - **Data persistence**: Creates reviewable
archives for quality assurance and training
The technical challenges specific to medical environments include
lighting constraints in sterile environments, equipment integration with
existing medical systems, and ensuring capture quality meets
professional medical standards.
For detailed applications in medical training and education, see
[Section 6.4.4](#sec-med-training){.quarto-xref}.
### Holoportation
Holoportation is an exciting application of volumetric video technology
that enables real-time 3D capture and transmission of people and
objects. This technology, when combined with augmented reality devices
like Microsoft's HoloLens, creates a sense of presence and shared space
between remote participants.
This demonstrates how multiple cameras capture a person in one location
and project her as a hologram in another room, allowing the researcher
to see her directly through his HoloLens.
\begin{tcolorbox}[colback=red!5!white,colframe=red!50!black,title=YouTube Video]
\textbf{Holoportation Demo}
Microsoft's tech: volumetric capture in one location, 3D hologram projection in another, enabling immersive remote presence with HoloLens.
\textit{Watch at: \url{https://www.youtube.com/watch?v=7d59O6cfaM0&t=s}}
\end{tcolorbox}
### Challenges and Limitations
Despite its potential, volumetric video technology faces several
challenges:
1. **Complex Setup**: The capture process requires extensive equipment
and carefully controlled environments.
As these examples demonstrate, volumetric capture requires incredibly
complex setups with significant limitations. Even with hundreds of
cameras, the capture volume typically spans only a few meters in
diameter.
2. **Capture Limitations**: Even with numerous cameras, it's
challenging to capture every angle without shadows or occlusions,
especially with multiple performers.
3. **Data Management**: The capture process generates enormous amounts
of data that must be processed, stored, and rendered.
The process requires collecting enormous amounts of data and intensive
processing. Compressing and rendering this data in real-time presents
significant technical challenges.
4. **Rendering Complexity**: The resulting 3D data is complex and
requires significant computational resources to render in real-time.
5. **Cost**: The equipment and processing required make this technology
expensive and not widely accessible.
### Conclusion
Volumetric video capture represents a significant leap forward in how we
record and interact with visual content. From entertainment to medical
training, this technology opens up new possibilities for creating
immersive and interactive experiences. As hardware capabilities improve
and algorithms become more sophisticated, we can expect volumetric video
to become more accessible and widely adopted across various industries
and applications.
## Light Fields and Neural Rendering {#sec-light-fields-and-neural-rendering}
Light field capture represents the pinnacle of 360-degree imaging
technology, offering an almost compromise-free solution for immersive
visual experiences. This cutting-edge technique goes beyond traditional
360° photography by allowing viewers to interact with the captured
environment in ways that closely mimic real-world perception.
> **Note**: This chapter provides comprehensive coverage of light field
> capture technology, neural rendering techniques, and implementation
> details. For display-focused aspects of light field technology, see
> [Section 2.5.3](#sec-emerging-display-technologies){.quarto-xref}.
### What is a Light Field?
To understand light field capture, we must first grasp the concept of a
light field itself.
> The light field is a vector function that describes the amount of
> light flowing in every direction through every point in space.
>
> *- Wikipedia*
In simpler terms, a light field encompasses all the light passing
through a given area (imagine a window) from every possible direction.
This comprehensive capture of light information is what enables the
creation of truly interactive and dynamic visual experiences.
### Key Characteristics of Light Fields:
1. Captures ALL light passing through a defined space
2. Records light from ALL directions
3. Essentially creates one 180° image per pixel
The implications of this are profound. Unlike a standard photograph or
even a 360° image, a light field capture allows viewers to change their
perspective within the scene, revealing new details and altering
reflections as if they were physically present in the environment.
### Light Field Capture Technology
Capturing a light field requires specialized equipment and techniques.
One method involves using a robotic arm equipped with a camera featuring
a fisheye or wide-angle lens. This setup systematically moves the camera
to capture images from multiple positions, creating a comprehensive
sphere of light field data.
\begin{tcolorbox}[colback=red!5!white,colframe=red!50!black,title=YouTube Video]
\textbf{Robotic Light Field Capture}
Automated light field photography: robotic arm with wide-angle lens captures scenes from many positions for immersive viewing datasets.
\textit{Watch at: \url{https://www.youtube.com/watch?v=h6WDyc525C0&t=s}}
\end{tcolorbox}
This process results in a dataset that allows viewers to:
- Move their perspective within the captured scene
- Observe changes in reflections and object positions based on their
viewpoint
- Experience a level of immersion far beyond traditional photography
or videography
### Understanding Light Fields in Practice
To better grasp the concept of light fields, consider the following
visualization:
\begin{tcolorbox}[colback=red!5!white,colframe=red!50!black,title=YouTube Video]
\textbf{Light Field Theory Visualization}
Explains light field concepts: how rays from objects pass through space, showing principles behind light field capture and storage needs.
\textit{Watch at: \url{https://www.youtube.com/watch?v=BXdKVisWAco&t=s}}
\end{tcolorbox}
In this example, we can see how light from a single point on an object
(in this case, a goat) passes through multiple points on an imaginary
window. Each of these light paths represents a different viewing angle,
and a light field capture stores information for all of these paths.
For each point in the captured space, you must store light information
from all possible directions---creating massive data requirements.
This comprehensive data capture is what allows for the dynamic,
interactive nature of light field displays.
### Light Field Video
Recent advancements have led to the development of light field video
technology. As presented at SIGGRAPH 2020, this technology introduces an
end-to-end system for capturing, reconstructing, compressing, and
rendering high-quality, immersive light field video content.
> We present immersive light video with a layered mesh representation.
> Most digital videos are either flat and two dimensional or they
> provide some depth perception through binocular parallax showing
> different but predetermined points of view for each eye. In contrast,
> we have built an end to end system for capturing, reconstructing,
> compressing and rendering high quality, immersive light field video
> content.
>
> *- Quote from Light field video*
\begin{tcolorbox}[colback=red!5!white,colframe=red!50!black,title=YouTube Video]
\textbf{Light Field Video Capture}
End-to-end system for immersive light field video: camera array setup and processing pipeline for video where users can move and look around.
\textit{Watch at: \url{https://www.youtube.com/watch?v=SvRgkXQZIQg&t=s}}
\end{tcolorbox}
The capture rig for this technology consists of.
> Capture rig consists of 46 times synchronized action sports cameras
> mounted on a 92 centimeter diameter plastic hemisphere. It is
> inexpensive and relatively easy to fabricate.
>
> *- Quote from Light field video*
### Neural Rendering
Neural rendering is an emerging field that combines traditional computer
graphics with machine learning techniques to create more realistic and
dynamic visual content. While not explicitly covered in this book, it's
worth mentioning as it's closely related to advanced light field
technology.
Neural rendering can:
1. Enhance the quality of captured light fields
2. Generate novel views from sparse input data
3. Create photorealistic renderings of 3D scenes
This technology has the potential to overcome some of the limitations of
traditional light field capture, such as the need for dense camera
arrays.
### Implications and Applications
The potential applications for light field technology and neural
rendering are vast and exciting:
1. **Virtual Reality (VR)**: Creating ultra-realistic, navigable
environments for VR experiences.
2. **Augmented Reality (AR)**: Enhancing real-world scenes with
perfectly integrated digital elements.
3. **Film and Entertainment**: Allowing viewers to explore scenes from
different angles, adding a new dimension to storytelling.
4. **Scientific Visualization**: Providing researchers with tools to
examine complex 3D data in unprecedented detail.
5. **Architecture and Design**: Enabling immersive walkthroughs of
buildings and spaces before they're constructed.
### Challenges and Future Developments
While light field capture and neural rendering represent significant
leaps forward in immersive imaging technology, they're not without
challenges:
- **Data Volume**: Capturing and storing light field data requires
enormous amounts of storage and processing power.
- **Capture Complexity**: Current capture methods can be
time-consuming and require specialized equipment.
- **Display Technology**: Developing displays capable of reproducing
light fields accurately is an ongoing area of research.
As technology advances, we can expect these challenges to be addressed,
leading to more accessible and widespread use of light field capture and
neural rendering technologies.
### Conclusion
Light field capture and neural rendering stand at the forefront of
immersive imaging technology, promising to revolutionize how we capture,
view, and interact with visual content. As research progresses and
technology improves, we can look forward to increasingly realistic and
interactive visual experiences that blur the line between the digital
and physical worlds.
## Integrating Captured Reality in XR Experiences
Integrating captured reality into Extended Reality (XR) experiences is a
crucial aspect of creating immersive and realistic virtual environments.
This process involves combining various reality capture techniques with
XR technologies to create seamless blends of real and virtual elements.
### 360-Degree Video Integration {#sec-360-video-integration}
360-degree video represents a fundamental reality capture technique that
captures real-world environments for immersive reproduction in XR
applications. This section focuses on the technical implementation and
integration aspects of 360-degree video capture systems.
#### Technical Implementation
360-degree video capture involves specialized camera systems and
processing pipelines:
**Camera Systems:** - Multi-camera rigs with overlapping fields of
view - Dedicated 360-degree cameras (e.g., Ricoh Theta, Insta360) -
Synchronization requirements for multi-camera setups
**Processing Pipeline:** - Stitching algorithms to combine multiple
camera feeds - Geometric correction and calibration - Resolution
optimization and compression
In a VR headset, you can simply turn your head to look around in any
direction. This represents one of the most effective applications for
mobile VR headsets.
\begin{tcolorbox}[colback=red!5!white,colframe=red!50!black,title=YouTube Video]
\textbf{360-Degree Video Example}
Immersive 360-degree video: 3DOF viewing lets users look in all directions with VR headsets, showing accessible reality capture for VR.
\textit{Watch at: \url{https://www.youtube.com/watch?v=pCve1w1GFOs&t=s}}
\end{tcolorbox}
#### Reality Capture Characteristics
Technical specifications and limitations: - **Degrees of Freedom**:
Three rotational DOF (3DOF) - pitch, yaw, roll - **Interactivity
Constraints**: View-only interaction, no positional tracking -
**Resolution Distribution**: Non-uniform pixel density across viewing
angles - **Temporal Synchronization**: Frame-rate matching between
capture and playback systems
#### Integration Challenges
Key technical challenges in 360-degree video integration: - **Parallax
Issues**: Stitching artifacts from multi-camera setups - **Motion
Sickness**: Vestibular-visual mismatch in mobile content - **Bandwidth
Requirements**: High-resolution spherical video streaming - **Storage
Optimization**: Efficient encoding for immersive content
For entertainment applications and user experience considerations of
360-degree videos, see
[Section 6.6.2.2](#sec-360-degree-videos-immersive-experiences){.quarto-xref}.
### Computer Vision for Reality Integration
Computer vision plays a crucial role in integrating captured reality
into XR experiences. It enables systems to understand and interact with
the visual world, allowing for more seamless blending of real and
virtual elements.
#### Motion Tracking
Motion tracking is a fundamental computer vision technique used to
follow objects or features across video frames. It can be implemented in
two main ways:
1. **Video-based tracking**: This method relies solely on analyzing
sequential video frames to detect and follow features.
2. **Combined with IMU**: Motion tracking can be enhanced by
integrating data from an Inertial Measurement Unit (IMU). This
fusion of visual and sensor data often provides more robust and
accurate tracking results.
#### SLAM (Simultaneous Localization and Mapping)
SLAM is a real-time technique that allows a system to: - Map an unknown
environment - Track its own position within that environment
simultaneously
This technology is crucial for applications like autonomous robots and
augmented reality systems that need to understand and navigate their
surroundings in real-time.
SLAM was originally developed for robotics, helping robots
simultaneously map their environment while tracking their own position
within that space.
### AR Cloud and Mirror Worlds
The concept of SLAM is evolving towards more ambitious applications:
1. **AR Cloud**: A persistent, shared AR experience across devices and
users.
2. **Mirror World**: A digital twin of the physical world, continuously
updated and accessible.
This technology enables the creation of digital mirror worlds---similar
to the digital twin concept we discussed earlier. By continuously
scanning different locations, you build digital versions of various
environments. When you return to these places, the system recognizes
your location much more quickly.
### Photogrammetry Integration
Photogrammetry plays a significant role in creating realistic 3D assets
for XR experiences. These photogrammetry-based models can be integrated
into virtual environments to create more authentic and detailed scenes.
Once you've made the initial investment---learning the workflow,
acquiring equipment like drones, and mastering the associated
software---you can create detailed 3D models for VR/AR applications in
real-world settings.
### Challenges in Reality Integration
Integrating captured reality into XR experiences comes with several
challenges:
1. **Data Processing**: Handling large amounts of captured data in
real-time.
2. **Seamless Blending**: Ensuring that real and virtual elements blend
naturally.
3. **Real-time Performance**: Maintaining high frame rates and low
latency for immersive experiences.
4. **Lighting and Shadows**: Matching virtual lighting to real-world
conditions.
5. **Occlusion Handling**: Correctly handling cases where real objects
should occlude virtual ones and vice versa.
### Future Directions
As reality capture and XR technologies continue to evolve, we can expect
to see:
1. More seamless integration of real and virtual elements
2. Improved real-time performance for complex captured environments
3. Enhanced collaborative experiences in shared AR environments
4. More sophisticated use of AI for understanding and interacting with
captured reality
### Conclusion
Integrating captured reality into XR experiences represents a frontier
in creating truly immersive and realistic virtual environments. By
combining various reality capture techniques with advanced XR
technologies, developers can create experiences that blur the line
between the real and virtual worlds. As these technologies continue to
advance, we can expect to see increasingly sophisticated and seamless
integrations of captured reality in XR applications across various
industries.
## Ethics and Privacy in Reality Capture
Reality capture technologies raise significant ethical and privacy
considerations that you need to keep in mind when developing XR
experiences. The ability to capture detailed 3D representations of
environments and people, combined with the potential for unintended
bystander capture and the large amounts of sensitive data generated,
creates responsibilities around consent, data security, and
representation.
Key considerations include:
- **Consent protocols**: Ensuring individuals who may be captured are
aware and have given informed permission, particularly challenging
with technologies like 360-degree cameras and photogrammetry in
public spaces
- **Bystander privacy**: Addressing unintended capture of people who
haven't consented, especially when using tools that stream data to
cloud services
- **Data governance**: Implementing secure storage, clear retention
policies, and appropriate access controls for captured data
- **Representation and bias**: Being mindful of what you choose to
capture and preserve, avoiding stereotypes, and respecting cultural
sensitivities
- **Authenticity**: Maintaining transparency about what has been
captured versus digitally altered, particularly important when
photorealistic capture combined with AI enables sophisticated
manipulation
The comprehensive discussion of privacy, consent, data governance,
representation, and best practices for ethical reality capture can be
found in [Section 10](#sec-ethics){.quarto-xref}. That chapter also
addresses emerging concerns around deepfakes and manipulated reality,
regulatory compliance requirements like GDPR, and frameworks for
responsible development of reality capture applications.
## Further Reading
Chapter 7 focused on the various techniques and technologies used to
capture real-world environments and objects for use in XR applications.
We explored methods such as photogrammetry, 3D scanning, volumetric
video capture, and light field technology. The chapter also covered the
integration of captured reality into XR experiences and the ethical
considerations surrounding these practices. To deepen your understanding
of reality capture and its applications in XR, consider the following
resources:
- Reality Capture (from Epic):
- Home of the Reality Capture photogrammetry application from Epic
Games.
- Capturing Reality Community:
- Community forum discussing various aspects of reality capture
technologies and techniques.
# Artificial Intelligence in XR Technologies {#sec-artificial-intelligence-in-xr}
## Introduction to AI in Immersive Media
Artificial Intelligence (AI) is increasingly becoming an integral part
of Extended Reality (XR) technologies, enhancing the capabilities and
user experiences of virtual, augmented, and mixed reality applications.
This chapter explores the intersection of AI and XR, highlighting how
machine learning and intelligent systems are shaping the future of
immersive technologies.
Key areas where AI is making an impact in XR include:
1. Computer vision for improved tracking and environment mapping
2. Natural language processing for more intuitive voice interactions
3. Machine learning for adaptive and personalized experiences
4. AI-driven physics simulations for more realistic virtual
environments
As we venture further into the digital age, the convergence of
artificial intelligence, the metaverse, and immersive technologies is
becoming increasingly significant. This convergence is reshaping how we
interact with digital content and environments, offering new
possibilities for human-computer interaction and digital world creation.
This natural and human interface that VR and AR makes possible creates
digital worlds where it's easier to populate environments with
artificial intelligence and create smarter, more responsive spaces.
This shift towards more intuitive, immersive interfaces presents an
alternative to the increasing presence of robots in our physical spaces.
Instead, it allows humans to interact more naturally with digital
content and AI-driven entities within virtual environments.
## AI-Generated Environments and Objects
One of the most exciting developments in this field is the use of AI to
generate and populate virtual environments. This addresses a significant
challenge in VR development.
These AI tools provide us with more advanced capabilities to create rich
and interesting virtual worlds---addressing what has been holding back
VR applications, namely the significant effort required to develop
compelling virtual environments.
### AI-Generated 360° Worlds
AI is now capable of generating entire 360° environments that users can
explore in virtual reality.These AI-created worlds go beyond static
images, incorporating depth information to create fully navigable 3D
spaces.
\begin{tcolorbox}[colback=red!5!white,colframe=red!50!black,title=YouTube Video]
\textbf{AI-Generated 360° Virtual Environments}
Explore how artificial intelligence creates fully navigable 3D worlds with depth information, demonstrating the future of AI-powered content generation for immersive virtual reality experiences and automated world-building.
\textit{Watch at: \url{https://www.youtube.com/watch?v=Q3KgkO0W1-4&t=s}}
\end{tcolorbox}
### Roblox's AI Integration
Roblox, a popular platform for creating and sharing virtual experiences,
is at the forefront of integrating AI into world-building tools. Their
"Chat to Create" feature allows users to verbally describe objects and
environments they want to create.
You can essentially converse with these AIs and describe what you want:
"I want a fireplace here, a bear there, and I want it to be in armor."
The AI generates these elements, allowing you to build out virtual
environments through conversation---environments you can then invite
others to experience and share.
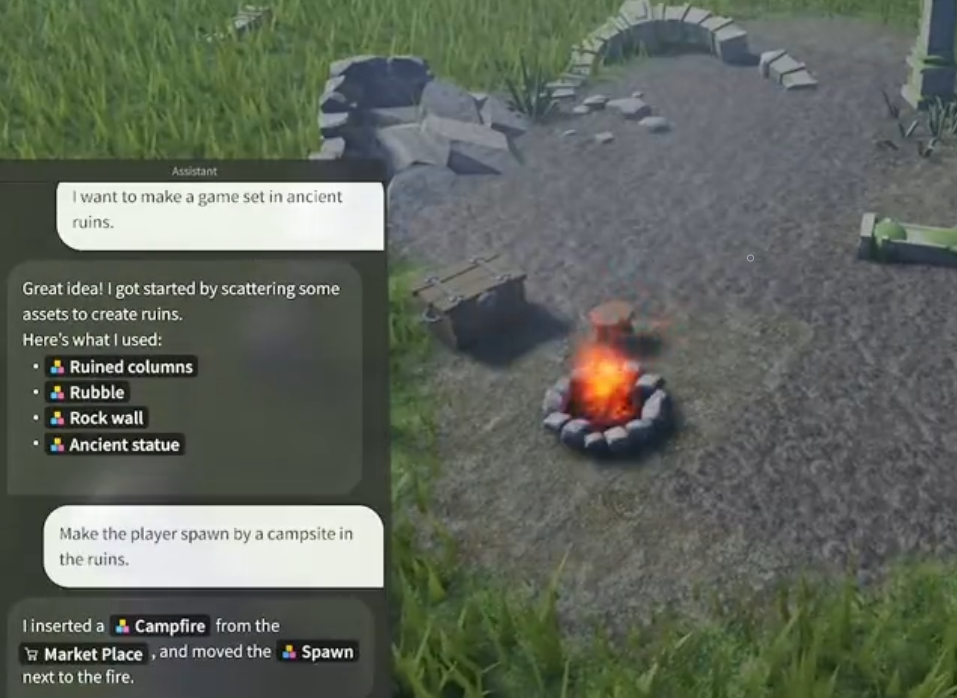
This technology democratizes the creation of virtual worlds, allowing
users with no programming or 3D modeling experience to bring their
imaginations to life through simple conversation with an AI.
### AI-Generated 3D Objects
The capabilities of AI in 3D content creation extend to individual
objects as well. Tools like DreamCraft3D allow users to generate
detailed 3D models simply by providing a text description.
By simply writing a text description of what you want, you can generate
a fully 3D virtual object that can populate your virtual environments or
be placed in real environments through augmented reality.
This technology has wide-ranging applications, from populating virtual
worlds with unique objects to creating AR experiences where AI-generated
models can be placed in the real world through a device's camera.
\begin{tcolorbox}[colback=red!5!white,colframe=red!50!black,title=YouTube Video]
\textbf{DreamCraft3D Text-to-3D Generation}
Witness AI technology that transforms text descriptions into detailed 3D objects and models, showcasing applications for populating virtual worlds and creating AR experiences with AI-generated content from simple prompts.
\textit{Watch at: \url{https://www.youtube.com/watch?v=0FazXENkQms&t=s}}
\end{tcolorbox}
### Implications for XR Development
The integration of AI-generated content in XR environments has several
significant implications:
1. **Rapid Prototyping**: Developers can quickly generate and iterate
on virtual environments and objects.
2. **Personalization**: AI can create custom environments and objects
based on user preferences or specific requirements.
3. **Scalability**: The ability to generate content algorithmically
allows for the creation of vast, diverse virtual worlds.
4. **Accessibility**: Non-technical users can participate in content
creation, potentially leading to more diverse and creative XR
experiences.
As AI technologies continue to advance, we can expect even more
sophisticated and seamless integration of AI-generated content in XR
applications, further blurring the lines between human-created and
AI-generated virtual worlds.
## Generative 3D Pipelines and Interactive Worlds
The past year has produced a clearer pipeline for moving from prompts to
explorable spatial experiences. Successful teams treat generative
systems as modular stages that can be swapped or repeated depending on
the fidelity targets.
### Pipeline Overview (2025)
1. **Prompting & Concept Capture**: Start with text, sketches, or
reference images. Platforms such as World Labs' Marble accept
plain-language prompts and return explorable 3DGS
scenes.[@worldlabs_marble_2024]
2. **Intermediate Video or Scene Generation**: Systems like Odyssey's
interactive video demos and DreamInteractive's UE5 workflows
generate cinematic flythroughs or layout videos that double as
validation
passes.[@odyssey_interactive_video_2024; @dreaminteractive_ue5_2024]
3. **3D Asset Materialization**: Choose output modalities---Gaussian
splats, meshes, or hybrid representations. Genie 3 and TRELLIS-style
research models offer toggles between splats and meshes;
DreamInteractive demonstrates mesh handoffs to Unreal
Engine.[@genie3_trellis_2024; @dreaminteractive_ue5_2024]
4. **Engine Import & Interaction Layer**: Bring assets into Unity or
Unreal, add lighting, physics, and interactions, and connect to
multiplayer or analytics services.
5. **Deployment & Iteration**: Test the experience on target hardware,
gather telemetry, and feed findings back into the prompt or editing
stages.[@worldlabs_marble_2024; @decartxr_github_2024]
> **Current limitations to plan around**
>
> - **Temporal coherence**: Video-first outputs (e.g., Odyssey) still
> struggle with shot-to-shot continuity; expect to curate sequences
> manually.[@odyssey_interactive_video_2024]
> - **Physics and affordances**: Generated worlds rarely include
> collision volumes or gameplay logic---teams must author these
> layers post-import.
> - **Texture fidelity & scale**: Mesh exports can arrive with
> stretched UVs or inconsistent scale; always validate measurements
> before interactive deployment.
> - **Cost envelopes**: Cloud-based systems (Marble, Decart-XR) meter
> GPU time; budget for iteration passes when scoping
> projects.[@worldlabs_marble_2024; @decartxr_github_2024]
### Import Checklists
Whether the output is a splat or a mesh, keep a standing checklist
before you promise interactivity:
1. **Coordinate alignment**: Normalize scene scale and orientation so
generated spaces align with engine units.
2. **Lighting strategy**: Decide between baked lighting, real-time
global illumination, or emissive splats; World Labs scenes often
ship with lighting baked into textures.
3. **Interaction shells**: Add invisible collision meshes or navmeshes
for locomotion. DreamInteractive's UE5 demos illustrate wrapping
generated geometry with simplified colliders for traversal.
4. **Accessibility hooks**: Pair AI-generated layouts with
hand-authored UI, captions, and locomotion options before shipping.
### Case Spotlights
- **World Labs Marble**: Prompt-to-3DGS restaurant scenes stream
directly to browsers and Vision Pro, showcasing rapid
ideation.[@worldlabs_marble_2024]
- **DreamInteractive UE5 Workflow**: Uses generative passes to block
out spaces, then layers Unreal assets for gameplay---ideal for
hybrid AI/manual teams.[@dreaminteractive_ue5_2024]
- **Genie 3 Analyses**: Research deep dives explain how structured
latents unlock mesh or splat outputs from the same prompt, guiding
pipeline decisions.[@genie3_trellis_2024]
- **Decart-XR**: Real-time passthrough transformation on Quest
illustrates how AI-generated visual styles can be interactive, not
just static captures.[@decartxr_github_2024]
## AI-Driven Characters and Interactions
As AI technologies advance, they are revolutionizing the way we create
and interact with virtual characters in XR environments. From
intelligent non-player characters (NPCs) to virtual assistants, AI is
enabling more natural, responsive, and engaging interactions in
immersive experiences.
### Virtual AI Agents
Virtual AI agents are becoming increasingly sophisticated, offering
personalized interactions within virtual environments. A prime example
of this technology is demonstrated in a golf game featuring an AI caddy
named Arthur.
](images/imcomp2023/golf_ai.png)
In this application, users can engage in natural language conversations
with Arthur, who serves as both a caddy and coach. The AI agent utilizes
advanced language understanding and generation capabilities to provide
contextually relevant advice and information about the golf courses.
The virtual caddy introduces himself naturally: "Hello there. My name is
Arthur, and I'll be your personal caddy and coach. What would you like
me to call you?"
This level of personalization and interactivity showcases the potential
for AI agents to enhance user experiences in virtual environments.
However, it's worth noting that the widespread implementation of such
sophisticated AI interactions may still be limited by computational
costs.
However, I'm not certain if this technology is widely released yet. One
limiting factor is that these AI systems are still rather expensive to
operate, which may be holding back broader implementation in consumer
applications.
[View the AI Golf Guide demo on
Twitter](https://x.com/roblox/status/1727432040646365416?s=46)
### Large Language Models in XR
The integration of large language models (LLMs) like GPT-3 and its
successors into XR environments is opening up new possibilities for
creating intelligent, context-aware virtual characters. These models
can:
1. Generate dynamic dialogue based on user interactions and the current
context.
2. Adapt character behavior to user preferences and past interactions.
3. Provide real-time language translation and cultural context in
virtual environments.
### Emotional and Contextual Awareness
Advanced AI systems are being developed to recognize and respond to
users' emotional states and contextual cues within XR environments. This
includes:
- Facial expression recognition to adapt character responses
- Voice tone analysis for more nuanced interactions
- Body language interpretation for more natural social interactions
These technologies have the potential to create more empathetic and
responsive virtual characters, enhancing the overall immersion and
engagement in XR experiences.
## AI in Content Creation and Storytelling
AI is not only changing how we interact with virtual environments but
also how we create content and tell stories within these spaces. From
procedurally generated worlds to AI-assisted narrative design, the
possibilities are expanding rapidly.
### AI-Generated Movies and Immersive Narratives
The realm of content creation is being revolutionized by AI-generated
movies and narratives. These productions are entirely produced by
artificial intelligence, from script to visuals, showcasing the immense
potential of AI in creative industries.
\begin{tcolorbox}[colback=red!5!white,colframe=red!50!black,title=YouTube Video]
\textbf{Sora AI Video Generation Demo}
OpenAI's groundbreaking text-to-video model creating highly realistic video content from text descriptions, revolutionizing content creation for immersive experiences and demonstrating the future of AI-powered narrative generation for XR applications.
\textit{Watch at: \url{https://www.youtube.com/watch?v=HK6y8DAPN_0&t=s}}
\end{tcolorbox}
Several platforms and models are at the forefront of this technology:
1. [Pika](https://pika.art/): An AI-powered platform for creating and
editing videos.
2. [Stable Video
Diffusion](https://stability.ai/news/stable-video-diffusion-open-ai-video-model):
An open-source AI model for video generation and editing.
3. [Sora](https://openai.com/sora): OpenAI's text-to-video model,
capable of generating highly realistic video content from text
descriptions.
These tools are pushing the boundaries of what's possible in digital
content creation, allowing for the rapid production of complex,
high-quality video content without traditional filming and editing
processes.
### AI-Assisted World Building
The concept of AI-assisted world building is bridging the gap between
imagination and reality in virtual environments. While not yet fully
realized, the potential for AI to assist in creating complex, dynamic
virtual worlds is immense.
AI-assisted world building could potentially allow creators to:
1. Generate detailed environments from high-level descriptions
2. Dynamically adjust and expand virtual worlds based on user
interactions
3. Create consistent and believable ecosystems within virtual spaces
This technology could dramatically reduce the time and resources
required to create large-scale virtual environments, making it possible
for smaller teams or even individual creators to build vast, immersive
worlds.
### Procedural Content Generation
AI-driven procedural content generation is already being used in many
games and virtual environments to create diverse and seemingly endless
content. This includes:
- Terrain generation for expansive virtual landscapes
- Dynamic NPC behavior and dialogue
- Adaptive music and sound effects that respond to user actions and
environment
As AI technologies continue to advance, we can expect even more
sophisticated procedural generation techniques that create not just
individual elements, but entire coherent and richly detailed virtual
worlds.
### Implications for XR Storytelling
The integration of AI in content creation and storytelling for XR has
several important implications:
1. **Personalized Narratives**: AI could adapt stories and environments
in real-time based on user preferences and actions.
2. **Infinite Content**: AI-generated content could provide endless
variations of experiences within a single XR application.
3. **Collaborative Creation**: AI could serve as a creative partner,
assisting human creators in developing more complex and nuanced
virtual worlds and narratives.
4. **Accessibility**: AI-assisted creation tools could make it easier
for non-technical users to create sophisticated XR content.
As these AI technologies continue to evolve, they promise to unlock new
possibilities for expression, learning, and experience across a wide
range of XR applications, potentially transforming how we create and
consume immersive content.
## AI for XR Development and Optimization
Artificial Intelligence is not only enhancing the content and
interactions within XR environments but also revolutionizing the
development process itself. From optimizing performance to enhancing
rendering techniques, AI is becoming an indispensable tool for XR
developers.
### Performance Optimization
AI algorithms are being employed to optimize the performance of XR
applications in real-time. This includes:
1. **Dynamic Level of Detail (LOD)**: AI can adjust the complexity of
rendered objects based on their importance and the device's
performance capabilities.
2. **Predictive Loading**: AI algorithms can predict user movements and
pre-load relevant content, reducing latency and improving immersion.
3. **Adaptive Resolution Scaling**: AI can dynamically adjust rendering
resolution to maintain frame rates while maximizing visual quality.
These optimizations are crucial for maintaining the high frame rates and
low latency required for comfortable XR experiences, especially on
mobile devices or standalone headsets with limited processing power.
### Machine Learning for Gesture and Voice Recognition {#sec-machine-learning-gesture-voice-recognition}
Advanced machine learning models are enhancing the way users interact
with XR environments through gestures and voice commands.This section
focuses on AI-driven improvements to recognition technologies, while
foundational gesture and voice recognition principles, implementation
techniques, and design best practices are covered in
[Section 5.8](#sec-gesture-and-voice-recognition){.quarto-xref}.
1. **Gesture Recognition**: AI models can recognize complex hand
gestures and body movements, allowing for more natural and intuitive
interactions in VR and AR.
2. **Voice Commands**: Natural Language Processing (NLP) models enable
sophisticated voice control systems, allowing users to interact with
virtual environments using natural speech.
3. **Multimodal Interaction**: AI can combine inputs from various
sources (gesture, voice, eye-tracking) to interpret user intent more
accurately.
These AI advancements are particularly important for creating accessible
XR experiences and for scenarios where traditional input methods are
impractical.
### AI-in-the-Loop Workflows for Development
AI tools are now embedded throughout the XR production toolchain,
helping teams ship faster while maintaining quality. Treat these
assistants as collaborators that accelerate ideation, refactoring, and
asset audits rather than full replacements for human expertise.
1. **Coding companions**: Engine-native assistants like Epic Developer
Assistant surface Unreal documentation, write Blueprint snippets,
and answer API questions in context. Pair these tools with automated
tests to validate generated code before
merging.[@epic_developer_assistant_2024]
2. **Rapid prototyping**: Workflows such as Claude Code's Three.js
apartment build show how AI can scaffold entire webXR scenes from
photo sets---useful for pitch decks or quick user
tests.[@claudecode_threejs_2024]
3. **Search and refactor**: Integrate chat-based code explorers to
trace input pipelines or render loops across large projects; this
shortens onboarding for new teammates.
4. **Asset provenance**: Maintain a provenance log when importing
AI-generated meshes or textures from tools like BlenderGPT and
Meshy. Document prompts, sources, and licenses to ease compliance
reviews.[@blendergpt_2024; @meshy_2024]
5. **Continuous review**: Schedule human-in-the-loop checkpoints to
confirm that AI suggestions respect performance budgets,
accessibility requirements, and platform guidelines.
> **Workflow tip**
>
> Create a shared "AI usage register" for your team that tracks which
> assistants were used for code, art, or design decisions. This audit
> trail supports ethical sourcing discussions and helps debug
> regressions when a model update changes outputs.
### AI-Enhanced Rendering Techniques
AI is also being used to improve the visual quality of XR experiences
while maintaining performance:
1. **Neural Rendering**: Techniques like Neural Radiance Fields (NeRF)
use AI to generate photorealistic 3D scenes from a set of 2D images.
2. **AI Upscaling**: Machine learning models can upscale
lower-resolution renders to higher resolutions in real-time,
reducing the computational load while maintaining visual quality.
3. **Intelligent Occlusion**: AI can predict and render realistic
occlusions in AR applications, improving the integration of virtual
objects into the real world.
Gaussian Splatting represents a particularly interesting development for
creating photorealistic avatars that could become more readily available
in XR applications.
While still in development, these AI-enhanced rendering techniques
promise to significantly improve the visual fidelity and performance of
XR applications.
### Documenting AI Collaboration in Development {#sec-ai-development-documentation}
As AI tools become standard parts of XR development workflows, how you
document their use becomes an important professional practice. This
isn't about confession or compliance---it's about making your
development process transparent, learnable, and reproducible.
**What to Document: Process, Not Just Tools**
Rather than simply listing AI tools used, document the development
process and how AI collaboration shaped it:
- **Initial challenge**: What problem were you trying to solve or what
feature were you implementing?
- **AI interaction**: What did you ask the AI? How did initial
suggestions compare to what you needed?
- **Critical evaluation**: Where did AI suggestions work well? Where
did you need to modify or reject them?
- **Iterative refinement**: How did the solution evolve through
conversation with AI tools?
- **Final implementation**: How does your final code or design differ
from initial AI outputs, and why?
This documentation demonstrates understanding and critical engagement,
not just AI use.
**XR Development Examples**
Consider these concrete scenarios where documenting AI collaboration
adds value:
*Shader Development*: You're implementing a custom shader for volumetric
fog in your VR environment. An AI assistant suggests an approach, but
you notice it doesn't account for stereo rendering. Your documentation
might note: - Initial challenge: Performant volumetric fog for VR - AI
suggestion: Standard single-pass volumetric approach - Your
modification: Adapted for stereo rendering with single-pass instancing -
Performance consideration: Reduced from AI's suggested quality level to
maintain 90fps
This documentation helps future developers (including yourself)
understand both the AI contribution and the XR-specific expertise you
applied.
*Locomotion Mechanics*: When implementing teleportation movement, AI
tools might suggest standard approaches. Your documentation captures: -
How you modified AI suggestions to prevent motion sickness - Why you
rejected certain AI recommendations based on comfort testing - How you
iterated on the arc visualization based on user feedback -
Platform-specific adaptations AI didn't initially consider
*Interaction Pattern Design*: For a hand-tracking interaction system,
document: - Initial AI suggestions for gesture recognition thresholds -
How play-testing revealed different needs for your specific use case -
Adjustments made for accessibility (larger tolerance ranges, alternative
inputs) - Integration challenges AI didn't anticipate when working with
your specific SDK
**Practical Implementation**
You don't need elaborate systems. Effective documentation can be:
**Project notes**: Maintain a development journal noting significant AI
interactions
2024-03-15: Used AI assistant to implement spatial audio occlusion
- Initial suggestion used standard raycasting
- Modified to use custom audio zones for performance
- Added fallback for devices without spatial audio support
**Code comments**: Note AI assistance and modifications directly in code
``` csharp
// Initial implementation suggested by AI assistant
// Modified to account for VR comfort constraints:
// - Reduced max velocity from 10 to 5 m/s
// - Added smoothing for direction changes
// - Implemented tunnel vision vignette
```
**Methods sections**: For projects with documentation or papers, include
a brief methods note
The shader system implementation was developed in collaboration with AI
coding assistants. Initial approaches were iteratively refined based on
stereo rendering requirements and mobile VR performance constraints.
**Design documentation**: Note AI contributions to interaction design
decisions
Navigation system:
- Teleportation mechanics: Base implementation from AI suggestion,
modified for comfort based on playtesting
- Comfort options: Added independently based on accessibility research
- Platform adaptation: Quest-specific optimizations developed manually
**When Documentation Matters Most**
Documentation is particularly valuable when:
- Working in teams: Others need to understand design decisions and can
learn from your AI collaboration process
- Educational contexts: Demonstrating your understanding and learning
process
- Iterative projects: Future you needs to understand past decisions
- Novel implementations: Others facing similar challenges can learn
from your approach
- Quality assurance: Teams need to trace why certain approaches were
chosen
**What This Achieves**
Good documentation of AI collaboration: - Demonstrates critical thinking
and understanding - Makes development process reproducible and
learnable - Supports knowledge transfer within teams - Shows where
domain expertise (XR-specific knowledge) complemented AI suggestions -
Creates audit trails for decision-making
This documentation practice positions AI as what it should be: a tool
that amplifies your expertise rather than replaces it. The documentation
shows not just that you used AI, but how you applied your XR knowledge
to evaluate, refine, and improve AI suggestions.
For broader ethical and professional considerations around AI
collaboration, see [Section 10](#sec-ethics){.quarto-xref}.
## Ethical Considerations in AI-Powered XR
The integration of AI into XR technologies raises significant ethical
considerations that you need to address in your development practices.
AI systems in XR collect unprecedented amounts of user data---including
biometric signals, gaze patterns, room layouts, and behavioral
information---creating substantial privacy and consent responsibilities.
Ambient AI companions may continuously observe private settings, while
AI-generated content can perpetuate biases present in training data,
leading to unfair treatment or stereotypical representations.
Key considerations for AI in XR include:
- **Privacy and data governance**: Managing the scope of data
collection, cloud processing implications, consent for spatial
recordings, and GDPR compliance
- **Bias and fairness**: Ensuring AI systems don't discriminate,
auditing generated content for cultural sensitivity, and addressing
accessibility gaps for underrepresented groups
- **Transparency in AI collaboration**: Documenting how AI tools are
used in development (covered in
[Section 8.6.5](#sec-ai-development-documentation){.quarto-xref})
- **User wellbeing**: Balancing AI capabilities with authentic human
experiences, addressing uncanny valley effects, and ensuring users
maintain agency
Emerging concerns include brain-computer interfaces raising new neural
privacy questions, emotional AI creating manipulation risks, and the
authenticity of AI-generated immersive experiences. As AI systems become
more sophisticated---enabling autonomous virtual worlds, advanced
emotional recognition, and enhanced haptics---the ethical framework for
their deployment becomes increasingly important.
The comprehensive treatment of these issues, including practical
implementation checklists, bias mitigation strategies, and ethical
frameworks for AI-powered XR development, can be found in
[Section 10](#sec-ethics){.quarto-xref}. That chapter also addresses the
broader context of how AI ethics intersects with XR's unique privacy
challenges, the psychological impacts of AI-driven experiences, and best
practices for responsible development.
## Further Reading
Chapter 8 explored the integration of Artificial Intelligence (AI) with
XR technologies, covering topics such as AI-generated environments and
objects, AI-driven characters and interactions, AI in content creation
and storytelling, and the use of AI for XR development and optimization.
We also discussed ethical considerations and future directions for AI in
XR. To further your understanding of this rapidly evolving field,
consider these resources:
### Additional Resources
- NVIDIA AI & VR Research:
- Showcases cutting-edge research at the intersection of AI and XR
technologies.
- OpenAI News:
- While not specific to XR, it provides insights into the latest
AI developments, many of which have potential XR applications.
- MIT Technology Review - Artificial Intelligence:
- Offers articles and analysis on the latest developments in AI,
including applications in XR.
# Further Reading
## Books
- Bailenson, J. (2018). Experience on Demand: What Virtual Reality Is,
How It Works, and What It Can Do. W. W. Norton & Company.
- Jerald, J. (2015). The VR Book: Human-Centered Design for Virtual
Reality. Association for Computing Machinery and Morgan & Claypool
Publishers.
## Research Papers
- Somanath, S., et al. (2024). Towards Urban Digital Twins: A Workflow
for Procedural Visualization Using Geospatial Data. Remote Sensing,
16(11), Article 11.
- Stahre Wästberg, B., et al. (2017). Visualizing Environmental Data
for Pedestrian Comfort Analysis in Urban Planning Processes. In
Proceedings of CUPUM 2017.
## Examples and Case Studies
- [Digital Twin City Center (DTCC) Milestone
Projects](https://dtcc.chalmers.se/milestone-projects/)
- [CityAirSim
Project](https://www.mistraurbanfutures.org/sv/projekt/cityairsim-ska-visa-hur-trafik-gronska-och-tatt-byggande-paverkar-stadsluften)
## AI recommendations
Check before use!
### Papers
- Risi, S., & Togelius, J. (2020). Increasing generality in machine
learning through procedural content generation. Nature Machine
Intelligence, 2(8), 428-436.
- Explores the use of AI for generating content in virtual
environments.
- Zhu, J. Y., Park, T., Isola, P., & Efros, A. A. (2017). Unpaired
image-to-image translation using cycle-consistent adversarial
networks. In Proceedings of the IEEE international conference on
computer vision (pp. 2223-2232).
- Explores AI techniques for generating and transforming visual
content, relevant to XR applications.
# Societal Impact and Ethical Design {#sec-ethics}
As immersive technologies become more sophisticated and widespread, you
need to consider their psychological, social, and ethical implications.
This chapter explores the key factors that XR developers and researchers
should keep in mind when creating immersive experiences. The goal is not
to provide prescriptive rules, but rather to highlight considerations
that should inform your design decisions and development practices.
## Psychological Impact and Virtual Embodiment
The ability of XR systems to manipulate our sense of body ownership and
self-perception carries profound implications. As discussed in
[Section 1.4](#sec-avatars-and-virtual-embodiment){.quarto-xref}, the
rubber hand illusion and body ownership experiments demonstrate how
easily our brains accept virtual bodies as our own. This plasticity
creates both opportunities and responsibilities.
### Implications of Body Ownership Manipulation
When users embody avatars of different sizes, races, or genders, their
behavior and self-perception can change. The Proteus Effect shows that
avatar appearance influences user behavior---people with taller avatars
may negotiate more aggressively, while embodying avatars of different
races can affect implicit bias. Research has even demonstrated that
virtual embodiment can influence cognitive performance and
self-efficacy.
You need to consider:
- **Psychological safety**: How might extended virtual embodiment
affect users' sense of self and body image?
- **Therapeutic applications**: While virtual embodiment shows promise
for treating conditions like phantom limb pain or body dysmorphia,
these applications require careful clinical oversight.
- **Identity exploration**: XR can provide valuable spaces for
identity exploration, but designers should be mindful of potential
psychological impacts from prolonged or intense embodiment
experiences.
- **Age-appropriate design**: The malleability of body perception may
be particularly significant for younger users whose self-concepts
are still developing.
### Self-Perception and Behavioral Change
The finding that virtual embodiment can alter math performance, racial
attitudes, and other cognitive and social factors demonstrates the power
of these technologies. This power requires thoughtful application.
Consider whether your XR experience might inadvertently reinforce
stereotypes or create unintended psychological effects through avatar
design and embodiment mechanics.
## Privacy, Consent, and Data Governance
XR systems capture unprecedented amounts of personal data. Modern
headsets track gaze direction, hand movements, body position, room
layouts, and increasingly, biometric signals. This data reveals not just
what users do, but how they move, where they look, and potentially what
captures their attention or causes emotional responses.
### The Scope of XR Data Collection
Unlike traditional computing interfaces, XR devices can capture:
- **Biometric data**: Gaze patterns, pupil dilation, heart rate
variability
- **Spatial data**: Room layouts, furniture placement, environmental
features
- **Behavioral data**: Movement patterns, reaction times, interaction
preferences
- **Bystander data**: Unintended capture of people who happen to be in
the environment
- **Passthrough imagery**: Real-world video feeds in mixed reality
applications
### Consent and Transparency
You need to consider several dimensions of consent in XR:
**Active vs. passive capture**: Users may consent to wearing a headset
but not fully understand the scope of data collection. Clear
communication about what sensors are active and what data is being
collected is fundamental.
**Bystander consent**: When using passthrough video or reality capture
in public or shared spaces, others may appear in your captured data
without their knowledge or consent. Tools like Horizon Hyperscape that
stream sensor data to cloud services for processing create particular
challenges for bystander privacy.
**Purpose limitation**: Users should understand not just what data is
collected, but how it will be used, who will have access, and how long
it will be retained.
**Withdrawal of consent**: Provide clear mechanisms for users to delete
their data, stop collection, or export their information.
### GDPR and Regulatory Compliance
XR data collection often falls under regulations like GDPR in Europe or
CCPA in California. You need to:
- Map every data type collected to its legal basis before deployment
- Obtain explicit consent for persistent spatial recordings
- Provide deletion workflows for captured spaces and avatars
- Redact or blur bystanders by default when streaming passthrough
video
- Maintain export logs tracking where data is stored and who accessed
it
### Cloud Processing and Data Residency
Many XR capture tools stream raw sensor data to cloud services for
reconstruction or processing. This creates questions about data
retention, residency, and security. When using platforms that rely on
cloud processing, understand:
- Where your data is processed and stored
- What the service provider's data retention policies are
- Whether you can specify data residency requirements
- What happens to your data if you stop using the service
### Ambient AI and Always-On Sensing
AI companions and assistants in mixed reality may continuously observe
private settings and conversations. When implementing ambient AI
features:
- Communicate clearly when recording is active
- Offer privacy modes that pause sensors on demand
- Provide visual or audio indicators of sensing state
- Allow users to review and delete interaction histories
## Bias, Fairness, and Representation
AI systems and captured reality can perpetuate or amplify existing
biases. In XR contexts, this manifests in several ways that you should
consider during development.
### Bias in AI-Generated Content
When using AI to generate virtual environments, characters, or avatars,
the training data's biases may appear in your application:
- **Representation**: AI-generated characters and environments may
lack diversity or rely on stereotypical representations
- **Cultural assumptions**: Generated content may reflect cultural
biases from training data
- **Accessibility**: AI systems may not adequately consider users with
different abilities
Before deploying AI-generated content, audit it for cultural sensitivity
and diverse representation. Consider involving community review,
particularly when creating content that represents cultures or
communities you're not part of.
### Bias in Reality Capture
Photogrammetry, 3D scanning, and other reality capture techniques raise
representation concerns:
- **Selection bias**: What you choose to capture and preserve reflects
decisions about what's valuable or important
- **Access bias**: Not all communities have equal access to reality
capture technologies or the ability to preserve their environments
digitally
- **Interpretation**: How captured spaces are presented and
contextualized can reinforce or challenge existing narratives
### Algorithmic Fairness
AI systems in XR may treat users differently based on characteristics
inferred from their behavior or biometric data:
- **Recognition accuracy**: Gesture and voice recognition systems may
perform differently for users of different ages, genders, or
cultural backgrounds
- **Adaptive systems**: AI that personalizes experiences based on user
data may inadvertently create discriminatory outcomes
- **Training data diversity**: Ensure systems are trained on diverse
datasets that represent your intended user population
### Inclusive Design Practices
To mitigate bias and ensure fairness:
- Test your XR experiences with diverse user groups throughout
development
- Involve people from underrepresented communities in design decisions
- Audit AI systems for differential performance across demographic
groups
- Provide multiple interaction modalities to accommodate different
preferences and abilities
- Be transparent about system limitations and known biases
## Accessibility and Inclusive Design
XR technologies present both opportunities and challenges for
accessibility. You need to consider how your experiences can be made
accessible to users with varying physical, sensory, and cognitive
abilities.
### Physical Accessibility
XR systems often assume certain physical capabilities:
**Mobility**: Many VR experiences assume users can stand, walk, or make
large gestures. Consider: - Seated play modes that don't require
standing or room-scale movement - Alternative navigation methods beyond
physical walking - Customizable interaction zones that accommodate
different reach ranges - Support for assistive devices and mobility aids
**Manual dexterity**: Hand tracking and controller-based interactions
may not work for all users: - Provide alternative input methods (voice,
gaze, simplified gestures) - Allow customization of gesture sensitivity
and timing - Support adaptive controllers and assistive input devices -
Avoid requiring fine motor control for critical interactions
### Sensory Accessibility
**Vision**: Not all users have full visual capability: - Provide audio
descriptions and spatial audio cues - Support screen readers and
text-to-speech where applicable - Allow customization of visual elements
(contrast, size, motion) - Consider colorblind-friendly design choices -
Offer haptic feedback as an alternative information channel
**Hearing**: Audio-dependent experiences exclude users with hearing
impairments: - Provide captions and visual indicators for audio cues -
Use visual and haptic alternatives to spatial audio navigation - Ensure
important information isn't conveyed solely through sound - Support
hearing aid compatibility and audio customization
### Cognitive Considerations
While comprehensive cognitive accessibility is beyond this chapter's
scope, you should be aware that users process information differently.
Consider providing options for adjusting information density,
interaction pacing, and complexity of decision-making to accommodate
different cognitive processing styles.
### Designing for Inclusion
Accessibility is not a retrofit---it should inform design from the
beginning:
- Follow established accessibility guidelines (WCAG, XR Access
guidelines)
- Test with users who have different abilities throughout development
- Provide extensive customization options rather than
one-size-fits-all experiences
- Document accessibility features so users know what accommodations
are available
- View accessibility as expanding your potential audience, not
limiting design
## Emerging Concerns
As XR technologies advance, new ethical challenges emerge that you
should monitor and consider in your development practices.
### Deepfakes and Manipulated Reality
Reality capture technologies combined with AI create possibilities for
sophisticated manipulation:
**Authenticity concerns**: When photorealistic virtual environments and
characters become indistinguishable from captured reality, questions
arise about: - How users can verify the authenticity of experiences -
The potential for creating misleading or false immersive content -
Applications in journalism, historical preservation, and documentation
where accuracy matters
**Volumetric deepfakes**: Volumetric capture combined with AI could
enable creation of convincing but fabricated recordings of people: -
Consider watermarking or provenance tracking for captured content - Be
transparent about what elements of an experience are captured versus
generated - Maintain integrity in applications where authenticity is
important
### Brain-Computer Interfaces and Neural Data
Advanced XR systems may incorporate brain-computer interfaces, raising
new privacy and consent considerations:
- **Neural data**: Brain activity patterns reveal cognitive and
emotional states in ways users may not fully understand or control
- **Cognitive liberty**: As systems potentially influence thought
patterns or emotional states, questions of autonomy and manipulation
arise
- **Unintended inference**: Neural data might reveal information users
didn't intend to share
### Emotional AI and Affective Computing
Systems that recognize and respond to emotional states create both
opportunities and concerns:
- **Emotional manipulation**: Understanding users' emotional states
could enable experiences that manipulate rather than enhance
- **Emotional privacy**: Users may not want their emotional responses
captured or analyzed
- **Consent for emotional data**: The sensitivity of emotional
information requires particularly clear consent
### Digital Rights and Ownership
As users create content and spend time in virtual spaces, questions of
ownership and rights emerge:
- **User-generated content**: Who owns virtual objects, spaces, or
experiences users create?
- **Virtual property**: What rights do users have to their virtual
possessions or achievements?
- **Persistent identities**: As virtual identities become more
important, what rights do users have to their avatars and digital
presence?
- **Right to deletion**: Can users truly delete their presence and
data from persistent virtual worlds?
### Environmental and Social Impact
The infrastructure supporting XR has real-world consequences:
**Energy consumption**: Cloud processing, AI training, and continuous
rendering require significant energy: - Consider the environmental cost
of computationally expensive features - Optimize for efficiency where
possible - Be transparent about the environmental footprint of XR
services
**Social dynamics**: Immersive technologies may affect how people relate
to each other: - Monitor for potential isolation or over-reliance on
virtual interaction - Consider how XR might affect in-person social
skills, particularly for young users - Design for balance between
virtual and physical experiences
## Transparent AI Collaboration and Learning
As AI tools become integral to XR development and content creation, how
we document and communicate about this collaboration becomes an ethical
consideration. This applies to all XR practitioners---from students
learning development to professional teams shipping products.
### Reframing AI Use
Rather than treating AI assistance as something to confess or hide,
consider it as a collaboration to document and make visible. The
question shifts from "Did you use AI?" to "How did you collaborate with
AI, and what did you learn from that process?"
This reframing recognizes that: - AI tools are becoming standard parts
of the development toolkit - The skill lies in knowing how to use these
tools effectively - Documenting the collaboration process demonstrates
understanding - Transparency supports learning and methodological
development
### Thought Partner vs. Thought Substitute
A critical distinction exists between using AI as a thought partner
versus a thought substitute:
**Thought partner**: You engage with AI iteratively, questioning
outputs, refining prompts, and applying critical judgment: - Initial
challenge or question you're working through - Key insights or
suggestions AI provides - Where you disagree, modify, or build on AI
suggestions - How the final implementation differs from initial AI
outputs and why
**Thought substitute**: Accepting AI outputs without engagement or
understanding: - Taking first outputs without iteration or refinement -
Implementing suggestions without understanding how they work - Unable to
explain or modify the AI-generated solutions
The value lies not in the AI's first response, but in the iterative
conversation and refinement process. This engagement demonstrates
understanding and develops capability.
### Making Collaboration Visible and Learnable
When you document your AI collaboration process, you: - Make your
learning process visible to others - Create records that help you
understand your own development - Demonstrate critical engagement rather
than passive acceptance - Contribute to collective understanding of
effective AI use
For students and learners, this documentation becomes part of
demonstrating understanding. For professional teams, it supports
knowledge transfer and quality assurance.
### Professional Practice and Lifelong Learning
This applies beyond educational contexts. Professional XR development
increasingly involves AI tools: - Code generation assistants that
suggest implementation approaches - Asset creation tools that generate
3D models or textures - Design assistants that propose interaction
patterns
Professional practice means documenting these collaborations: - What AI
tools were used at what stages - How their outputs were evaluated and
modified - What design decisions were informed by AI suggestions versus
human judgment
This documentation serves quality assurance, supports team
communication, and maintains accountability in professional contexts.
### Practical Approaches
You don't need complex systems to document AI collaboration. Consider:
- **Project notes**: Maintain working notes about AI interactions
during development
- **Methods documentation**: Include AI assistance in technical
documentation
- **Conversation logs**: Keep records of significant AI interactions
for reference
- **Decision logs**: Note when AI suggestions were accepted, modified,
or rejected and why
The goal is making the collaboration process transparent and learnable,
not creating administrative burden.
For practical methods of documenting AI collaboration in XR development
workflows, see
[Section 8.6.5](#sec-ai-development-documentation){.quarto-xref}.
## Ethical Framework for XR Developers
Rather than providing prescriptive rules, this framework offers
questions and considerations to inform your development decisions.
### Design-Stage Considerations
When beginning an XR project, consider:
**User wellbeing**: - Could this experience cause physical discomfort or
harm? - What psychological impacts might prolonged use have? - Are there
vulnerable populations for whom this experience might be problematic?
**Data and privacy**: - What data does this experience need to
collect? - Is the data collection proportional to the value provided? -
How will you handle consent, especially for bystander data? - What's
your data retention and deletion policy?
**Accessibility**: - Who might be excluded by your current design? -
What alternative interaction methods could broaden access? - Are you
designing for customization and user preference?
**Representation**: - If using AI-generated content, have you audited it
for bias? - Does your experience reflect diverse perspectives and
representations? - Have you consulted with communities your experience
represents?
### Implementation-Stage Considerations
During development, regularly review:
**Technical implementation**: - Are you implementing data collection
with appropriate security? - Does your system handle user consent
properly? - Have you provided privacy controls and transparency
features? - Are accessibility features integrated or retrofitted?
**Testing and validation**: - Are you testing with diverse user
groups? - Have you validated that accessibility features work as
intended? - Are you monitoring for unintended consequences or edge
cases?
**AI and automation**: - If using AI systems, do you understand their
limitations and biases? - Have you documented your AI collaboration
process? - Can you explain how AI-generated elements work and were
validated?
### Deployment and Ongoing Considerations
Once deployed, continue monitoring:
**User feedback**: - Are users experiencing your application as
intended? - Are there reports of discomfort, exclusion, or other
concerns? - How are you incorporating user feedback into updates?
**Data practices**: - Are you honoring your stated data policies? - Are
you responding appropriately to data deletion requests? - Have there
been any data incidents or breaches requiring notification?
**Emerging issues**: - As your application evolves, do new ethical
considerations arise? - Are you monitoring developments in XR ethics and
accessibility? - Are you updating practices as standards and
expectations evolve?
### When Tensions Arise
Ethical considerations sometimes conflict with business goals, technical
constraints, or design preferences. When facing these tensions:
1. **Make trade-offs explicit**: Rather than ignoring ethical concerns,
acknowledge them and document why particular decisions were made
2. **Seek input**: Consult with ethics professionals, accessibility
experts, or affected communities
3. **Plan for iteration**: If you can't address all concerns
immediately, plan how you'll address them in future updates
4. **Be transparent**: Communicate known limitations to users rather
than obscuring them
### Resources for Continued Learning
XR ethics is an evolving field. Stay informed through:
- XR Access (xraccess.org): Resources and guidelines for XR
accessibility
- IEEE and ACM ethics guidelines for emerging technologies
- Platform-specific guidelines from XR hardware manufacturers
- Academic research on XR psychology and human factors
- Community discussions about XR development practices
## Conclusion
The power of XR technologies to create immersive experiences, manipulate
perception, and capture detailed personal data carries significant
ethical responsibilities. This chapter has highlighted key
considerations across psychological impact, privacy, representation,
accessibility, and emerging concerns.
The goal is not to constrain innovation but to inform it. By considering
these factors throughout your development process---from initial design
through deployment and beyond---you can create XR experiences that are
not only technically impressive but also psychologically safe,
respectful of privacy, accessible to diverse users, and aligned with
ethical principles.
These considerations will continue evolving as technologies advance and
our understanding of their impacts deepens. Ethical XR development is
not about following a fixed rulebook, but about maintaining ongoing
attention to how your work affects the people who use it and the broader
society in which it exists.
You need to consider these factors. Not because external rules demand
it, but because creating responsible, inclusive, and ethical XR
experiences is fundamental to the long-term success and positive impact
of these technologies.
# References {#references .unnumbered}
::: {#refs}
:::
# Appendix: 2025 Update Highlights {#appendix-2025-update-highlights .unnumbered}
This appendix summarizes the 2024--2025 revisions that tune the book for
new hardware cycles, mixed reality workflows, and AI-assisted
production. Use it as a roadmap when tracing which chapters picked up
new guidance or when planning lesson updates around the revised
material.
## Chapter 2 -- XR Technologies and Form Factors
- Documented the 2025 form-factor spectrum from PCVR rigs to emerging
smart glasses so readers can map interaction trade-offs against
compute
locations.[@uploadvr_meta_ultralight_2024; @bigscreen_beyond2_2024; @meta_rayban_display_2024; @google_android_xr_2024]
- Highlighted Android XR's cross-device stack and Meta's sensor
accessories to show how software platforms and peripherals converge
on gaze-and-pinch plus sEMG input
models.[@google_android_xr_2024; @meta_rayban_display_2024]
## Chapter 5 -- Spatial Interaction Design
- Summarized Niantic's 2025 Spatial SDK launch on Quest 3 alongside
Meta's instant-placement, universal keyboard, and colocation
upgrades to outline the baseline MR capability set designers can
assume.[@niantic_spatial_sdk_2024; @uploadvr_meta_sdk_v71_2024]
- Connected the SDK feature list to friction reducers (persistent
anchors, shared coordinates, live meshing) so lesson plans can
emphasize multi-user and cross-device deployment
patterns.[@niantic_spatial_sdk_2024; @uploadvr_meta_sdk_v71_2024]
## Chapter 6 -- Applications of XR Technologies
- Added new scenario tiles that justify "Why XR?" through regulatory
(EASA-certified Varjo simulators), industrial
(Unreal/Twinmotion/Cesium digital twins), and societal (therapeutic
VR in prisons)
lenses.[@varjo_xr4_easa_2024; @unreal_cesium_aec_2024; @guardian_creative_acts_2024]
## Chapter 7 -- Reality Capture
- Introduced a Gaussian splatting taxonomy covering urban
walkthroughs, macro studies, hybrid scenes, and industrial
inspection to contextualize fidelity, compression, and artifact
management.[@ludlow_quality_square_2024; @honeybee_macro_3dgs_2024; @eastcott_hybrid_splats_2024; @radiancefields_4dgs_2024]
- Expanded capture-to-distribution workflows with Quest-native
Hyperscape acquisition and Varjo Teleport streaming to illustrate
pathways from consumer capture to enterprise
delivery.[@hyperscape_capture_2024; @varjo_teleport_2024]
## Chapter 8 -- Artificial Intelligence in XR
- Outlined prompt-to-3D pipelines that traverse Marble's scene
generation, DreamInteractive's Unreal integrations, Genie 3
research, Odyssey's interactive video passes, and Decart-XR's
real-time
stylization.[@worldlabs_marble_2024; @dreaminteractive_ue5_2024; @genie3_trellis_2024; @odyssey_interactive_video_2024; @decartxr_github_2024]
- Captured AI-in-the-loop production practices with examples spanning
Epic Developer Assistant, Claude Code's Three.js prototype,
BlenderGPT, and Meshy to emphasize coding, search, and asset
provenance
workflows.[@epic_developer_assistant_2024; @claudecode_threejs_2024; @blendergpt_2024; @meshy_2024]
- Reinforced ethics and accessibility updates around geospatial data
consent, passthrough privacy, and ambient AI companions to help
instructors frame responsible deployment
discussions.[@hyperscape_capture_2024; @niantic_large_geospatial_model_2024; @merv_mr_demo_2024]
## Continuing Source Tracking
The raw watchlist for 2024--2025 announcements remains in
`plans/update-sources-2025.md` so editors can keep planning material
separate from the curated bibliography.